
Finals are over! Hard to believe – I finally have my life back. Well, for a few days/weeks at least. Anyway, one of the first things I did after finishing all the handmade Christmas gifts was gathering loads and loads of tulle again and sewing together the second Petticoat. This time I didn’t forget to take pictures and could make a detailed tutorial.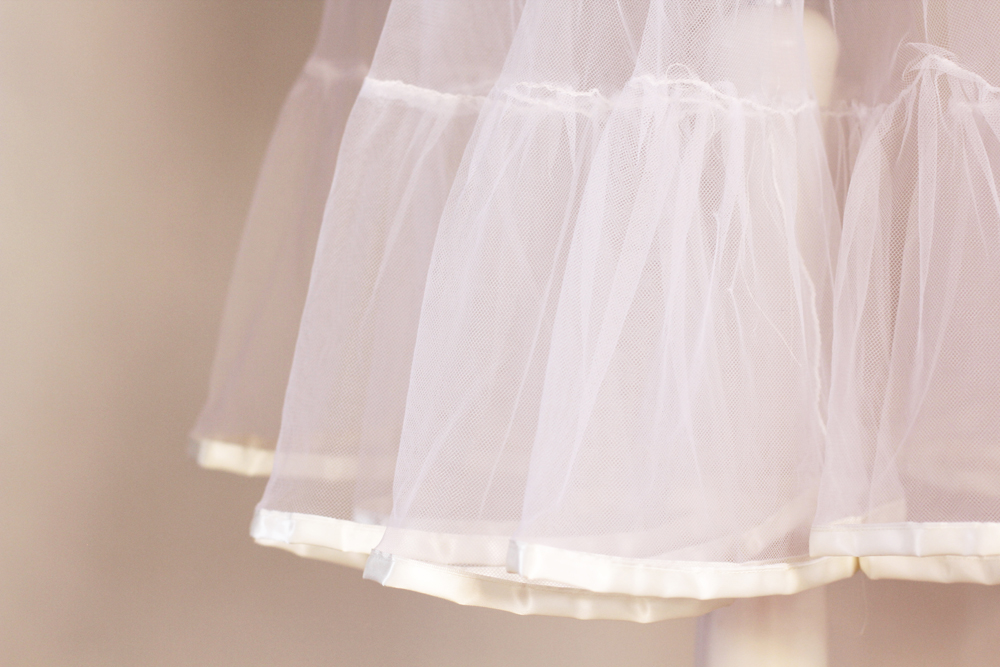
Here we go:
THE MATHS (not as bad as it sounds)
First of all, you have to decide about the length and number of layers of your Petticoat.
For the length it’s best you measure the skirt/dress you want to wear your Petticoat with from waist to hemline. The Petticoat should be about 1 inch shorter than the dress.
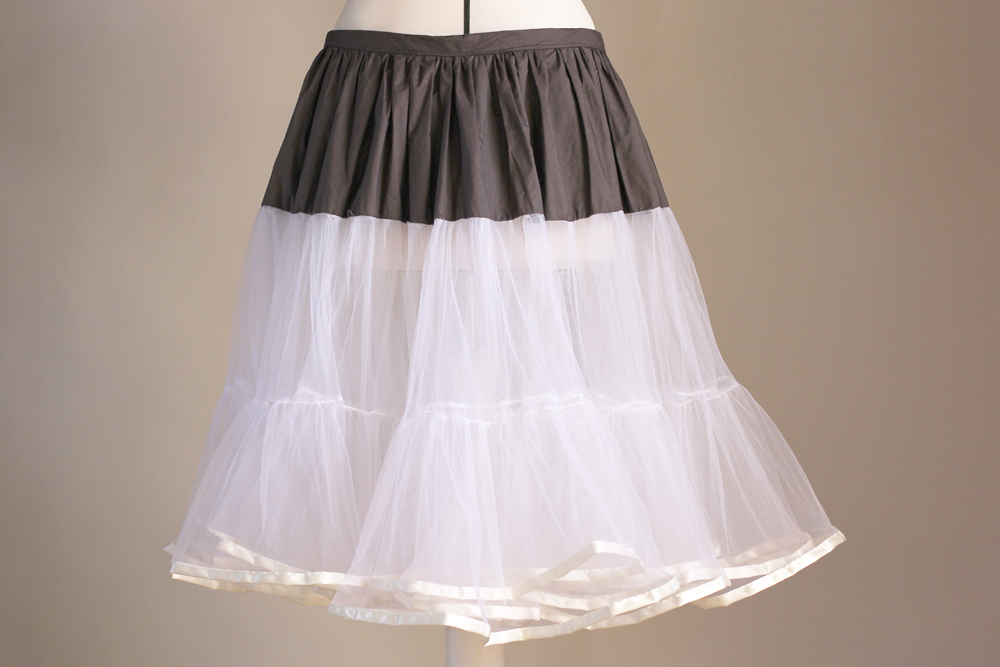
Depending on how many layers you want your Petticoat to have, you need to buy about 4yrd of tulle.(I used 3,5m and got 3 layers á 56cm out of it). You can use other fabric, but tulle is quite stiff and helps your Petticoat to become more puffy. Tulle is also quite itchy, if you want to make a Petticoat for a dress you don’t want to wear tights with, you might consider sewing a little underskirt or make the first layer out of a softer fabric.
I just replaced the tulle of the first tier of all layers for a chiffon fabric. It’s more comfy, makes the Petticoat look really nice and does not look too bulky under the dress.
As soon as you have decided about the length and layers, you have to do a little math to know how much tulle you’ll need.
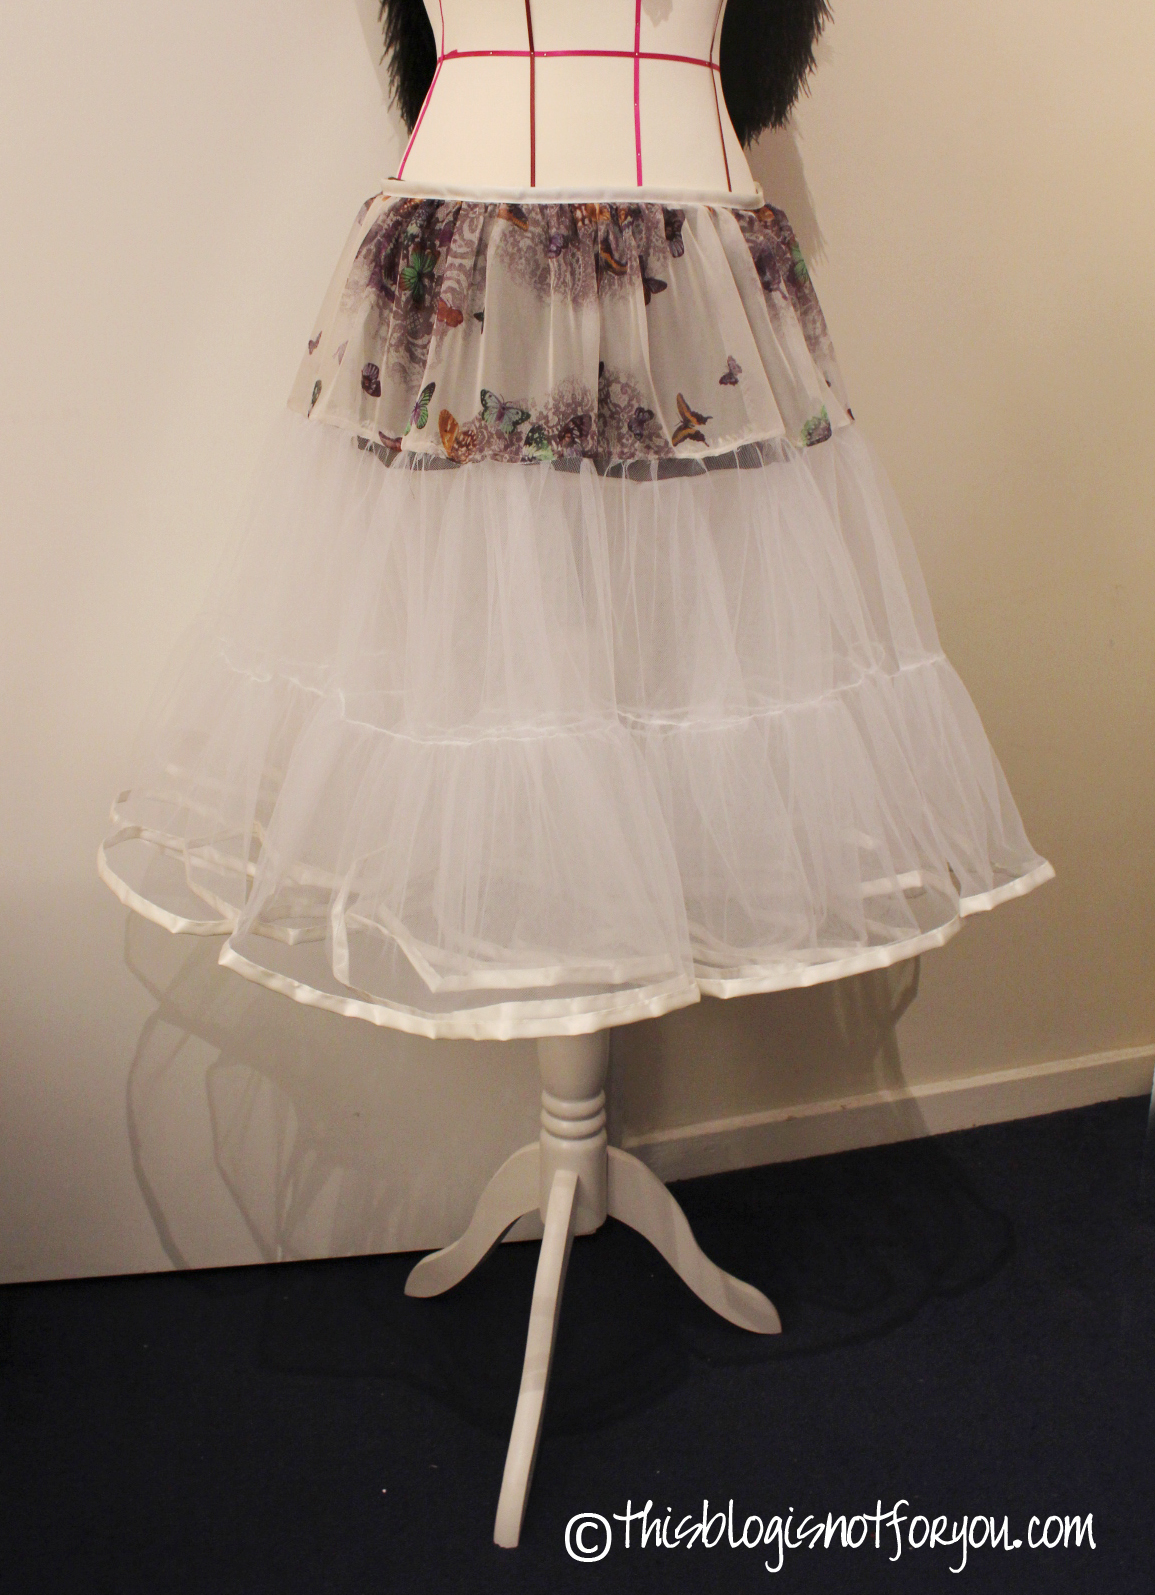
The Petticoat I made consists out of 3 tiers and a waistband. So if the skirt of your dress is 25 inch, you want your Petticoat to be about 24 inch long, so 3 tiers á 8 inch.
When you figured out how wide the single tiers are, you also want to know how long. As you can see on the scheme below, the length of the tiers doubles from tier to tier.
The top tier is about twice your waist circumference/ lentgh of waistband (about 2 yrd will do). So if you want your Petticoat to have 3 tiers, the bottom one will be about 8 yrd long. (Yeah that’s a lot of cutting and gathering, I know!)
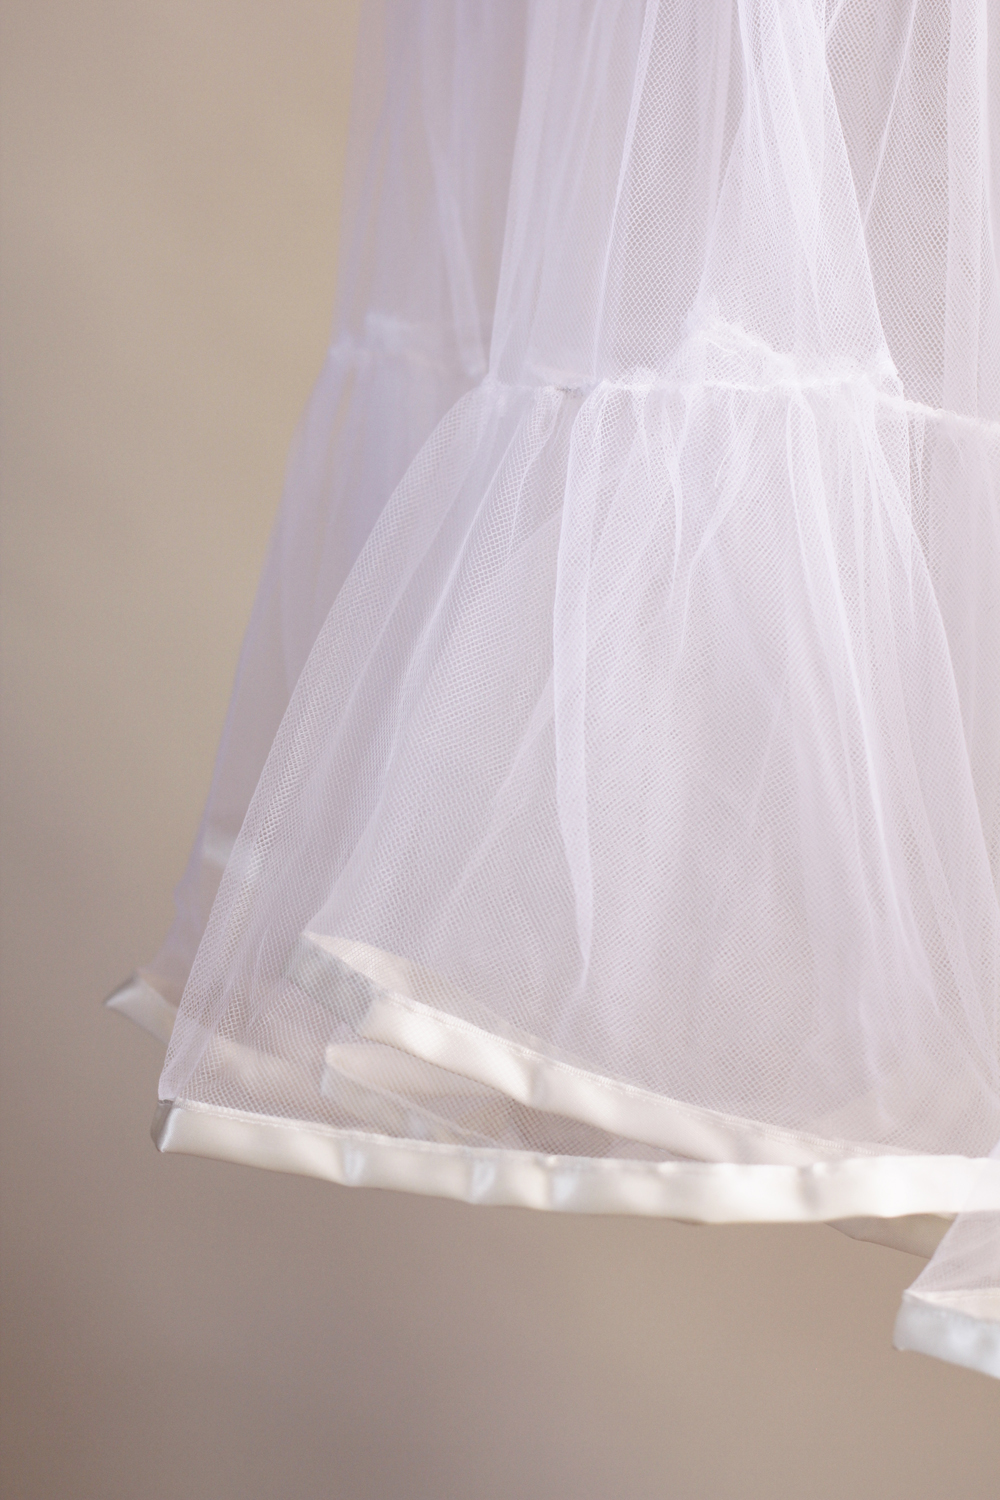
Also, consider the seam allowance before cutting the tulle. For tulle you generally won’t need much seam allowance – a simple zigzag stitch on the fabric edge will do. With other fabric it might be about 0,5 inch/ 1-1,5 cm. The bottom tier only needs seam allowance on one side if you’re hemming it with ribbon.
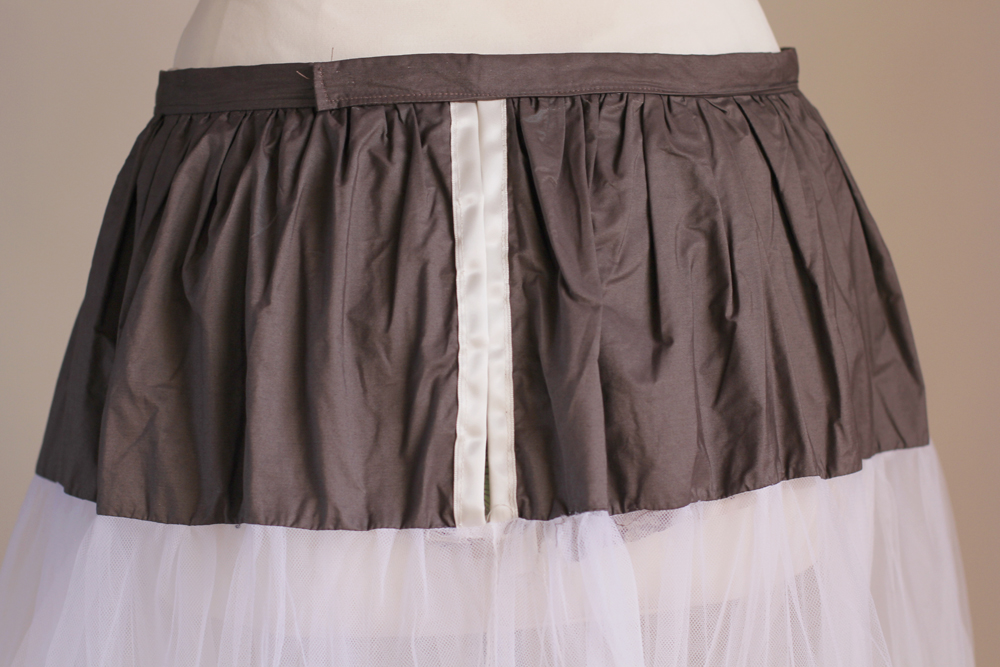
For the waistband I just used the ribbon I used for the hem.
So here’s a little scheme, which should also help with the general construction if you want to have more than one layer. My two layered Petticoat (picture at the end of this tutorial) differs a little from the two-layered Petticoat scheme (more on that later).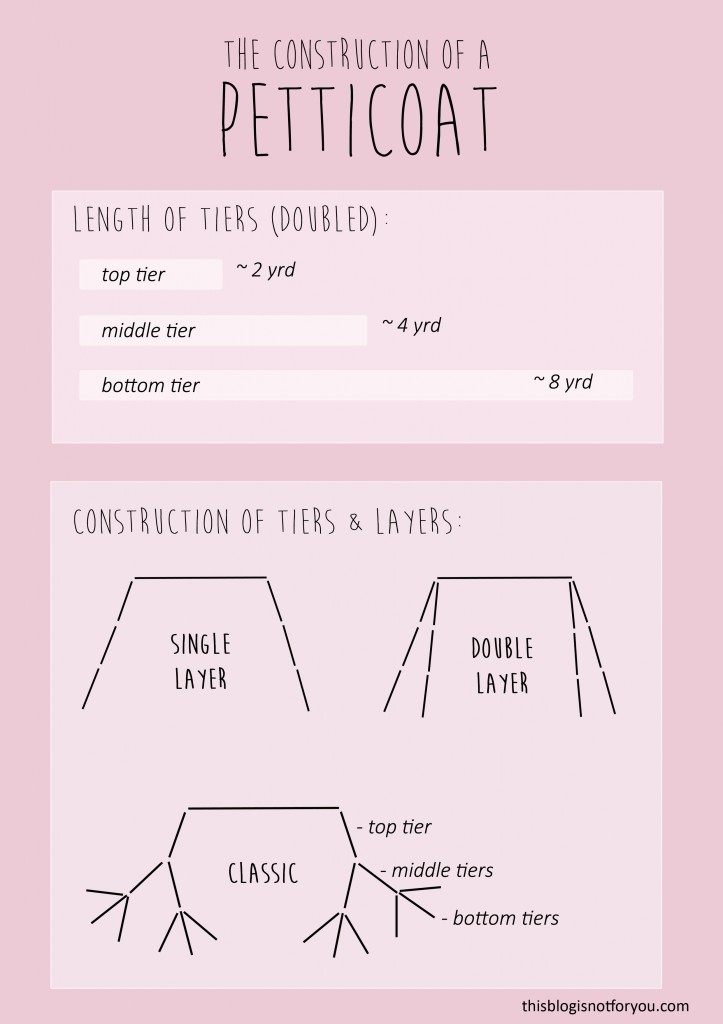

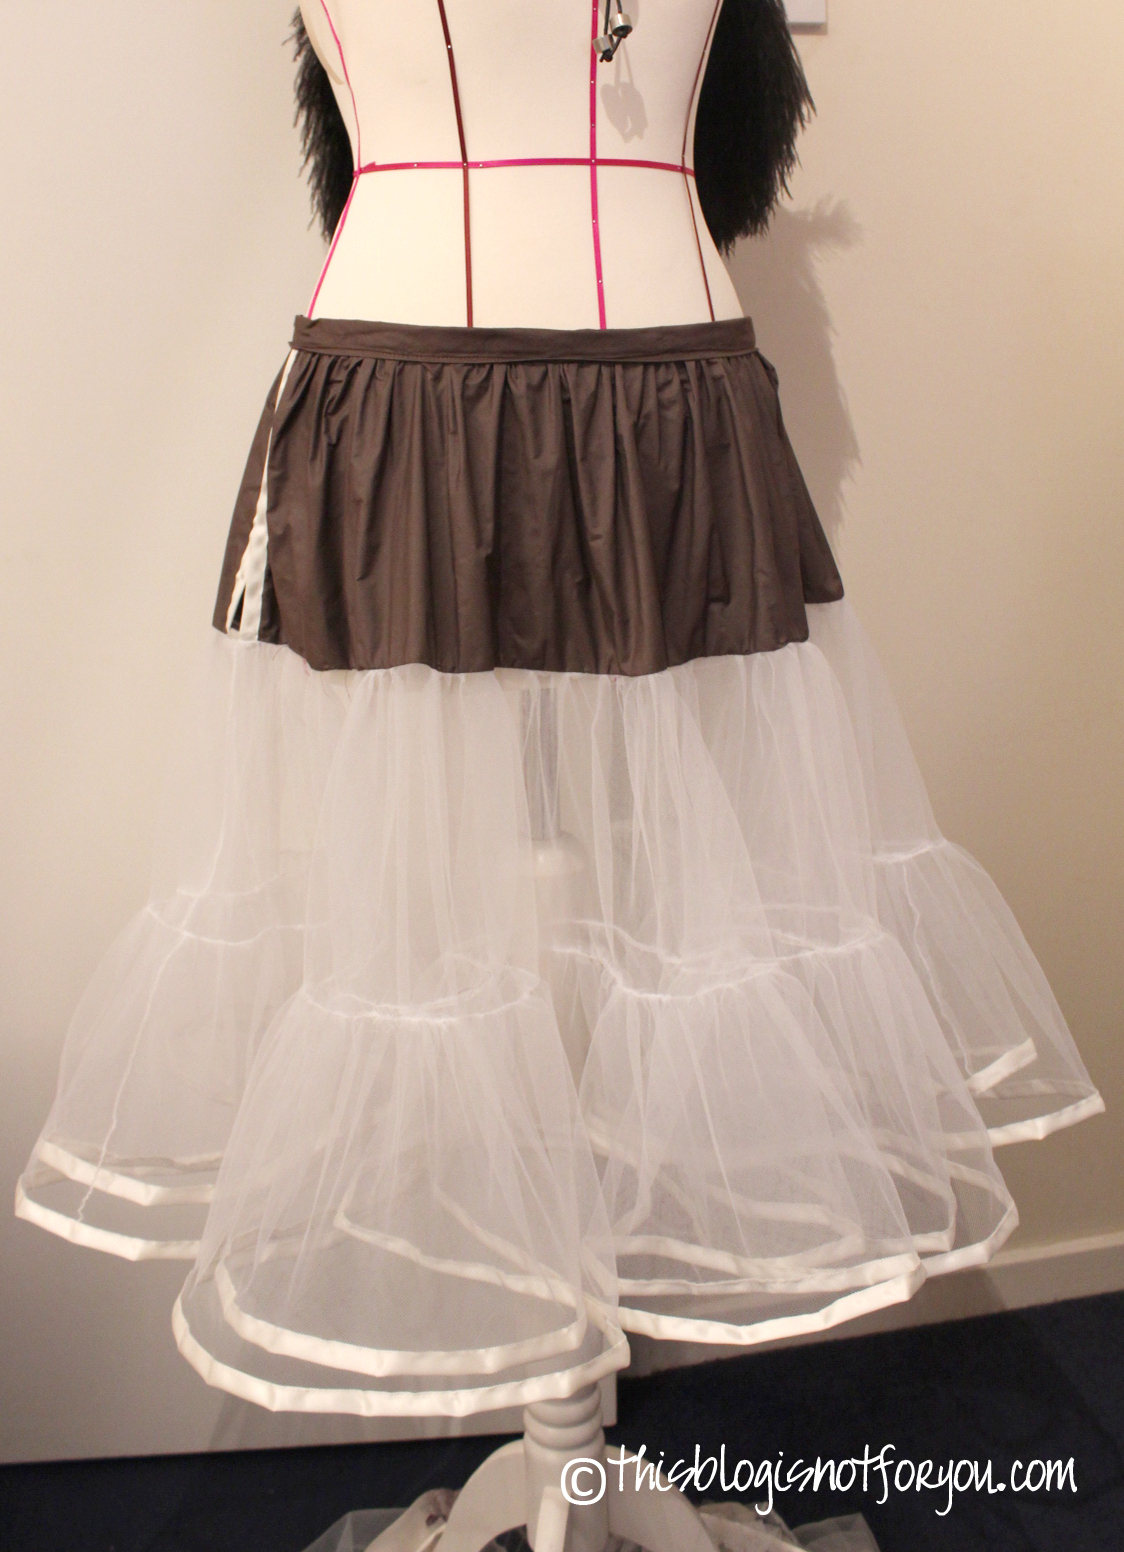
This is what my single layer Petticoat looks like. I wanted one that’s not too puffy. Whenever I want to add more volume, I wear the double-layered Petticoat under this one. The more layers, the puffier – makes sense, eh?
SEWING THE THING TOGETHER
First of all, for sewing a Petticoat one starts from bottom to top. That is sewing together the pieces for the single tiers, hemming and gathering the bottom tier.
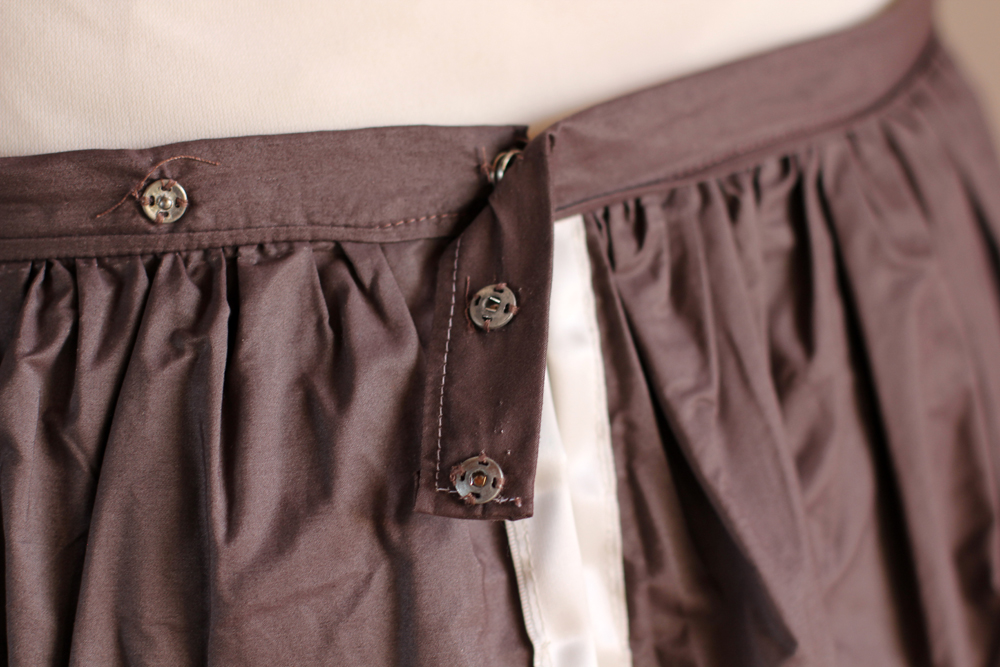
To sew together the ends of the top tier. You’ll need to add ribbon later on for the fastening.

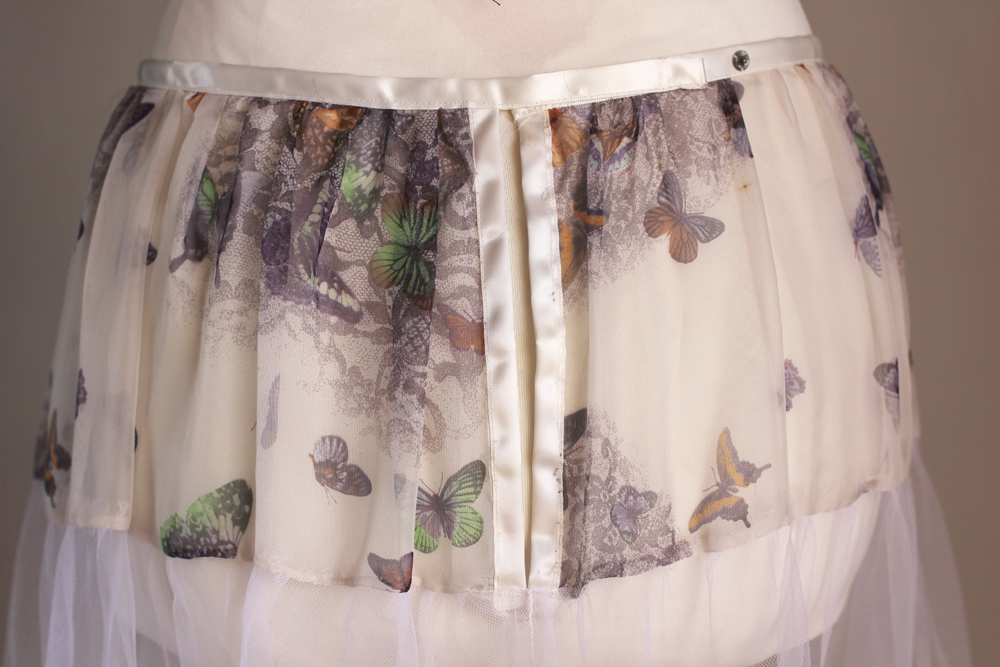
After planning and cutting, start pinning the ribbon to the bottom tier. I used 1inch-wide creme-coloured satin ribbon. It’s fairly inexpensive and looks nice.


After pinning, stitch it down.

For the gathering, sew along the side of the bottom tier with straight stitches. Use large stitches and a tight tension, it makes it easier to pull the top thread to gather the fabric.


Lay the bottom tier around the middle tier. Makes it easier to gather the bottom tier to the lentgh of the circumference of the middle tier.

Makes sure you have the tulle right side to right side before pinning.

With pulling the upper thread start gathering the bottom tier until it has the same circumference as the middle tier.


If you don’t have enough room for spreading the fabric out in a circle, you can also fold both tiers in half and thus gather the bottom tier to the right length.


Pin everything into place and sew the tiers together. Before doing the same thing with the middle and the top tier, you need to hem the ends of the top tier.


As mentioned, for the waistband I used the same ribbon I used for the hem. For the fastening I used a simple hook closure. I made this with three hooks, so I can adjust the Petticoat to the length of the dress I am wearing lowering it down when I widen the waistband.
This last pic is of the single layer Petticoat. Last week I finished the second one. Two layers – even more tulle. Sooo much fun, haha.

For the second, double-layered Petticoat I came up with this scheme, since I didn’t have enough tulle left:

For max volume I can wear the first Petticoat on top of the other one. This way I don’t have just a single three layered one, which isn’t really suitable for daily use 🙂 This is how the two together look like: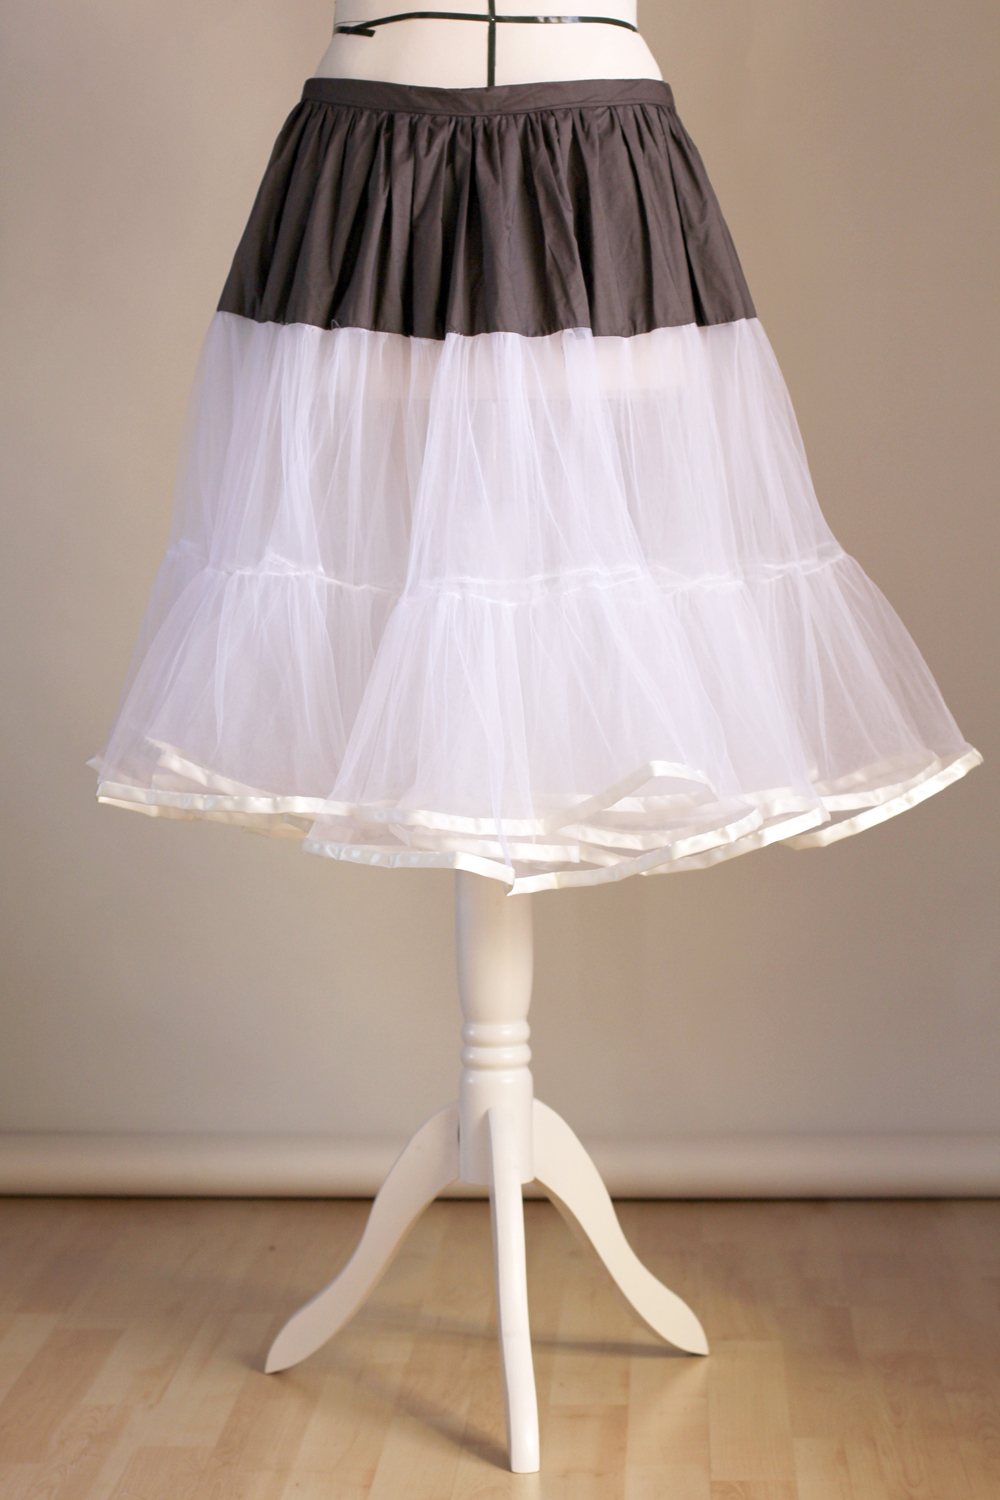

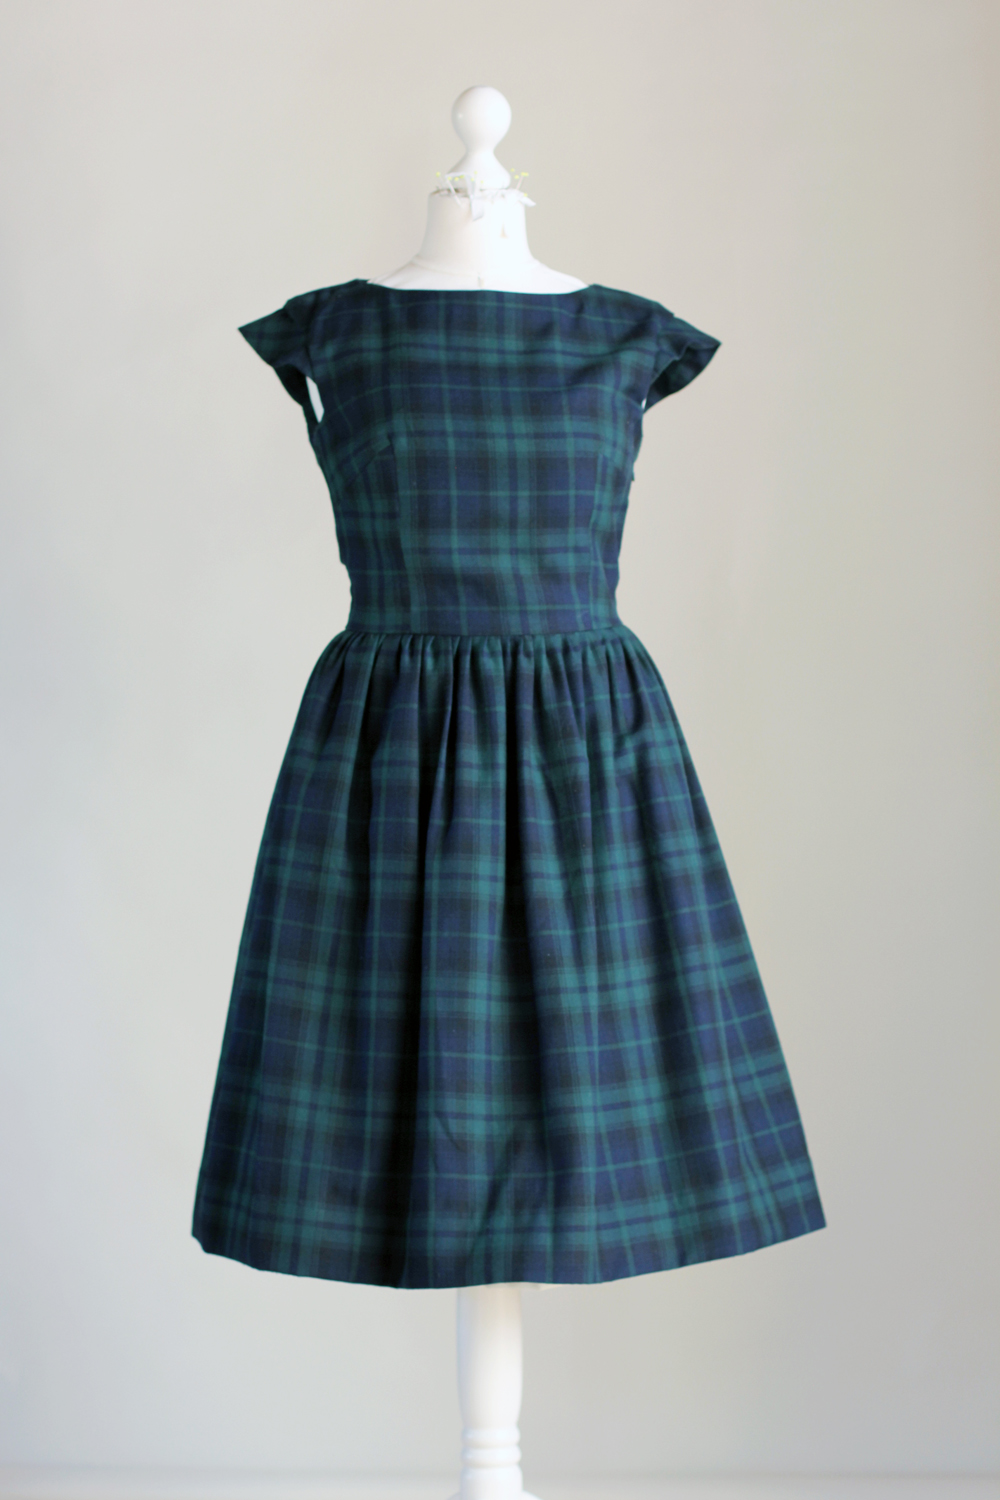
To see the effect of wearing a petticoat underneath a dress or skirt, here’s the same dress with and without a petticoat: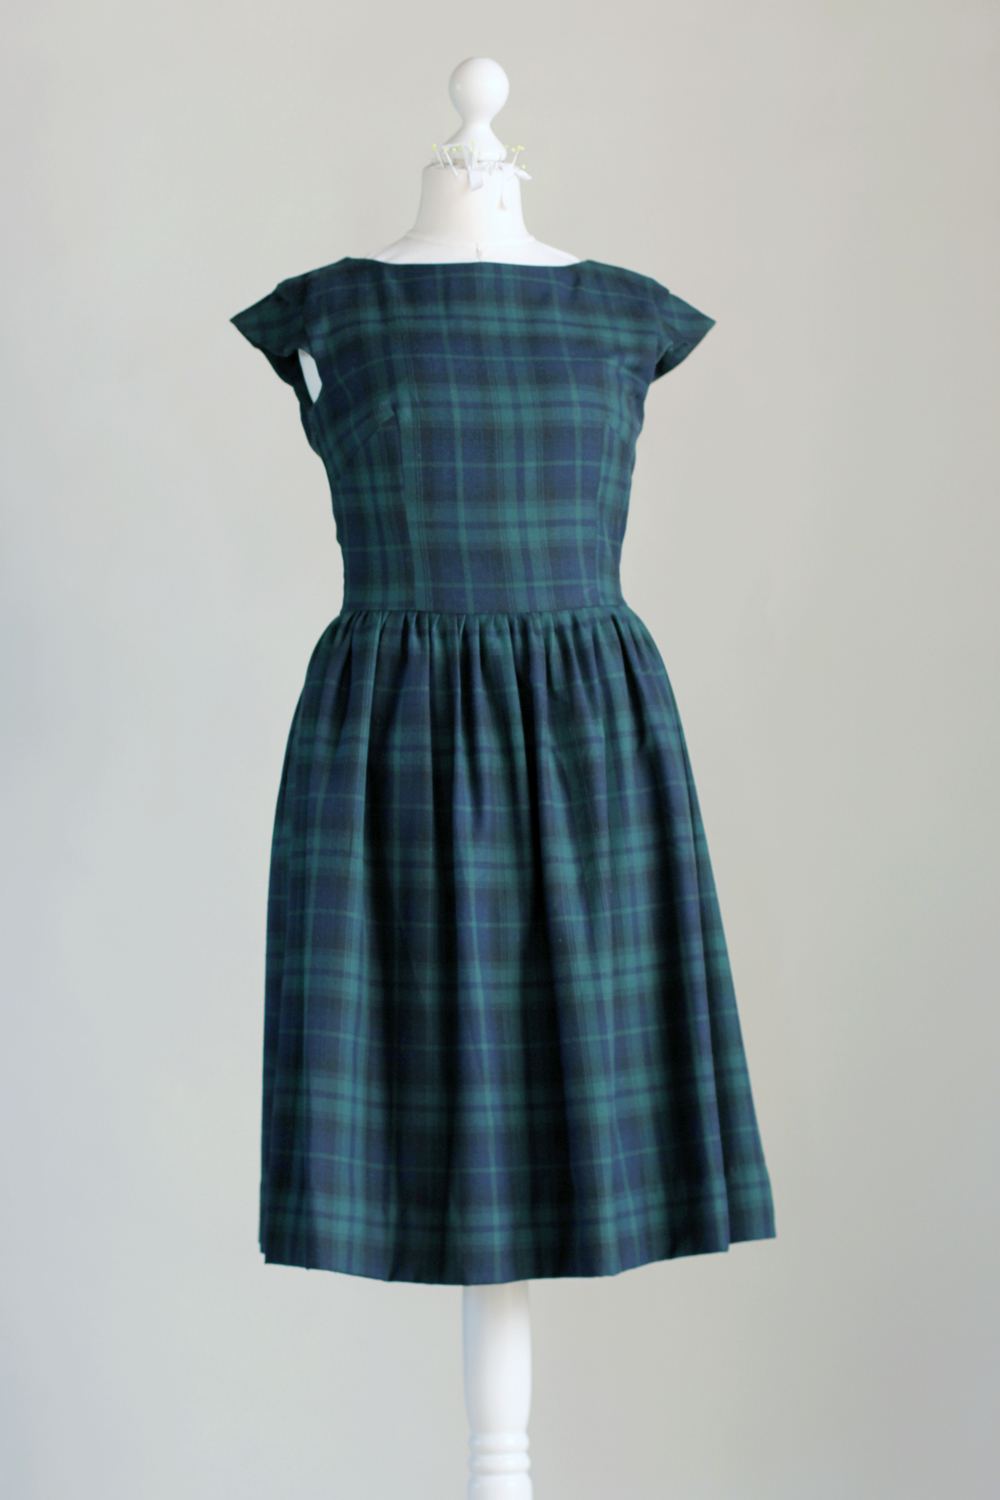
Voilá! It’s really simple and so so soo much cheaper than buying one. Have fun sewing your own Petticoat! May patience be with you! haha. (As mentioned before, Sinatra and red wine helps. Please just don’t spill it!)
If you have any questions, leave them in the comments and I’ll promise to answer them asap.
xx
Charlie
Happy sewing!
♥
facebook/bloglovin/pinterest
twitter/instagram
Stay in touch!
Love this tutorial, one of the (seemingly) easier one’s I found. I hope to be trying this in the near future! 🙂
I’d be happy to see the results!
hey glad I found your page, am planning to start making petti coats soon and I would be grateful for any advice you can give me
Is this too hard? I’m very new to sewing. How much time does this take? What will the materials cost?
It really isn’t too hard, the planning might be a bit complicated (how much fabric, how many tiers and layers etc) but the sewing definitely isn’t. I think its a good project for a beginner. If you use tulle, you won’t even need to finish the raw edges or use bias binding. Tulle is normally one of the cheaper fabrics, so costs will probably be 20 dollars/euro or less.
I love your tutorial! It was very clear and to the point with lots of pics. The only thing I don’t understand is how to make a multilayered petticoat. My brain will not process the diagram.
You can either sew several layers and them assemble them all together by sewing them together at the waistband. Or, for a classic petticoat, you start with a single layer at the top. The second tier consists of two layers. On to each of these two layers you attach the bottom tier consisting of three layers each. So top-down the layers first double, then triple to get a lot of volume. You should end up with a total of six layers at the bottom. Hope that helps.
wow!
I have been searching some help to make petticoat for my 50’s dress.
And that pink background pic make all clear to me! Thanks! ♥
Now i will go and start sewing. ;D
Thanks!
Happy sewing! x
Thank you so much for the simple and easy to understand tutorial.
I will be putting it to good use 🙂
Thanks & good luck!
How would I cut that down for a child’s size I’m not good at numbers thanks x
For a younger child you could probably just use half the amount of fabric (1/2 yrd at the top, 1yrd for the middle tier, 2 yrd for the bottom one).
Thank you so much for that explanation, I will put that into practise at the weekend.
Great tutorial! I’m very new to sewing and the tiers all make sense. The part I’m having a little trouble grasping is the waistband and hooks part. Is there any way to better explain this or any links on how to do that and how it effects the length.
It’s best to just put the petticoat on and mark the placement of the hook or snaps with pins first. You can fiddle around and see where you want the hem to hit. The first closure should have the skirt sit on your natural waist. If you then loosen the waistband a bit it sits a bit lower, with is practical for a longer skirt or dress.
too cute you make it look so easy i think you did an excelent job
Thank you Marlana! ♥
BEST EXPLANATION OF PETTICOAT CONSTRUCTION!! geez. after browsing through dozens of websites, this is the first one that actually explained the freaking measurements!!
Thank you 🙂 Glad this was helpful.
Nice tutorial! Thank you for sharing your expertise. I want to try one as soon as I am financially able.
Cheers,
Lyric
Thank you for this! I watched so many videos and read so many other sites, but this is the one that made sense to me. Just finished my friend’s petticoat for her wedding and I’m pleased with the way it turned out! Thank you, thank you!
Amber
Thanks a lot, Amber!! Glad this was helpful for your project!
Good tutorial, buy l am going to make my grandaughters petticoat for her wedding
and it will be a straight skirt from waist to knee of 19″ then the layers will flounce at the front and trail down the back like a train effect. How go l do this? Your help would be appreciated. Elizabeth Farrell.
I just finished my petticoat, which came out pretty good for my first time. The only problem I had was making the bunching even. Do you have any tips for my next one?
The gathers will turn out much more even if you use two rows of gathering stitching and then stitch in between these. That should do the trick. Also, using more pins helps, although it’s a bit of a nuisance with that much fabric! 🙂 Good luck!
This is a neat tutorial! I love poofy skirts, but what dress patterns do you think would work best with a petticoat like this? I have a few that might work, but I’m not sure. Most of my dresses are A-line and fairly narrow.
Hi Margaret! The best skirt for a poofy petticoat would be a circle or half-circle skirt. You can try and wear one under a A-line dress to give you a bit of volume, but if the petticoat is too poofy, this might give you a weird cone shape. Basically, everything that has a really wide hem works best. Also, circle skirts aren’t too bulky at the waist, so you can wear a lot of volume underneath without looking bigger than you are 🙂
Thank you! I am going to make little circle skirts for my daughter’s Halloween costumes, but wanted them to floof out more. I was considering adding a tulle layer on top, for fun visual effects and a hoop skirt underneath for the volume, but now I can’t decide. I got some inexpensive silk when we lived in Bangladesh, and it’s a pretty lightweight one. Now that I’ve seen this tutorial, I’m thinking maybe I should make all that tulle into a petticoat instead.
Either way, thank you for this tutorial. I’ve watched several online on YouTube, and the usual “picture is worth a thousand words” definitely did not apply. This was super helpful, particularly with the diagrams.
so…. your “top tier” is fabric? not tulle at all?
It’s fabric, yes. But you can also use tulle to get even more volume. I used fabric because it’s less scratchy, especially where the skirt sits close to your waist. But you could also just use tulle all the way and add a lining underneath the tulle, because the tulle can feel really uncomfortable on your skin, especially if you’re not wearing tights. Hope that helps!
is it d strong or soft tulle u used to achieve dis?
It’s pretty sturdy (the stronger non-stretch tulle that most fabric shops have). Soft tulle is much more like normal fabric, more drapey and therefore doesn’t give a lot of volume for a proper petticoat. x
I have an A line bridal frock..it is little bit lengthy for me..I can’t cut and decrease the length because the hem part is full of work..I hope a perfect petticoat will solve this problem..but I don’t know how to take the perfect measurement for my petticoat and which type of material will suit for the petticoat..can u give me an answer to solve this problem
Thank you for the tutorial. Can you please tell me if these two underskirts can be worn under a ballroom dance dress? Are they voluminous enough or do I need to add a third underskirt? Thank you.
Hi Jessica,
It’s hard to answer that question in general. First, it really depends on the stiffness of the material you are using. If you are using tulle or other fabric that is quite stiff and has great volume, then one or two layers can be enough. If your petticoat is made from very lightweight fabric, you might need more layers. Another factor is the weight of the dress you are wearing. Second, if the skirt is really heavy, you might need several layers to get to the volume/effect you’d like to achieve because it will weigh down on your petticoat. Hope that helps! x
Thank you for your prompt reply.
I am using organza under a silk dress so I should think that two underskirts would be enough.
Much appreciated X
Great tutorial. I am fairly new to sewing and have to make a costume with a petticoat. Trying to figure out how much fabric I need and want to confirm my understanding. Assuming the measurements of your example, if I want to sew a classic petticoat, the bottom tier would have six layers a 8m each (total 48m)?
Thanks 🙂
Hi Jenny!
The total length pretty much depends on the length of your petticoat. For a shorter one, you can cut several strips of fabric from only a few metres of fabric. That way you wouldn’t need to get 48 metres – that would cost a lot of money! Measure the final length of the petticoat skirt you want to achieve and calculate the length of the different tiers, before you buy any fabric. Most fabrics are 115cm or 150cm wide, so you will be able to cut several layers from 8m length of fabric. You might get away with 10-15 metres or less. And if you’re planning to get a sturdy heavy tulle fabric, you might not need six layers at the bottom.
Hope that helps!
Hey, I recently acquired a good bit of tulle. (From the bottom of my sisters very full, princess wedding dress, cause it was too long.)
And I am pretty much expanding my limited machine sewing skills for the first time in years by working on a petticoat based on this tutorial.
I have one question. You said the top tier, the fabric one, should be twice the waist circumference. Do you gather the top tier to match the circumference of the waistband, the same way the bottom and top are gathered?
Hi Carlie! Yes it’s gathered into the waistband, so it fits comfortably around the hip area and gives some volume. If you do not want any fullness in that area or don’t have enough fabric, you could make the very top tier close-fitting, using your waist and hip measurements and adding a tiny bit of wearing ease. This requires a little bit more skill, although it’s really not that difficult. If it’s one of your first sewing projects, I’d recommend gathering the top, as it’s easier to fit. If you struggle with the waistband and fastening, using an elastic as a waistband would be a great alternative.
Yep, best online ‘How-To’ for a petticoat! I, also, spent hours reading the available instructions all over the internet. Only really needed this one. Your clarity and pictures are much appreciated! It takes some time to make your first one (good part of a Sunday), but just made one to dress up a cocktail dress I’ll be wearing for a friend’s wedding. Started with a boring $20 sundress in a lovely patterned linen and after $8 for a DIY petticoat and a few minor changes to the shape of the bodice I have an elegant, quite dressy outfit to really make an entrance with! The next petticoat will be a cinch! Thanks again and happy sewing.
Great tutorial . I am sure The Fabric Exchange has so many choices of fabric for this kind of fabric.
Hi. I loved the tutorial. I have got to get back to my love of sewing soon. I want to find (or eventually make) a pretty prom or semi formal tea length dress for an antique dress form my wife and I have; she says I am such a girlie boy ( she is right). I want to make a very pretty, lacey petticoat for it; can’t wait for winter, a cup of coffee, a warm fire and sewing! As a side note, I agree, the first layer should always be a soft silky fabric, then pile on the tulle! I love sewing and this is just what I love to try doing sooo much. I want to try to make a stunning dress from a vintage pattern as well. Looks hard.
I am strictly Uniformed 24/7. For various reasons I often have to wear Petticoats made from layers and layers of Crumpley-Crackling NEWSPAPERS! I make them myself, with all the sheets of paper perfectly folded and pleated and neatly taped together into a huge pyramide or bell shape to really Puff out my huge sticky-out Skirts all round my Rear End. It is a bit embarrassing because they are really Stiff and Bustling and I Rustle noisily with every step but I find Newspaper is ideal and very cheap. I do get a lot of unwanted attention and wandering hands!
Ooh so exciting! I have been looking for a tutorial that would be easier to follow and understand the different sections. I have a 50 style dress I wanted to team up with. Petticoat and this is perfect! Thanks for sharing and explaining in such detail!
Hi Tonja, thanks for the lovely feedback, I’m glad you found this helpful! x
Thank you so much for the tutorial. Is so clear with all the pictures and so much fun to read 🙂
This is wondeful. Thank you
Thank you for this wonderful tutorial! I’m a beginner, but it was easy to follow along – even though the tulle and chiffon definitely didn’t make this a breeze! I intended to make a two-layered petticoat, but I ended up making two one-layered ones (one with a button closure and one with an elastic waistband), which layer very well.
This is my first successful sewing project! Thank you!
Thank you so much♡ This will help take my daughters Christmas dress from ‘pretty’ to ‘princess’!
This is a really great article! I will definitely try this process out!
Hello,
A lovely tutorial. I want to make a petticoat for wearing under maxi skirts. The attached slip stops midthigh. I would like to remove that all together. Years ago I square danced. I really treasured my soft petticoats, but have no idea what material to try. I am a short ,plus sized woman. However, I feel feminine and feel pretty, as the skirts sashay around my ankles. The swirl and twirl component is a delight. I have 4 maxi skirts that I was given. They are literally 6 to 8 sizes larger than I normally wear. I plan to just adjust waist band to fit with elastic or ribbon drawstring. I have plenty of skirt material to swish and sway. I wore one of the skirts to serve at a church funeral luncheon. Later. I learned that the skirt is a bit sheer in sunlight. Thank goodness. I had volunteered to wash dishes for 2 hours so my lack of modesty wasn’t on display during entire time, and the parents of the deceased young man may not have noticed. I would greatly appreciate any assistance or recommendations you could share. My sewing skills are basic. I do best with step by step instructions. If I can see or picture something. I can understand what to do.
sincerely,
Ginger
I appreciate any assistance or recommendations
Hi Ginger,
I would recommend lightweight, soft cotton or viscose fabrics. They’re soft and pleasant on the skin, and a perfect lining fabric. Depending on how voluminous you’d like the skirt to look, you could add some petticoat layers/tiers to the existing slip. If you have several skirts, making a petticoat to wear under any one of them might be a bit more practical. The instructions in the post will also work for maxi skirts, if you add some length to every one of the petticoat tiers.
Hope that helps a bit!
Charlie
Good Evening,
I am making a petticoat for a friend. I don’t if I have the measures meant right. I hope you can help me with that. The person waist is 58 and hips 61. The petticoat needs to be 36 -1 = 35 inch’s long. I think the top should be 3.2 yards, middle 6.4 yards and bottom 12 yards with them being 11 or 12 inch wide. I like your tutorial and hope I got it right. I hope you will be able to help me.
Sincerely,
Willie E Lewis