to improve is to change [new header in progress]

Although I like the old header which is still the very first, it doesn’t really fit to this blog anymore. I still do reviews on good books and movies, but the majority of posts is and will be about crafting and sewing I guess. So say byebye to the old one (which is books and a vinyl record by the way) – the new one is on its way (although it may take a little while).

like fireflies in december [DIY advent calendars]

#1 overflowing waterfall Advent calendar

I got this one this year. I’m still overwhelmed. Can you believe what was in there this morning (1st Dec)? A second smaller Advent calendar with 24 different tea bags. Calender-ception!

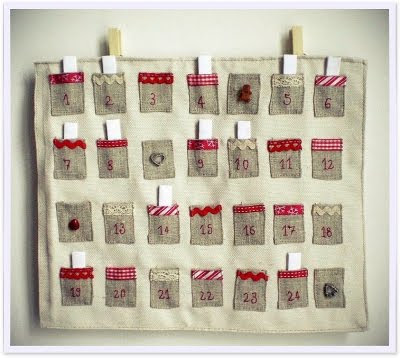
#2 pillow case into Advent calender

This one I made for my parents last year. It was a last minute project (yeah, December comes after November, I should start to remember that…).
It took a few hours, since I sewed the whole thing myself. It’s basically made from two pillow cases, one brown, one red and small pieces of white cloth.

Unfortunately, I didn’t make many pictures during the process, but it’s fairly easy to explain:

1. Cut one of the pillow cases in half, so one part still has the zipper/fastening part on it. Take that part and close the now open end. (Open the zipper, turn the pillow case inside out, sew right sides together, turn again.)

This way you end up having a narrow pillow case/ bag I used as “door” for Dec 6, St. Nicholas’ Day and also attach the other bags. It was big enough to put a magazine in there and some bigger chocolates.

2. Cut out little fabric square and write the numbers on them (I used fabric paint – makes it more permanent).

3. Cut out rectangle pieces for the “doors”/ little bags. Sew the numbers on before you sew the bags. Makes it much easier.

4. Don’t forget to include the strings so you can close the little bags.

5. Sew some cute buttons on the pillow case / bag 6 to attach the other bags. Make two buttonholes for the calendar to be hung up.

6. Fill with whatever you want.

7. Put everything together.


#3 more cute Advent calendar DIY ideas

1. Advent calendar that’s been refilled every year – some bags lost on the way…

Why not use all kinds of different socks and bags? I love the “patchwork” idea!

2. burlap activity countdown calendar

Optimal for filling with time.

3. matchbox Advent found at Matha Stewart

4. envelope calendar – found at Design Sponge

5. paper bag Advent calendar by lovely things

Simple, yet beautiful.

6. Christmas ornament calendar by life as a thrifter

nice idea for everyone who has too many ornaments lying around in boxes…

sweet dreams are made of this [bedtime candy, chalkboard paint project #1]

“It is one of life’s bitterest truths that bedtime so often arrives just when things are really getting interesting.”

— Lemony Snicket (A Series of Unfortunate Events, #11)

After seeing some pretty awesome chalkboard paint projects we wanted to do some chalkboard painting ourselves. So we ordered the cheapest paint we could find on Amazon. It finally arrived today and we started right away! We have guests over the weekend and I love to prepare Betthupferl (German for bedtime candy), so I had the idea of upcycling some old jam jars. I keep loads and loads of jars, sometimes they come in pretty handy. Since I never used chalkboard paint before, it wouldn’t have been great damage if the paint wasn’t good at all.

Here’s how I did it:

I used this brand, mainly because it was quite inexpensive. It was really easy to use and worked out well. I wouldn’t use it indoors, since it’s a spray and as you can see on the picture below it scatters the paint on a large scale. It’s best to hold it about 30cm from the surface and whilst spraying keep the can in motion. After applying the first layer wait at least 3-5 minutes until the next. For the jars one layer was enough, I did two though just to be on the safe side.

For labelling I used a liquid chalk marker. Fill with candy, apply ribbon – and you’re done! A cute idea and pretty simple to copy – our guests loved it!

So here they are – stuffed with goodies, sweet dreams guaranteed!

I’m afraid I’m a chalkboard paint addict now… There will be more chalkboard paint projects coming up for sure!

unfinished tales of my sewing table [sneak peek at upcoming projects]

Do you know the feeling of having an uncountable amount of good ideas and inspirations always in moments where you have least time to put them into action?

Well, happens to me all the time. Maybe creativity is part of procrastination, but when I am stressed out and have thousands of other things to do my head just doesn’t stop having loads and loads of crafting and sewing ideas. I started something like a “draft book” to keep track of ideas and inspirations and as soon as I have time I start crafting away my collected “to do’s”.

Once I found a good pattern or idea for a dress, I try to think of what kind of fabric I will use  and how much of it I’ll need. Keeping little snippets of the chosen fabric together with the pattern helps a lot at keeping ideas and future project well-assorted and you don’t have to start at the scratch later on.

The dress above is the one I have been working on recently and it just needs some more finishing until it’s done. I used the #133 pattern of Burda Style 8/2012.

I love the pattern and will use it again for sure. I decided to keep the skirt a little longer (as on the picture above) since it goes well with the checked pattern of the fabric. But I’ll certainly make another one with a different and lighter fabric that is going to be way shorter and a little more modern. If only I had more time…!

As mentioned, I am sewing a second (fuller) petticoat, but all the tulle-gathering is very time-consuming and since I want to do a tutorial about petticoat sewing as well (taking pictures, writing instructions) I will probably take a few more days and weeks

.

This looped stole developed more or less out of an accident – it was supposed to become a scarf, but I ran out of wool and couldn’t get more of that kind. The idea of making a looped stole out of it actually wasn’t that bad, it’s really nice and cosy to wear. I am going to adorn it, but I haven’t figured out what I am going to use for that. I’ll post a picture when I am done!

 Additionally, I am working on several smaller sewing projects at the moment, mainly christmas gifts. That’s the main reason for not posting any proper pictures yet – I don’t want to spoil anyone. But there are several sewing tutorial in the pipeline for after Christmas, so keep some fabric remnants ready!

the flickering light of the candles [candle DIY]

I often keep old empty glass tins, they come in handy for storing buttons, beads and so on. A few days ago I found a wick while looking for some candles which gave me the idea of making a candle out of one of the creme tins. Here is how I did this:

 I spread the gold glitter with a wet brush, it’s fairly sticky so you won’t need glue (which would leave stains). Then I painted the inside of the tin with glass paint. (I guess acrylic paint would work as well).

Put the wick inside and glue it on (or use candle wax as I did). Melt white candle wax and fill the tin. Leave the tip of the wick (1cm) uncovered. I put some glitter on the wax before it firmed up to make it look more christmassy. (One could also wrap some golden wire or ribbon around the rim.)

And you’re done!
Here’s another one I made from an empty pesto jar and book pages.

“Sitting in the flickering light of the candles on this kerchief of sand, on this village square, we waited in the night. We were waiting for the rescuing dawn – or for the Moors. Something, I know not what, lent this night a savor of Christmas. We told stories, we joked, we sang songs. In the air there was that slight fever that reigns over a gaily prepared feast. And yet we were infinitely poor. Wind, sand, and stars. The austerity of Trappists. But on this badly lighted cloth, a handful of men who possessed nothing in the world but their memories were sharing invisible riches. “

— Antoine de Saint-Exupéry (Wind, Sand, and Stars)