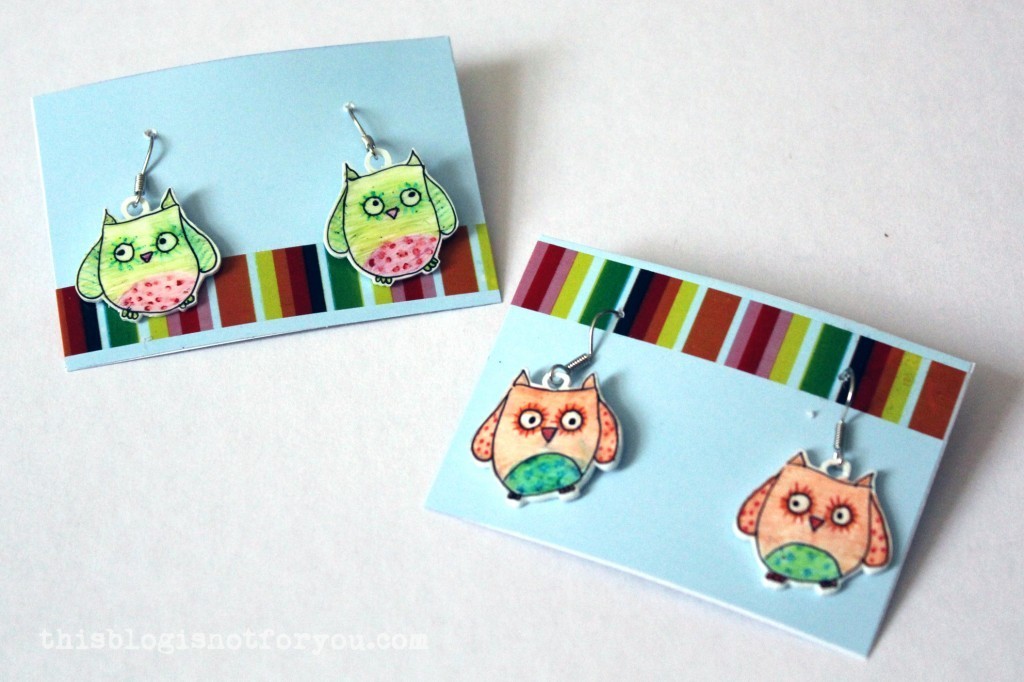
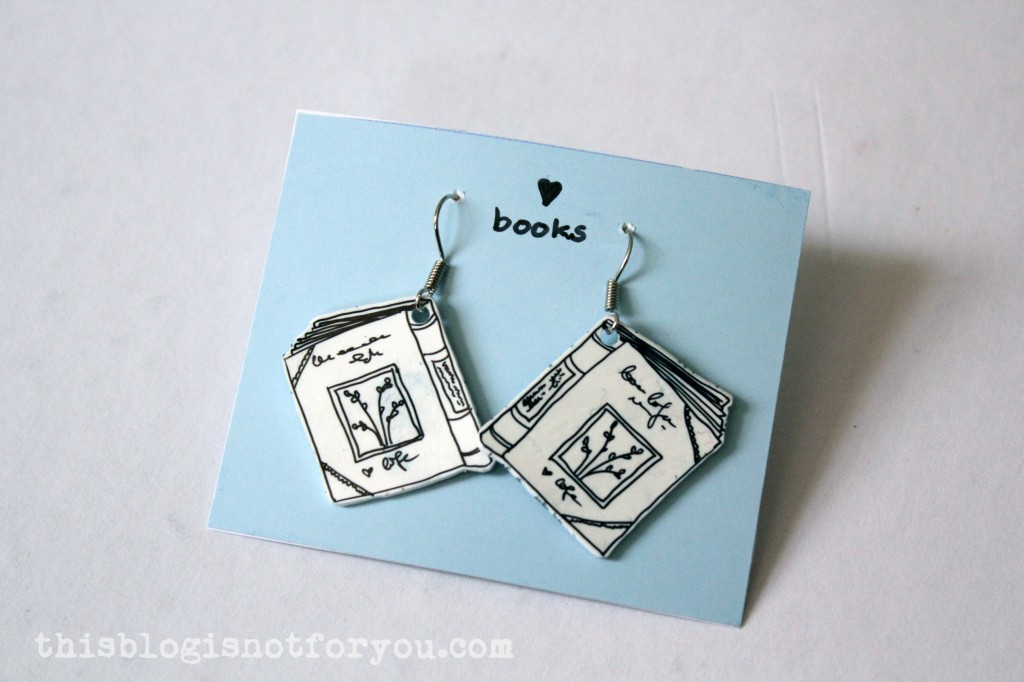
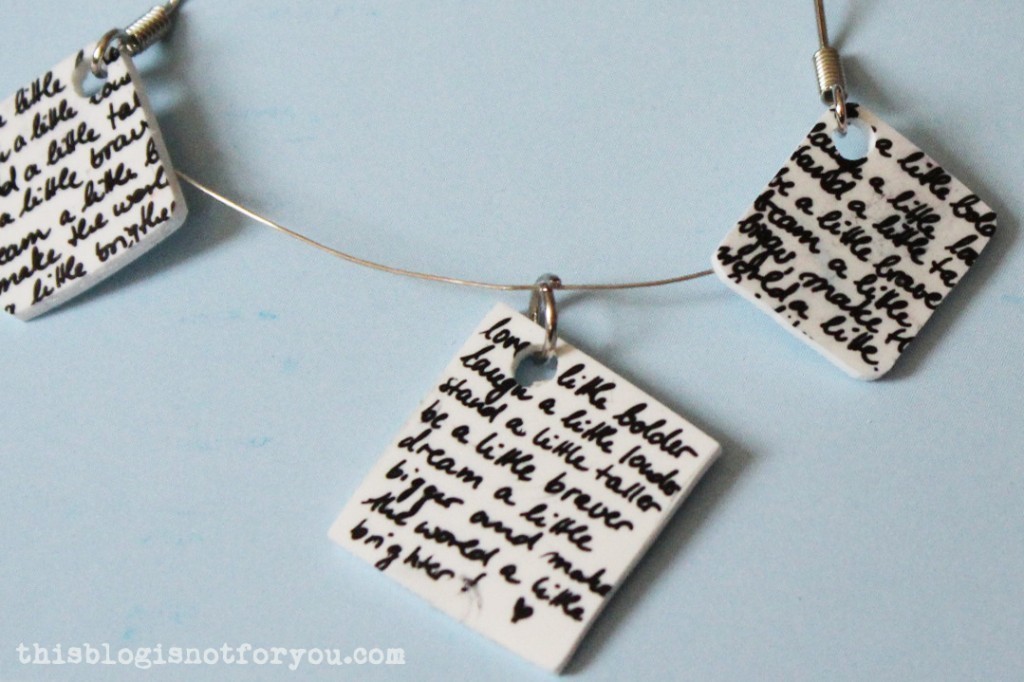
I made these cute little earrings and necklace charms for my friend’s birthday. She loves owls and books, so these were the obvious choice!
The owls and books are about 1inch/2.5cm. I made the holes with a hole punch and used pliers to attach the hooks of the earrings. Earring hooks are quite inexpensive and you can get them in DIY/craft stores or order them online. I always have some at home in case I need small gifts. Using shrink plastic, beads and wire or even fabric, you can make some cute little earrings in no time!The shrinkage is about 50%, which you have to consider when you choose the size of your image. You can draw directly on the plastic using a permanent marker. If you want to add colour, you can sandpaper the shrink plastic with very fine (!) sandpaper and then simply use crayons, acrylic paint or water colour. I recommend to keep the finished make from getting wet, as non-water-resistant colours might blur (even after baking the plastic).I made these chevron earrings for myself (I got my friend to wear them for the pic 😉 ).If you like my shrink plastic DIYs, you might want to check these out, too!
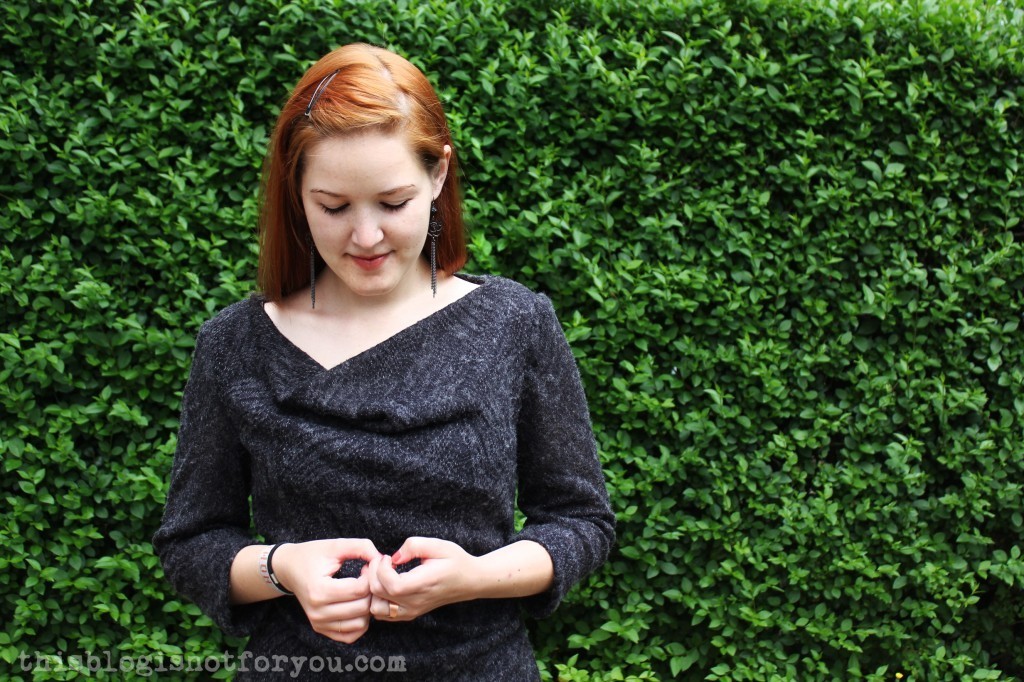
In January I was approached by the generous team of Minerva Crafts who offered to try out one of their fabrics (including a pattern). I was over the moon and super excited, and rummaged through their shop for quite some time as I couldn’t decide (as always). The fabric arrived promptly in the mail two days later. Now, three months later, my dress is finished. What?! Three months? Shame on me! And why wait to finish a wool dress until it’s almost too warm outside to wear it?
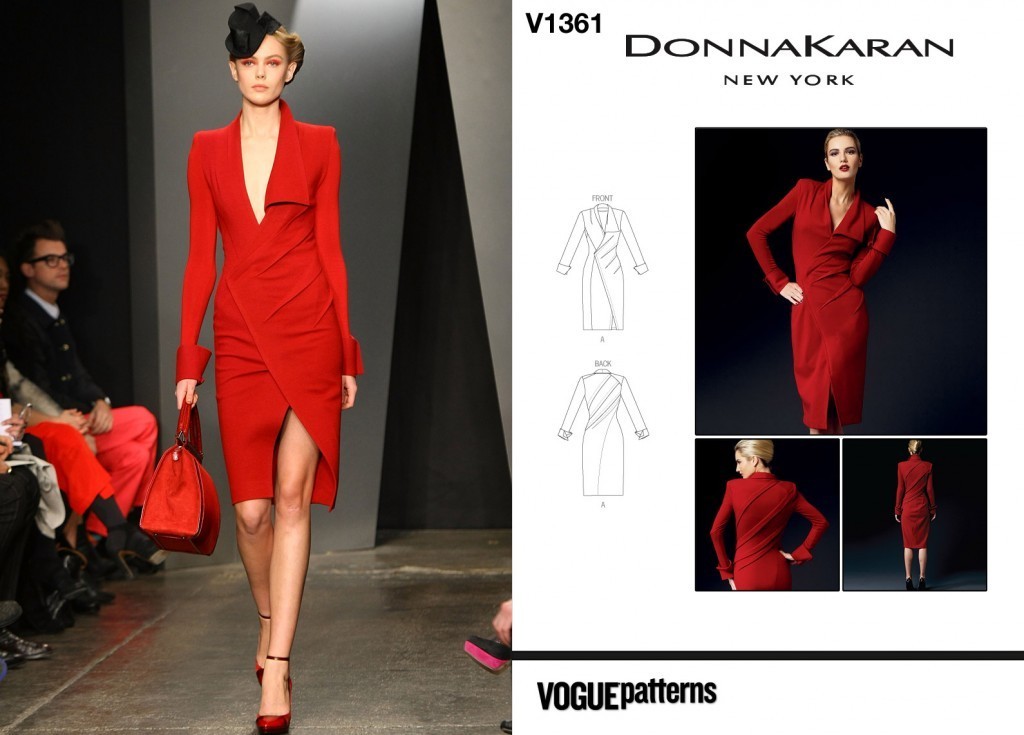
The reason it took me so long was that I struggled with the pattern. I picked a very ambitous Donna Karan for Vogue pattern, which was super hard to fit and in the end just didn’t work with the fabric I had picked. Lesson learned. I will show you the disastrous toile I made another time.
I still love the pattern, but at the moment I’m still fed up with the fitting process and I will have to let some time pass before I can pick it up again. The main problem of the fit was that there basically are no side seams and A LOT of pleats which run diagonally across the back, side and front of the dress. Any alteration (eg. grading up to a larger size for the skirt) requires A LOT of thinking. Unfortunately, the lovely wool I picked was a bit too light-weight for this project.
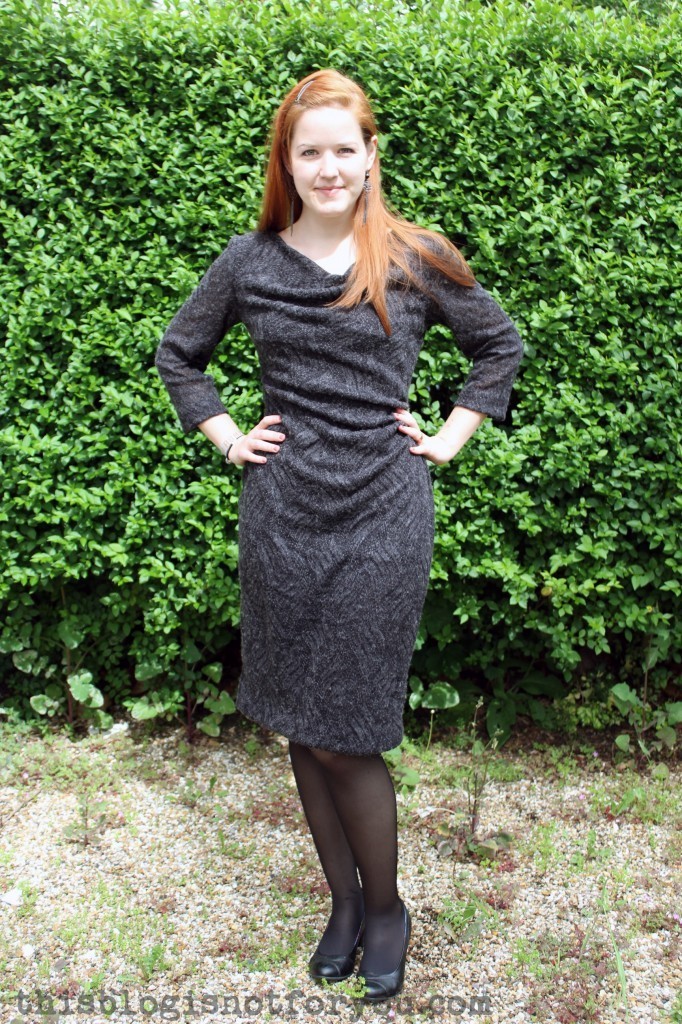
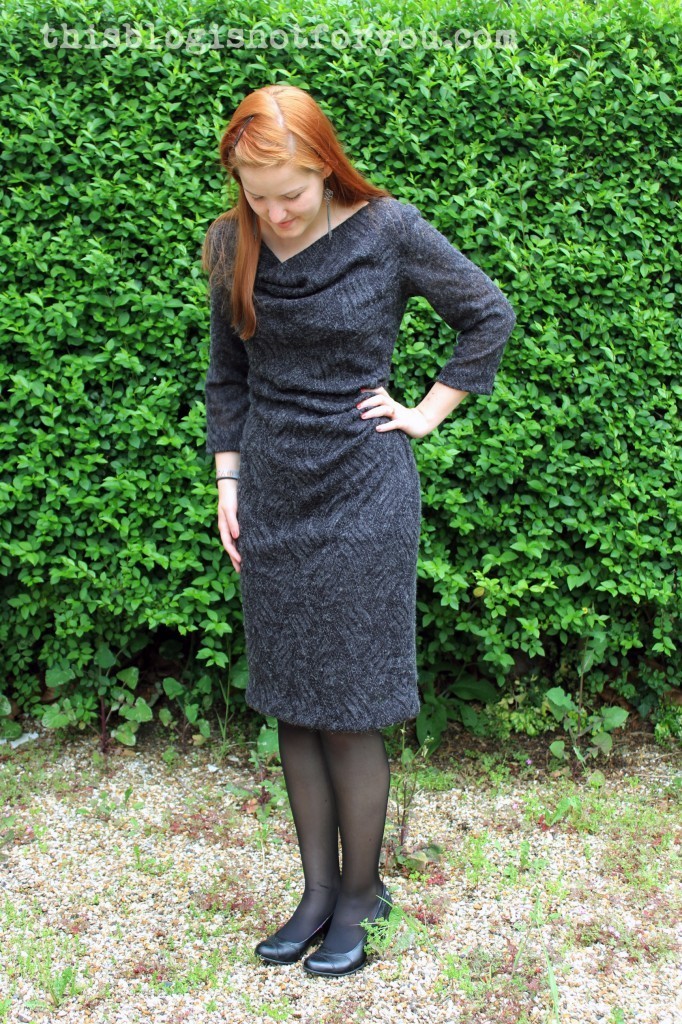
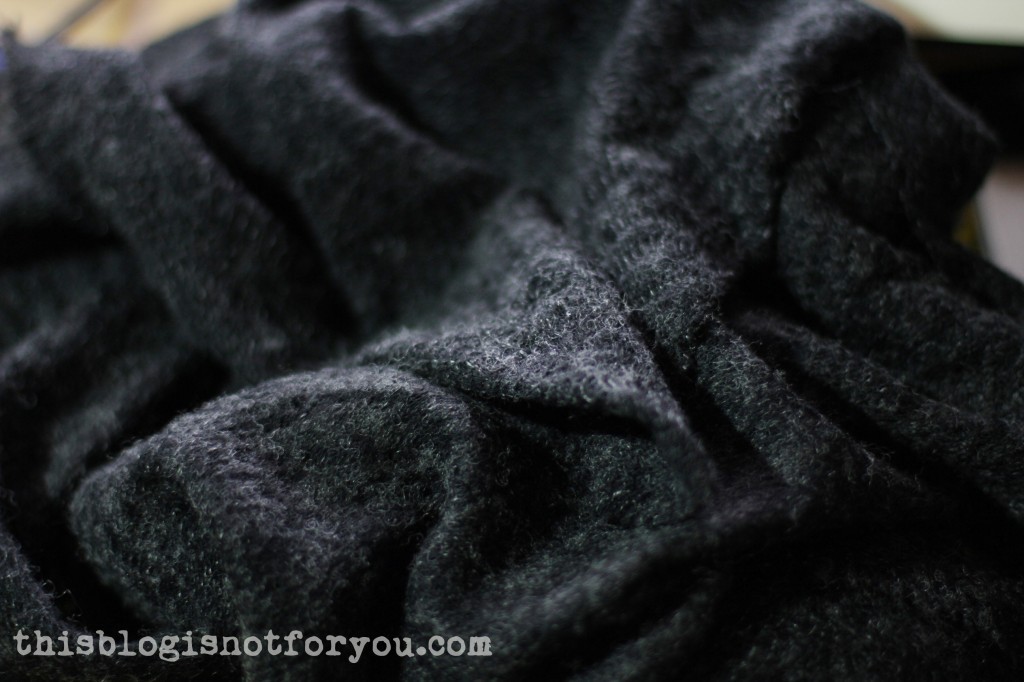
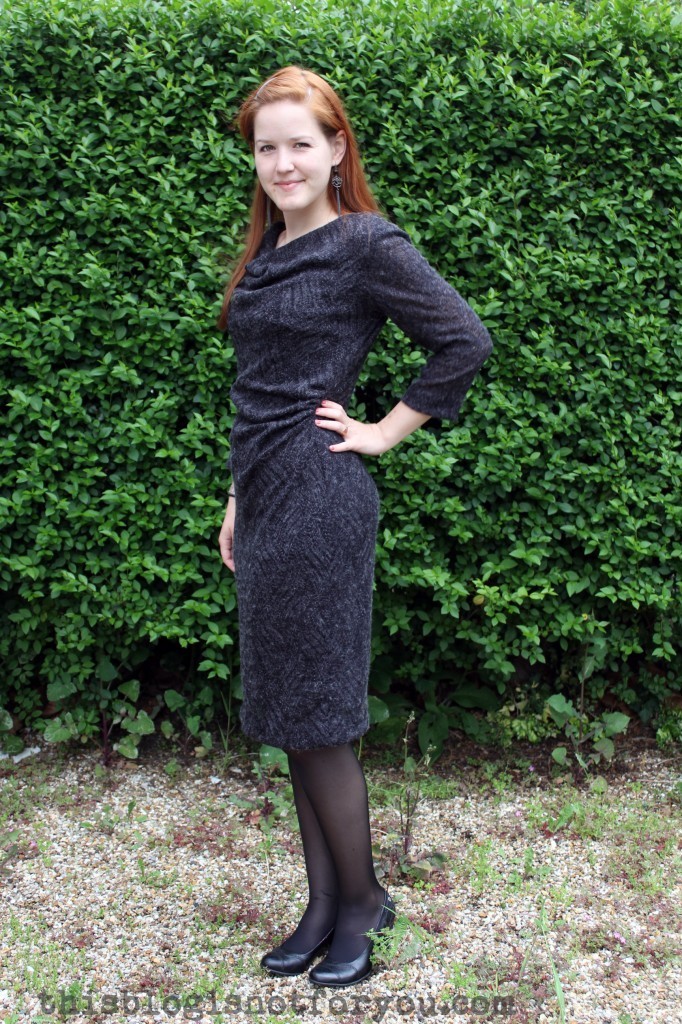
I picked three metres of a charcoal grey knitted stretch fabric which is 75% Acrylic, 8% Wool, 17% Nylon. The texture is amazing and works really well with more drapey projects, such as the cowl neck dress I ended up making instead of the Donna Karan dress.
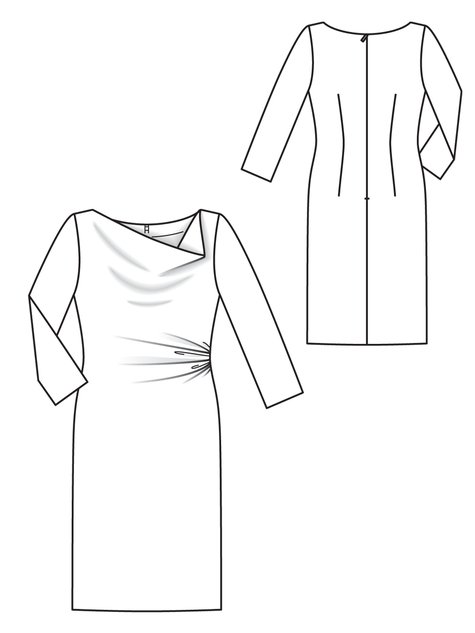
source: Burdastyle.comBurdastyle 10/2012 #118A
I eventually went with a Burdastyle pattern of the 10/2012 issue, #118 A. The pattern originally has a zip and is made for non-stretch fabrics, cut on the bias. I skipped the zip as my fabric was very stretchy, took the side in a bit and finished the project in one evening. That’s how fast is was!
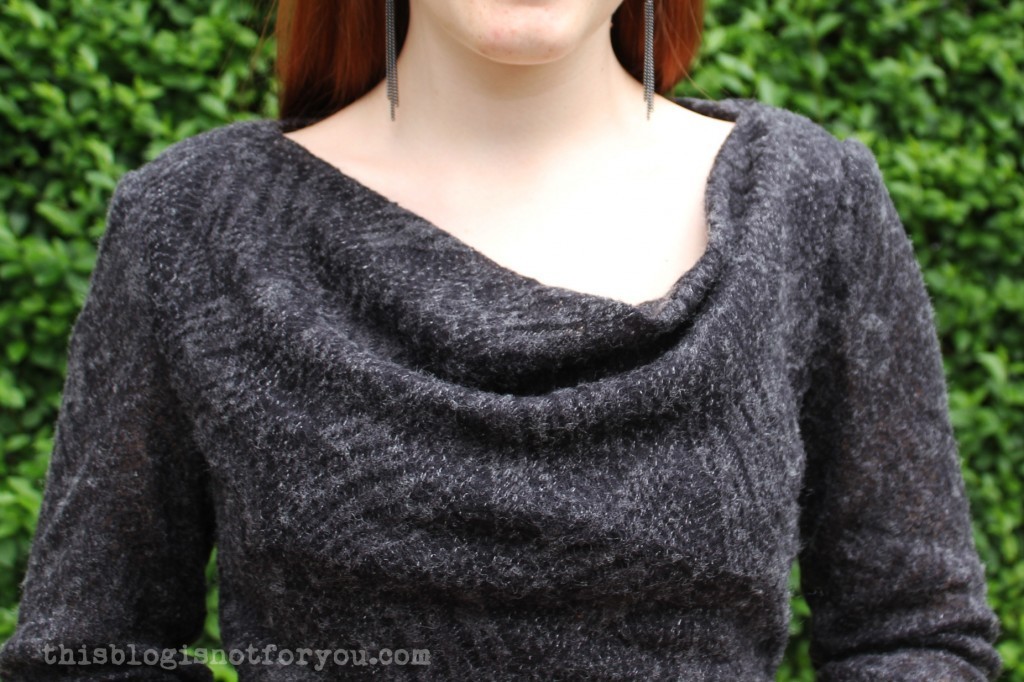
I love the cowl neck and the gathering at the waist and feel super comfy in this dress. I will probably not have too many occasions to wear it in the near future, as it’s a bit too warm for summer, but I see myself wearing this a lot in autumn and winter. It’s just so soft that I want to constantly hug myself (sounds a bit pathetic, I know).I have a bit of the fabric left which will be just enough for a little cardigan! I’m also planning on sewing a little slip dress with some black spandex fabric, I’m a bit paranoid about the see-throughness of this fabric. And btw, this is #22 (actually it’s the almost unfinished #23) of my 27 Dresses Challenge! Five more to go!
Will I ever be able to sew the Donna Karan dress? I’ll let you know, if I do.
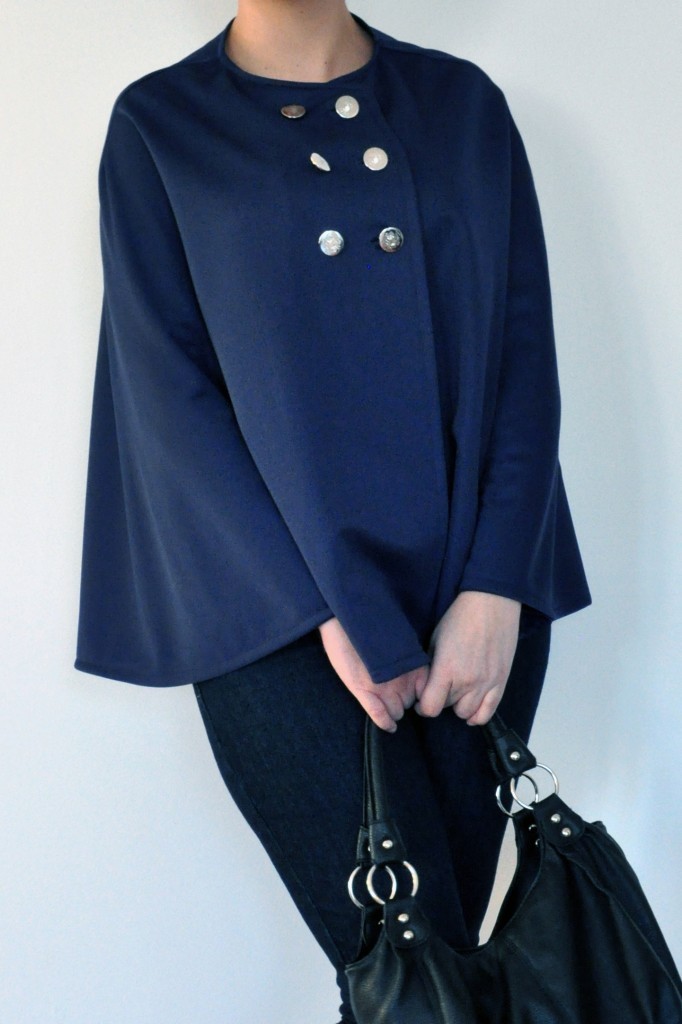
Today I’m featuring this wonderful navy blue Fairy Tale Cape made by Paméla, one of the lovely ladies who tested the pattern for me.
She decided to make the cape without the hood and combined a navy knit fabric with 6 silver buttons. I’m in love with this version of the Fairy Tale Cape! It is super elegant and navy blue is my favourite colour! Now I feel the need to make a copy of this version for myself!
And thumbs up for striking the same pose as the lady on my pattern illustration – you are awesome, Paméla!
If you’d like to make your own version of the Fairy Tale Cape – you can download the pattern here!
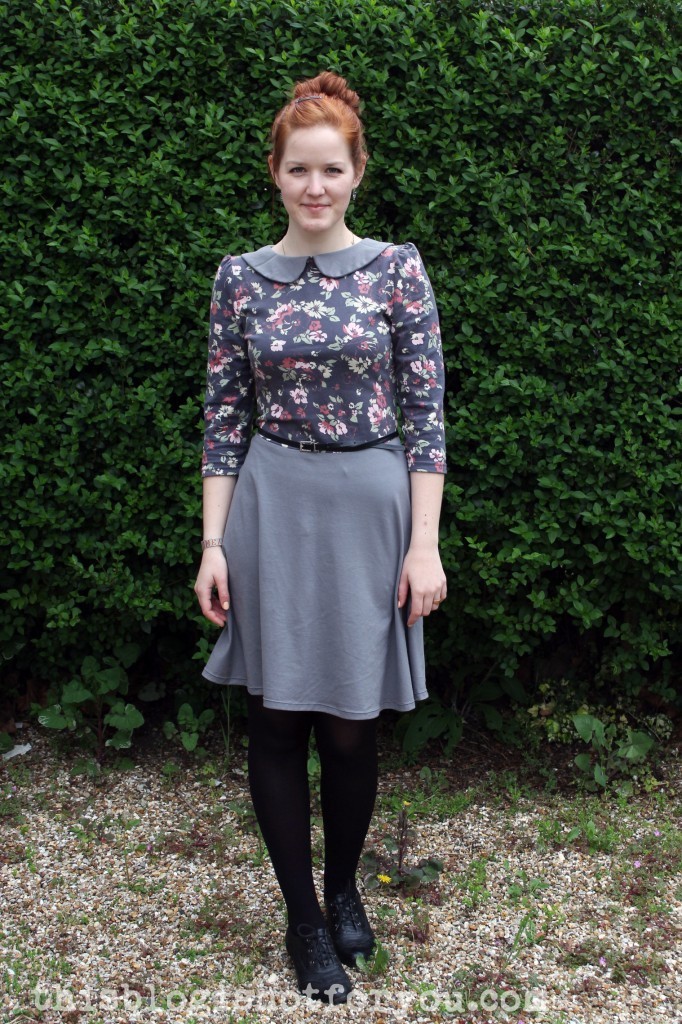
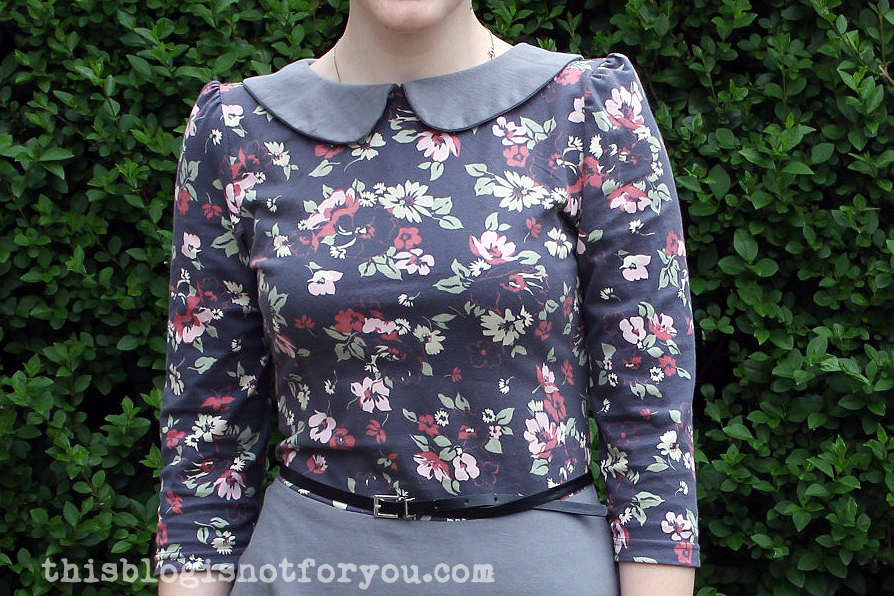
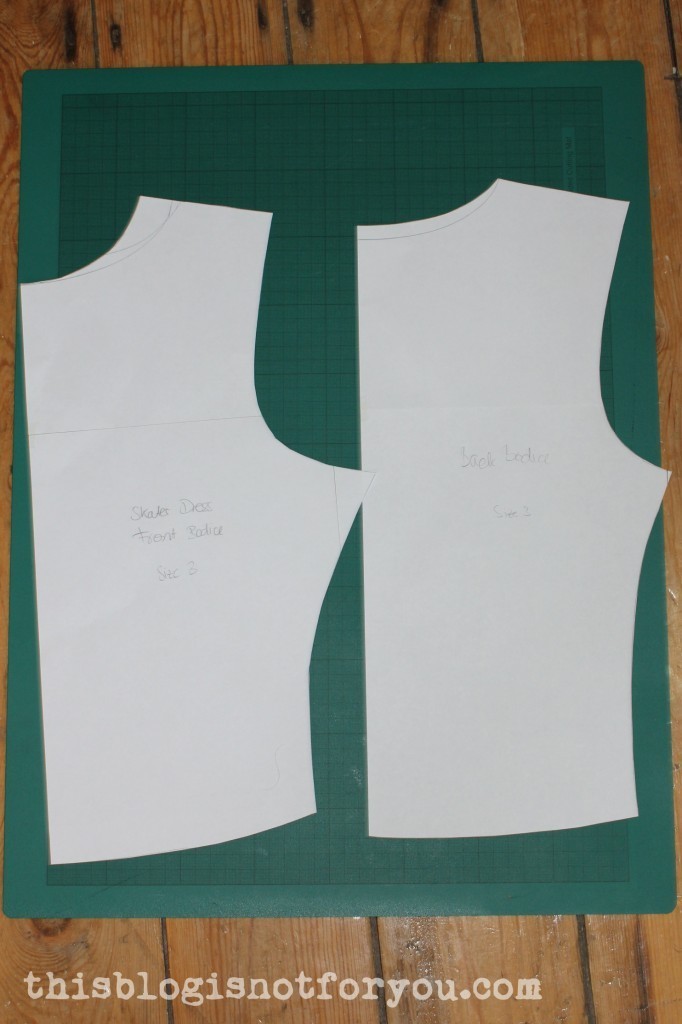
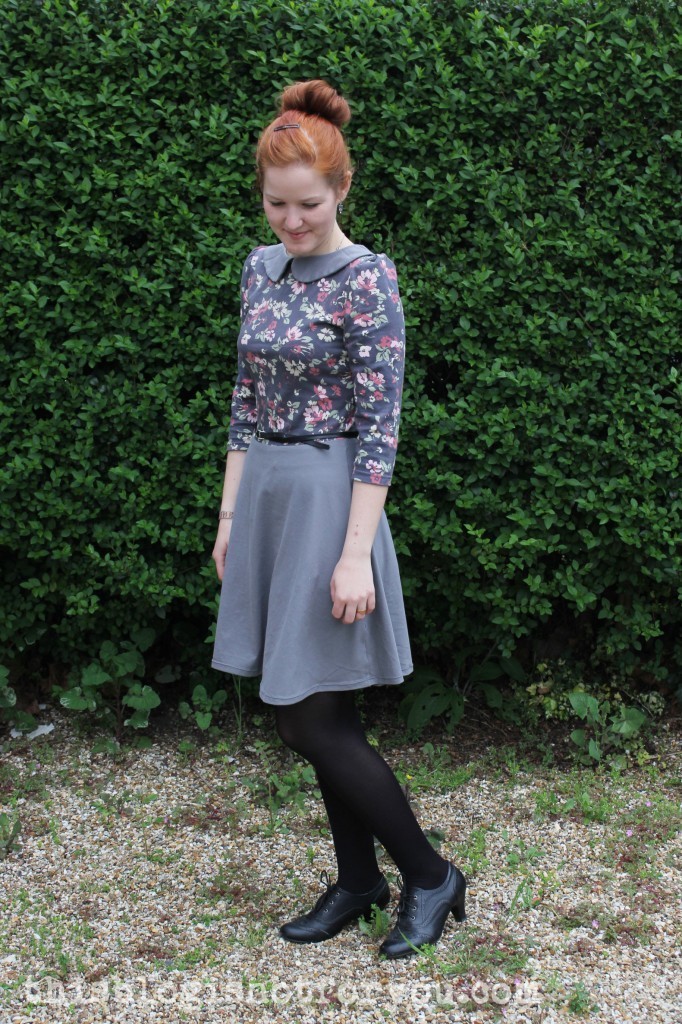
I did it again! I made another version of Kitschy Coo’s Lady Skater Dress! Of course, I couldn’t just stick with the original pattern, but had to make some alterations. I re-used my altered puff-sleeve pattern from my previous pinstripe Lady Skater and also added a Peter Pan collar as I’m not a big fan of the original t-shirt neckline. For the skirt and collar I used a light grey jersey I bought on sale half a year ago. The bodice was made out of a thrifted Laury Ashley jersey skirt. Normally, I’m absolutely not into floral fabrics, but I somehow fell in love with this one:
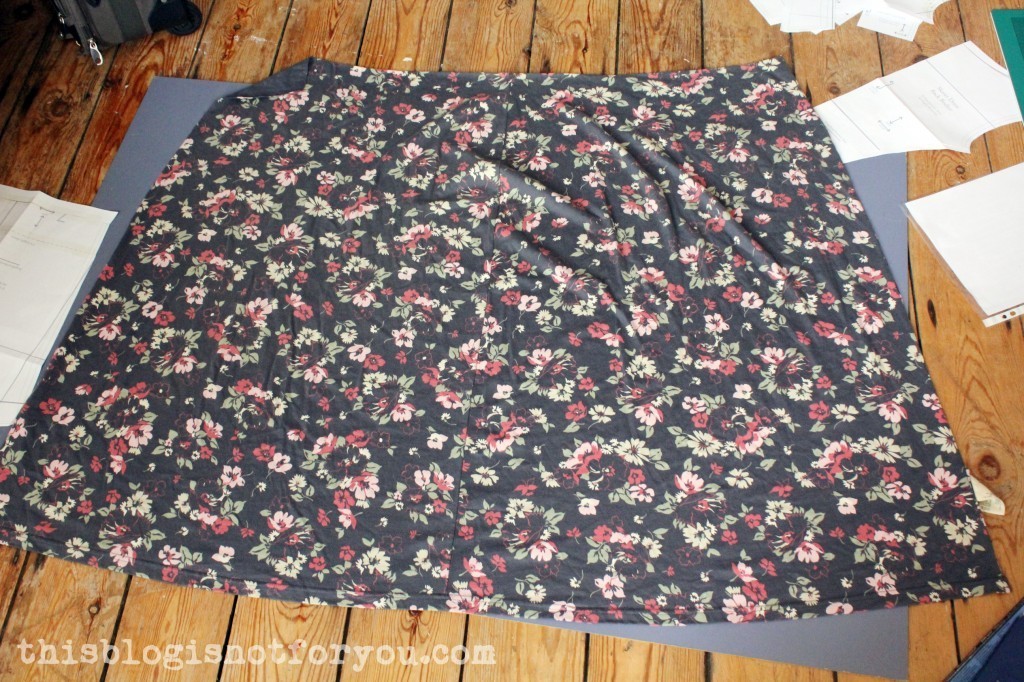
I loved the vintage look of the skirt when I saw it and the Laura Ashley fabric seemed to be of very good quality. I wasn’t sure whether it would be enough, but with a bit of squeezing (and shortening the sleeves) I managed to cut both bodice and sleeves out of it.Here you can see that I had to shorten to sleeves a bit, but I could also re-use the hem of the skirt for the sleeve hems. Pretty convenient :)
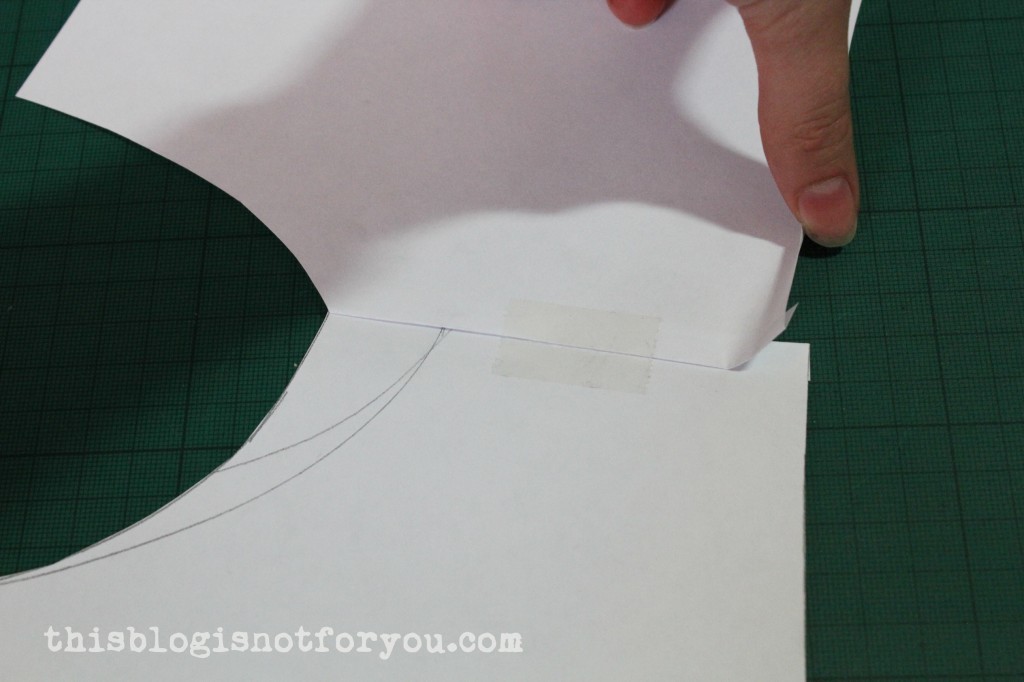
Here’s how I drafted the collar:I taped front and back of the bodice pattern together (folding away the seam allowance) so that they were overlapping a bit on the armhole edge (see below). This way the collar lies flatter.Drafting the actual collar (don’t forget to add seam allowance!):I handbasted most of the seams of the collar before machine sewing them. Parts of the collar are cut on the bias and might stretch and shift, so handbasting seemed like a good idea. I also basted the collar to the dress, turned the raw edges over inside and stitched the raw edges to the dress with a zig zag (which you cannot see from the outside as the seams are covered by the collar). I love my second Lady Skater Dress as much as I love the first one! I wore it already (way too often) over the holidays and in my head I’m already making more!
These pics were taken on one of these days where I was just not in the mood for taking pictures. Do you know these days? Not even my new hair colour seemed to help. Taking pics feeling all of your neighbours are watching you is so awkward!
Well, this is #21 of my 27 Dresses Challenge. #22 is finished, too, but still in need of a lining. #23 might never be finished, but more on that later! xx
Heeeelllo! Hope you all had happy Easter holidays! Mine were awesome and I think I cannot eat any more chocolate for the next few years (I might change my mind by the end of the week). Before travelling to Germany for the holidays, I went konditorn [German for ‘going out to eat confectionary like old ladies do’] with a friend (modelling the necklace above) and when we went shopping afterwards, she dragged me into an Oliver Bonas store. Man, I wanted to buy everything in there, but luckily I was out of money.
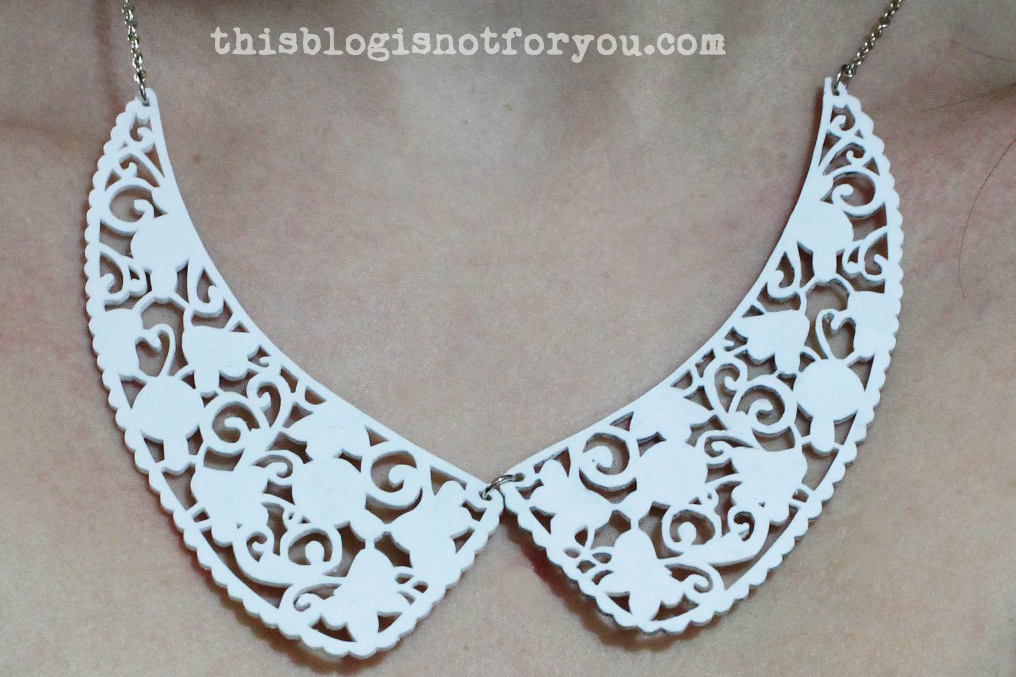
We looked at this Cute Collar Necklace and I mentioned that this could be a cool DIY project. I loved this necklace so much, so I looked it up online and printed it off the same night.Using the printed copy as a template I transferred the shapes (roughly) onto shrink plastic with a pencil (for reference, the picture was printed on A4 paper, the unshrinked plastic is approx. 20cm high).After shrinking the collar pieces are now approx. 11cm. Using pliers I attached the necklace. I joined the collar pieces with a small silver ring.I love this necklace so much, but it was a whole lot of work. Cutting out the collar pieces was the hardest part and my fingers hurt so much, but it was totally worth it (and I saved 34 €).

 I made these cute little earrings and necklace charms for my friend’s birthday. She loves owls and books, so these were the obvious choice!
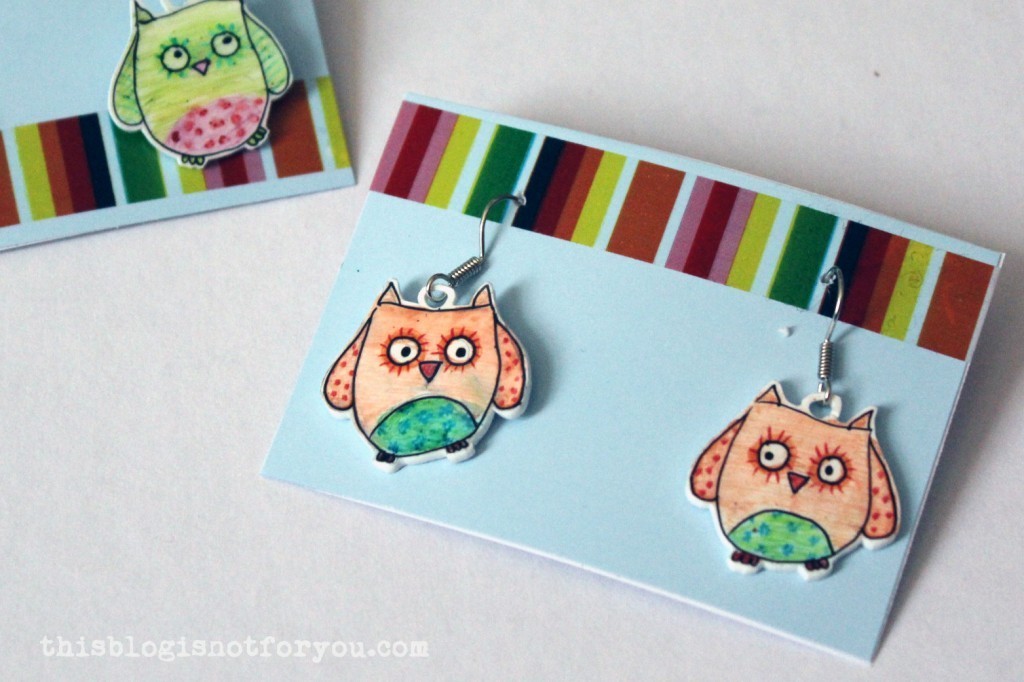
 The shrinkage is about 50%, which you have to consider when you choose the size of your image. You can draw directly on the plastic using a permanent marker. If you want to add colour, you can sandpaper the shrink plastic with very fine (!) sandpaper and then simply use crayons, acrylic paint or water colour. I recommend to keep the finished make from getting wet, as non-water-resistant colours might blur (even after baking the plastic).
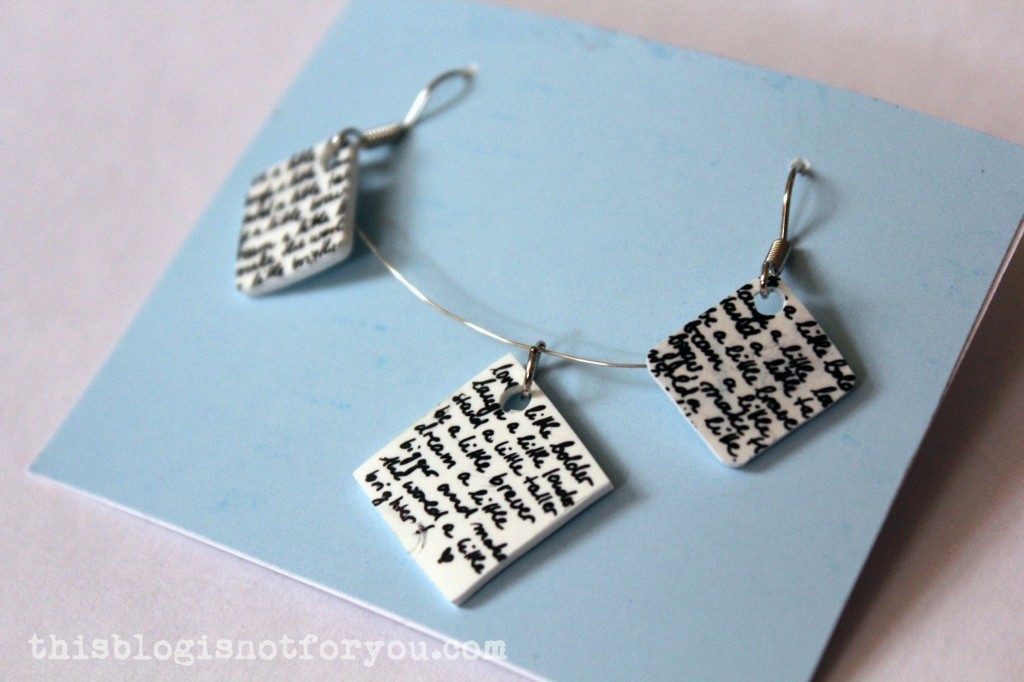
 I made these chevron earrings for myself (I got my friend to wear them for the pic 😉 ).
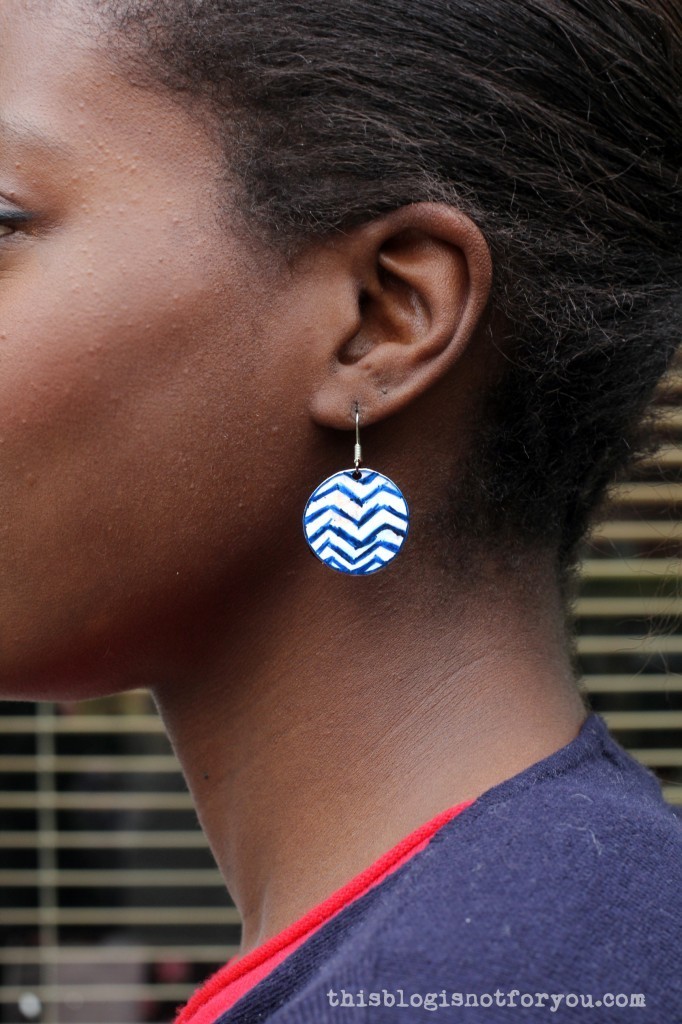 If you like my shrink plastic DIYs, you might want to check these out, too!
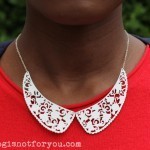


 I have a bit of the fabric left which will be just enough for a little cardigan! I’m also planning on sewing a little slip dress with some black spandex fabric, I’m a bit paranoid about the see-throughness of this fabric. And btw, this is #22 (actually it’s the almost unfinished #23) of my
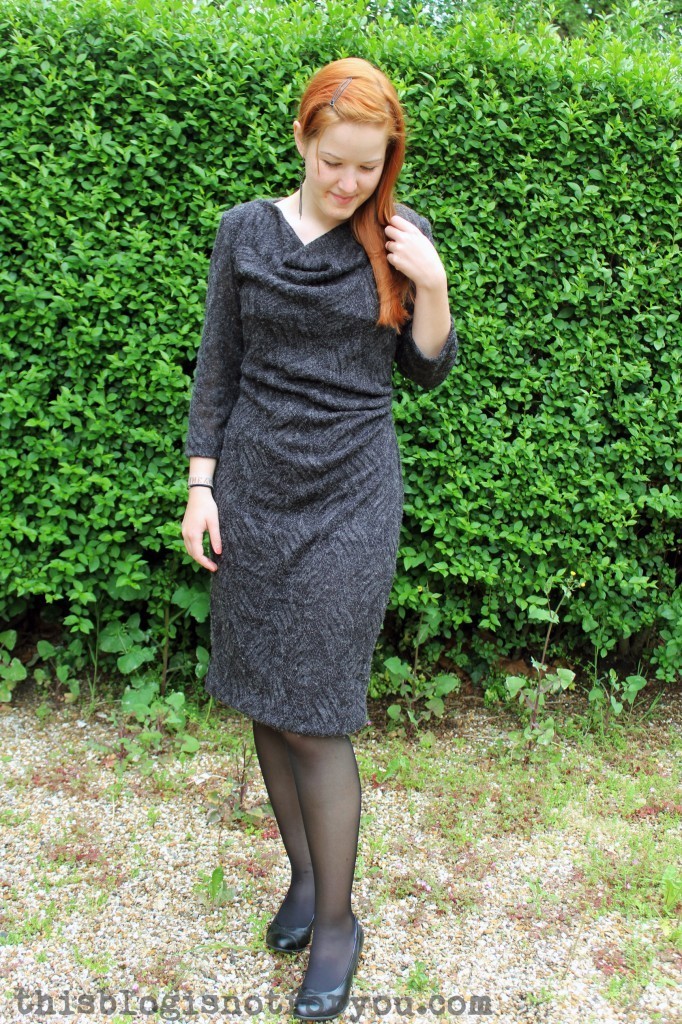
 Today I’m featuring this wonderful navy blue
 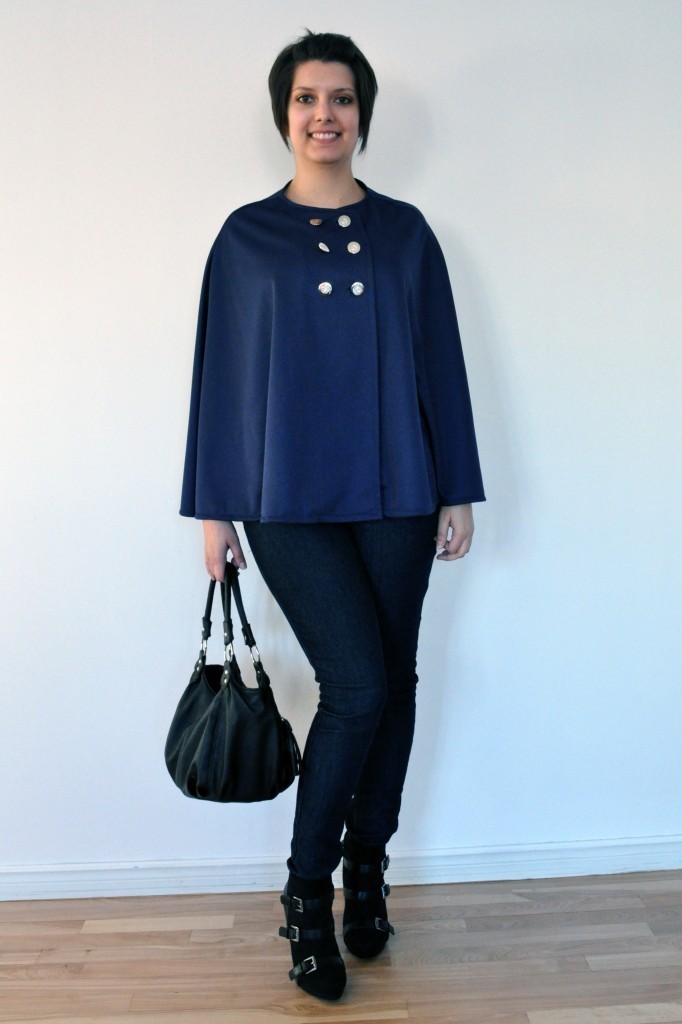 She decided to make the cape without the hood and combined a navy knit fabric with 6 silver buttons.
 I’m in love with this version of the Fairy Tale Cape! It is super elegant and navy blue is my favourite colour! Now I feel the need to make a copy of this version for myself!

 I did it again! I made another version of Kitschy Coo’s Lady Skater Dress! Of course, I couldn’t just stick with the original pattern, but had to make some alterations. I re-used my altered puff-sleeve pattern from my previous
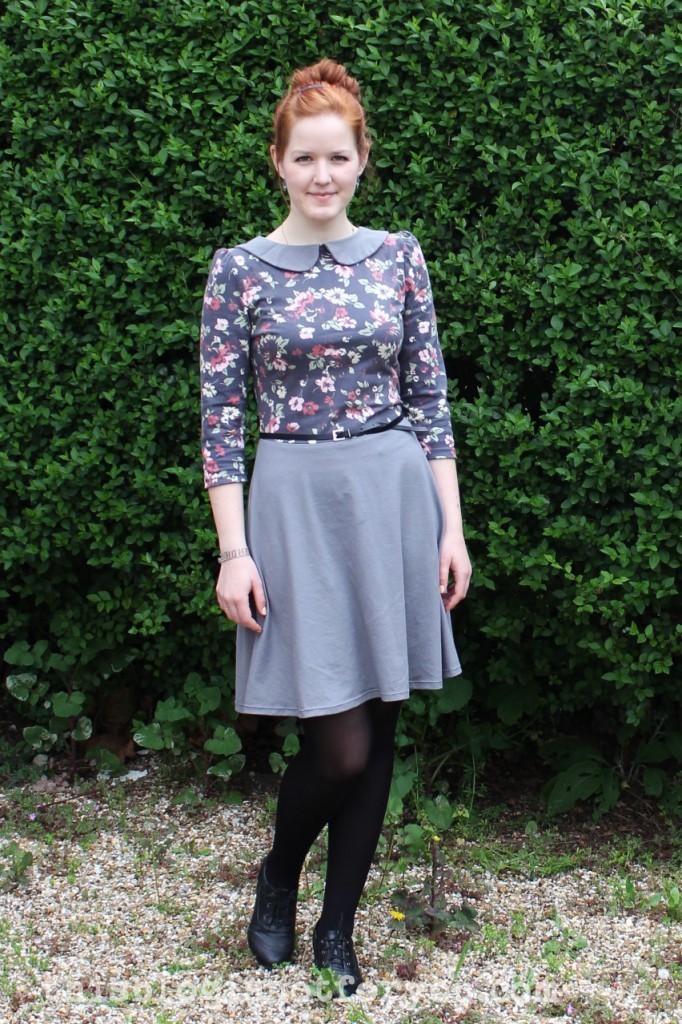
 For the skirt and collar I used a light grey jersey I bought on sale half a year ago. The bodice was made out of a thrifted Laury Ashley jersey skirt. Normally, I’m absolutely not into floral fabrics, but I somehow fell in love with this one:
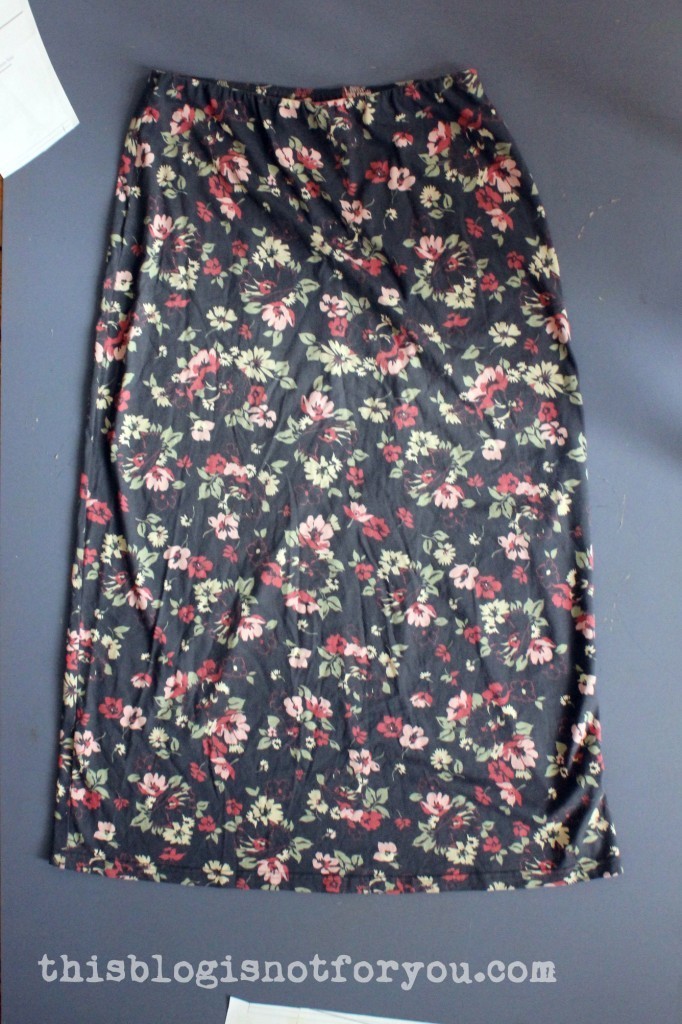
 Here you can see that I had to shorten to sleeves a bit, but I could also re-use the hem of the skirt for the sleeve hems. Pretty convenient :)
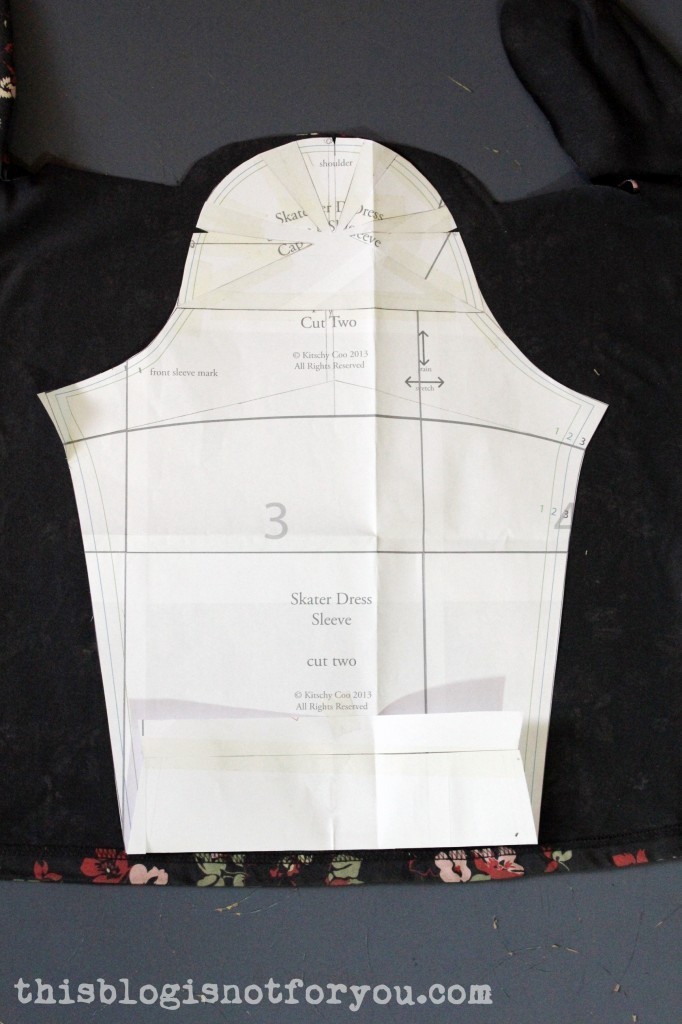
 I taped front and back of the bodice pattern together (folding away the seam allowance) so that they were overlapping a bit on the armhole edge (see below). This way the collar lies flatter.
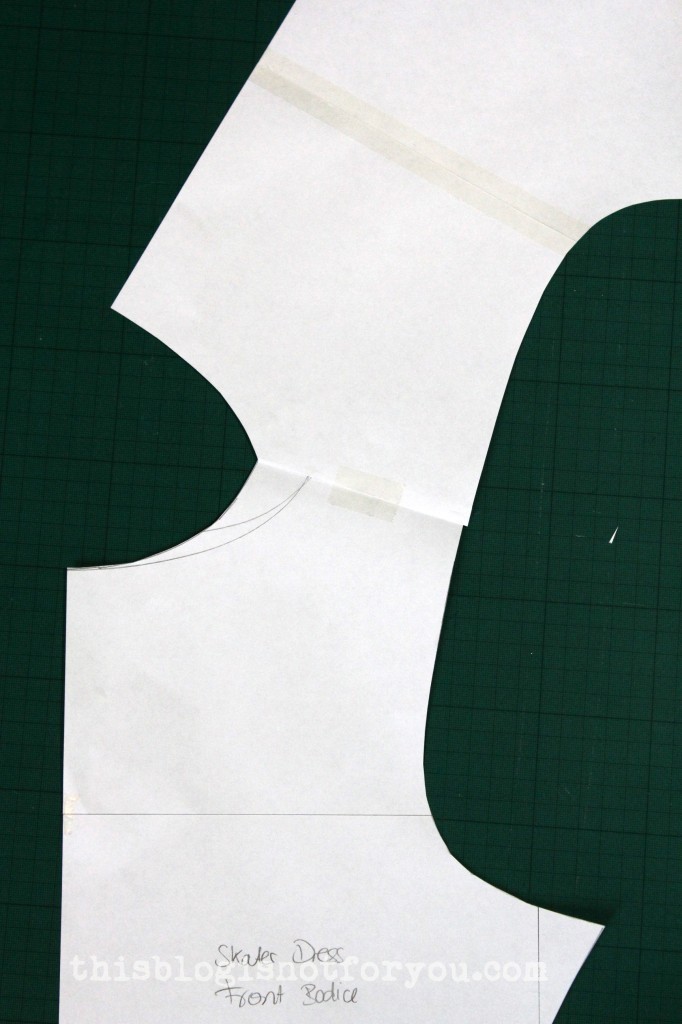
 Drafting the actual collar (don’t forget to add seam allowance!):
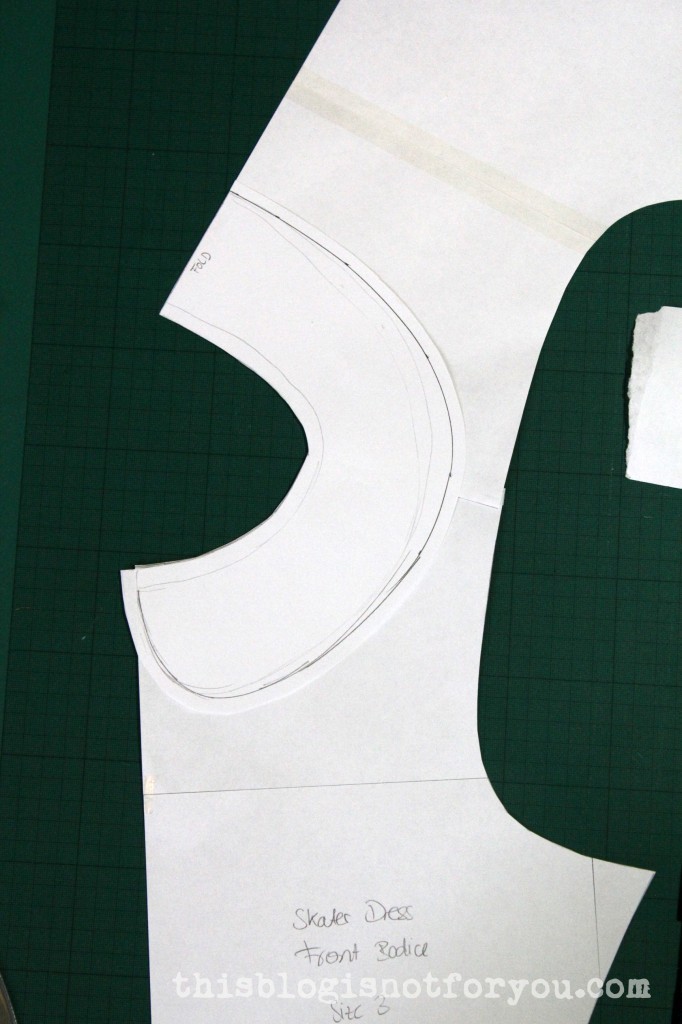 I handbasted most of the seams of the collar before machine sewing them. Parts of the collar are cut on the bias and might stretch and shift, so handbasting seemed like a good idea. I also basted the collar to the dress, turned the raw edges over inside and stitched the raw edges to the dress with a zig zag (which you cannot see from the outside as the seams are covered by the collar).
 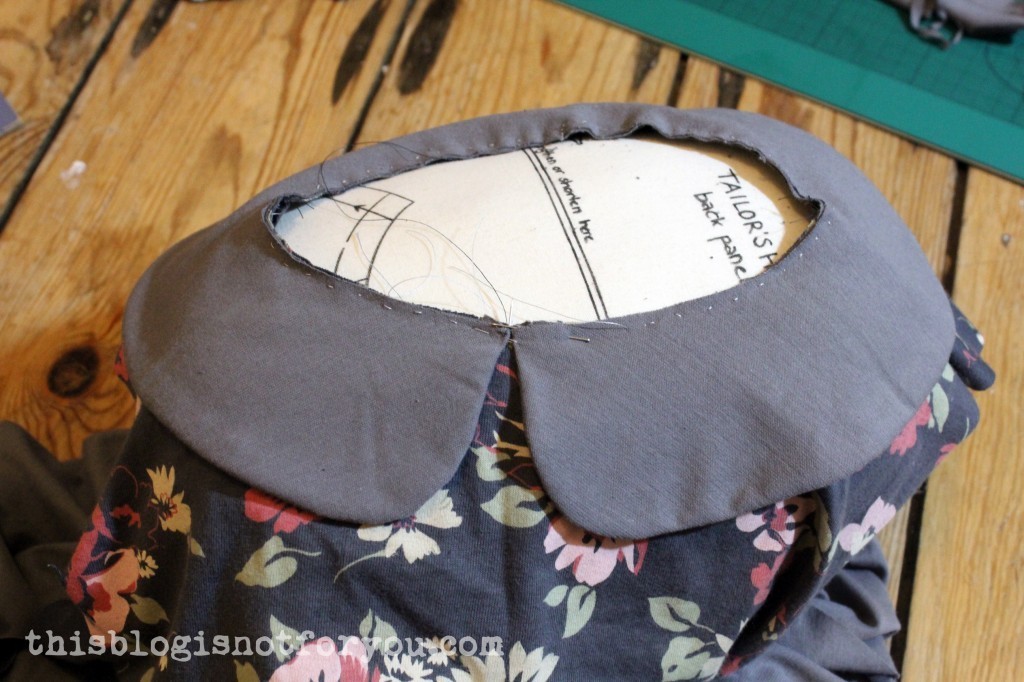 I love my second Lady Skater Dress as much as I love the first one! I wore it already (way too often) over the holidays and in my head I’m already making more!
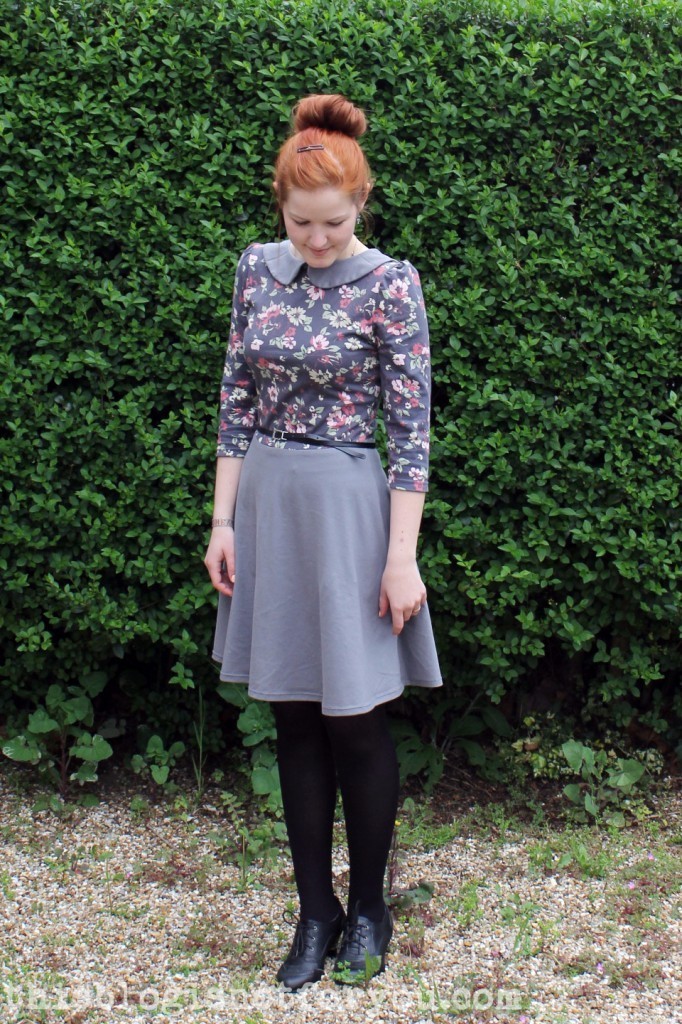
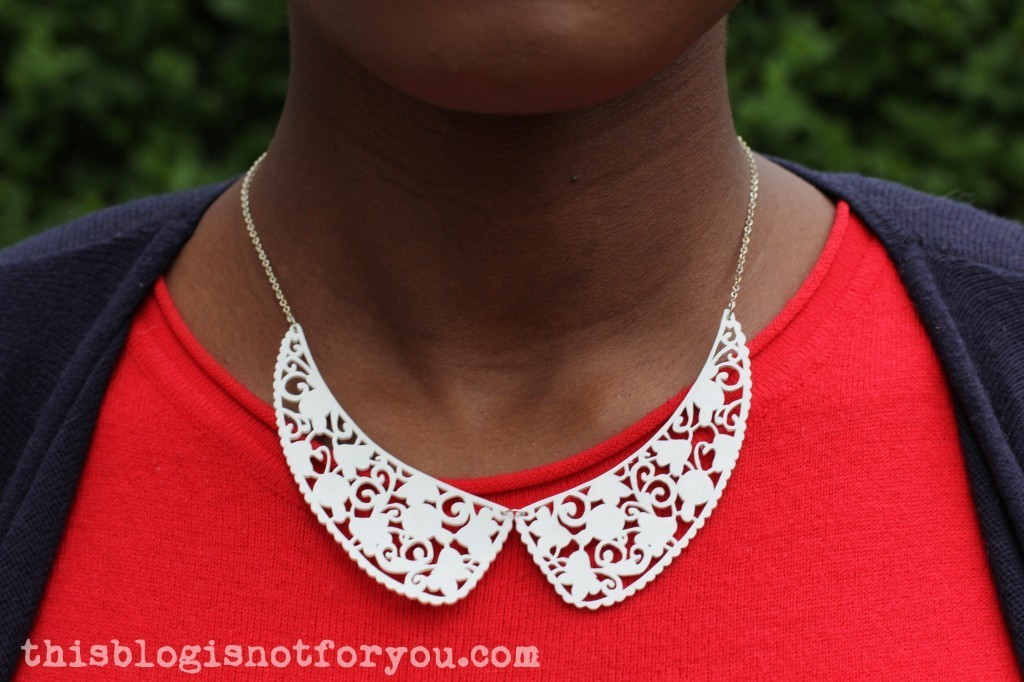 Heeeelllo! Hope you all had happy Easter holidays! Mine were awesome and I think I cannot eat any more chocolate for the next few years (I might change my mind by the end of the week). Before travelling to Germany for the holidays, I went konditorn [German for ‘going out to eat confectionary like old ladies do’] with a friend (modelling the necklace above) and when we went shopping afterwards, she dragged me into an Oliver Bonas store. Man, I wanted to buy everything in there, but luckily I was out of money.
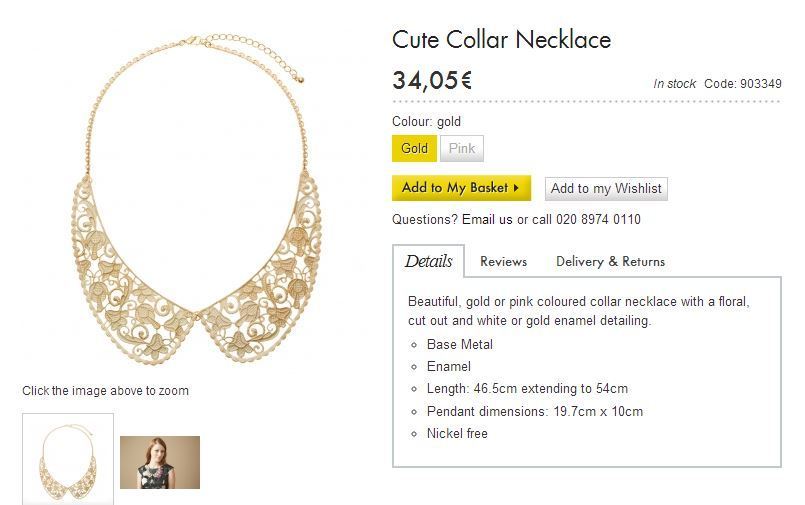 I loved this necklace so much, so I looked it up online and printed it off the same night.
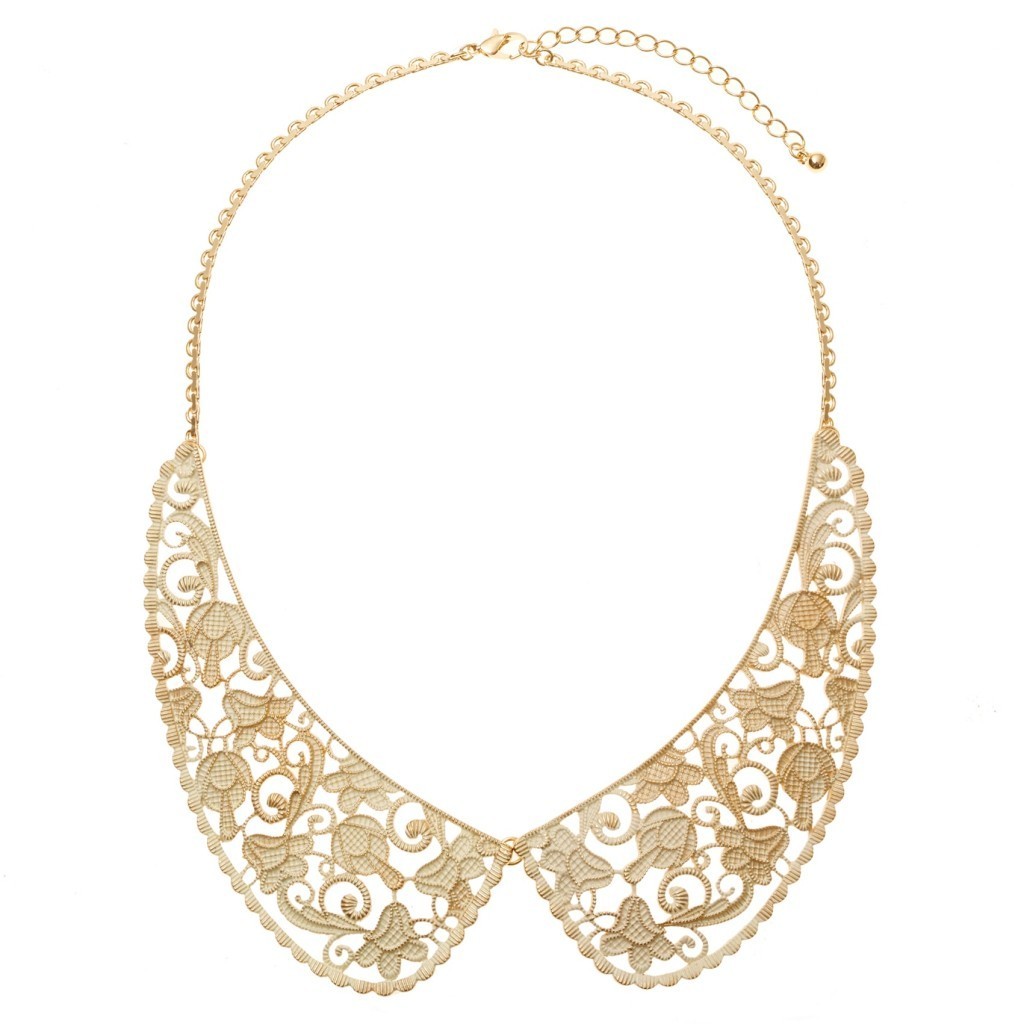 Using the printed copy as a template I transferred the shapes (roughly) onto shrink plastic with a pencil (for reference, the picture was printed on A4 paper, the unshrinked plastic is approx. 20cm high).
 After shrinking the collar pieces are now approx. 11cm. Using pliers I attached the necklace. I joined the collar pieces with a small silver ring.
 I love this necklace so much, but it was a whole lot of work. Cutting out the collar pieces was the hardest part and my fingers hurt so much, but it was totally worth it (and I saved 34 €).