WIN A RUBY RABBIT KIT THIS EASTER WEEKEND! (WOOL AND THE GANG GIVEAWAY!)

Ruby Rabbit WATG by thisblogisnotforyou.com

Ruby Rabbit WATG by thisblogisnotforyou.com

Ruby Rabbit WATG by thisblogisnotforyou.comRuby Rabbit WATG by thisblogisnotforyou.comRuby Rabbit WATG by thisblogisnotforyou.com

RUBY RABBITS

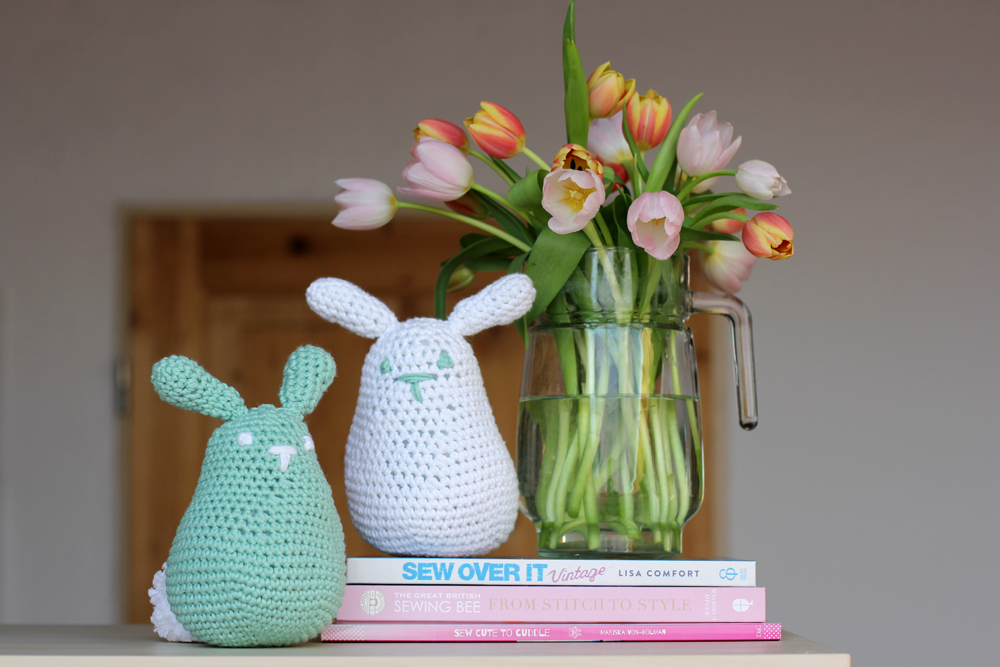
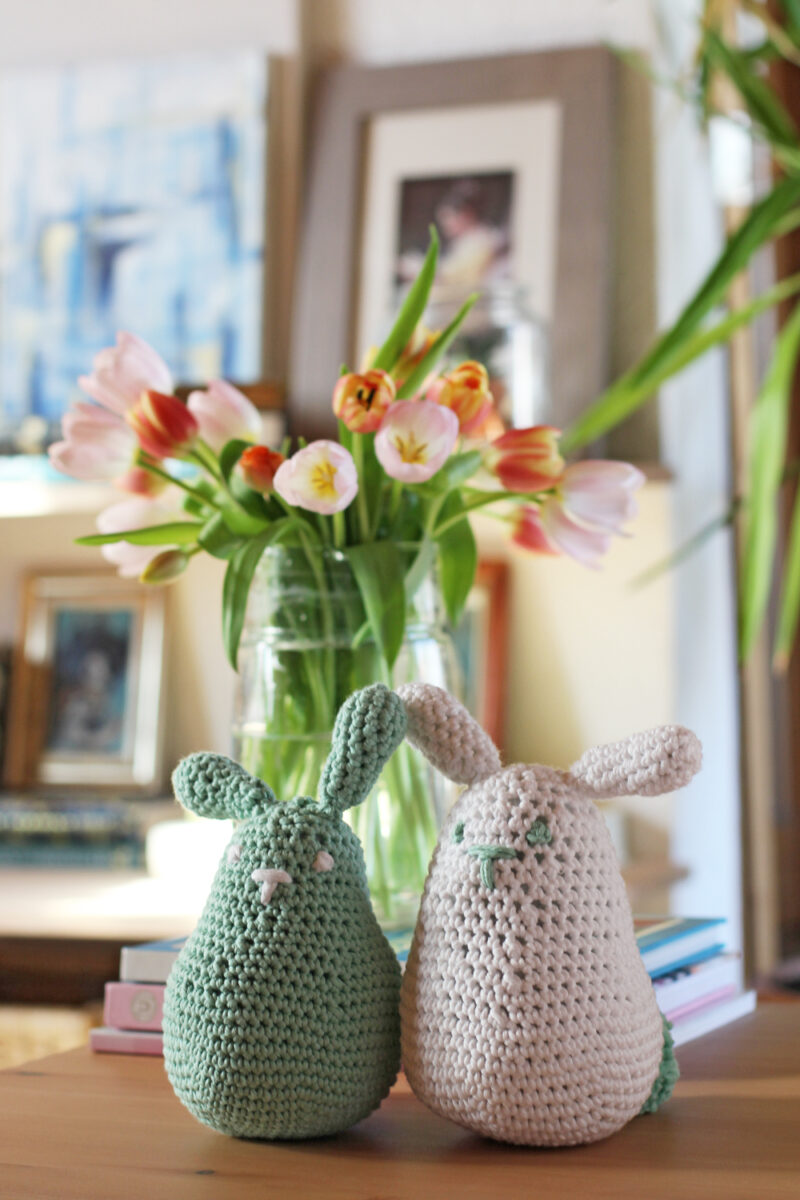
WOOL AND THE GANG sent me some of their Shiny Happy Cotton Yarn to try their Ruby Rabbit Toy kit just in time for the Easter holidays. I’ve never crocheted before, so this was a first for me! I love new challenges and quick DIYs, so this was a perfect after-work project. (All opinions are my own. You can enter the giveaway at the end of the post.)

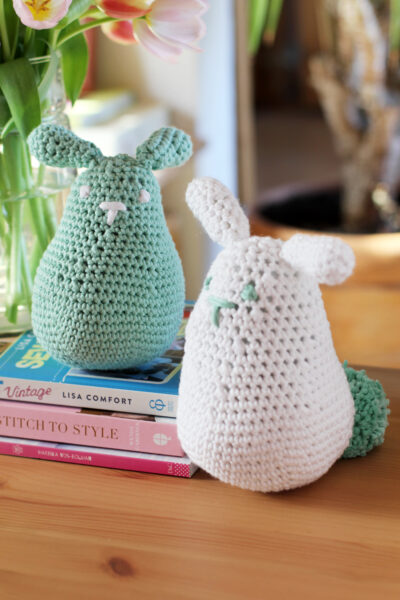
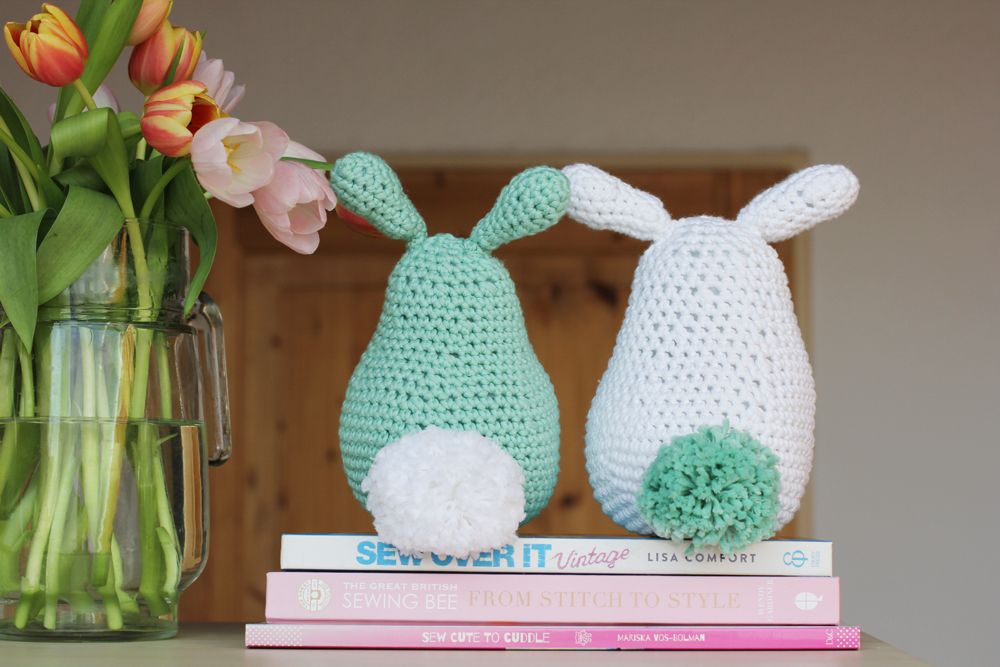
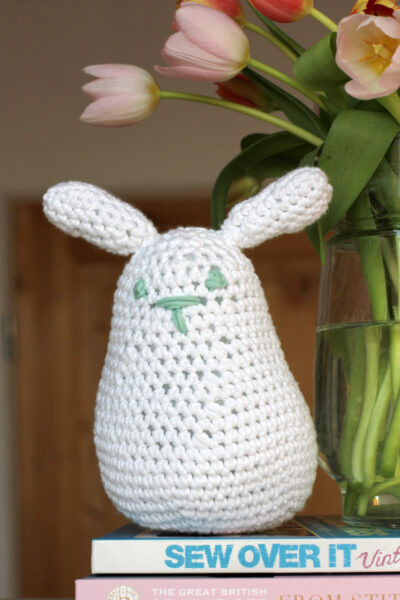
It took me two evenings in total and I was surprised how successful my first dabble at crocheting was! I made the white bunny first. If you look closely, you can see it’s a bit larger than the mint green one and somewhat wonky – but all in all, I’m really pleased with how it turned out.

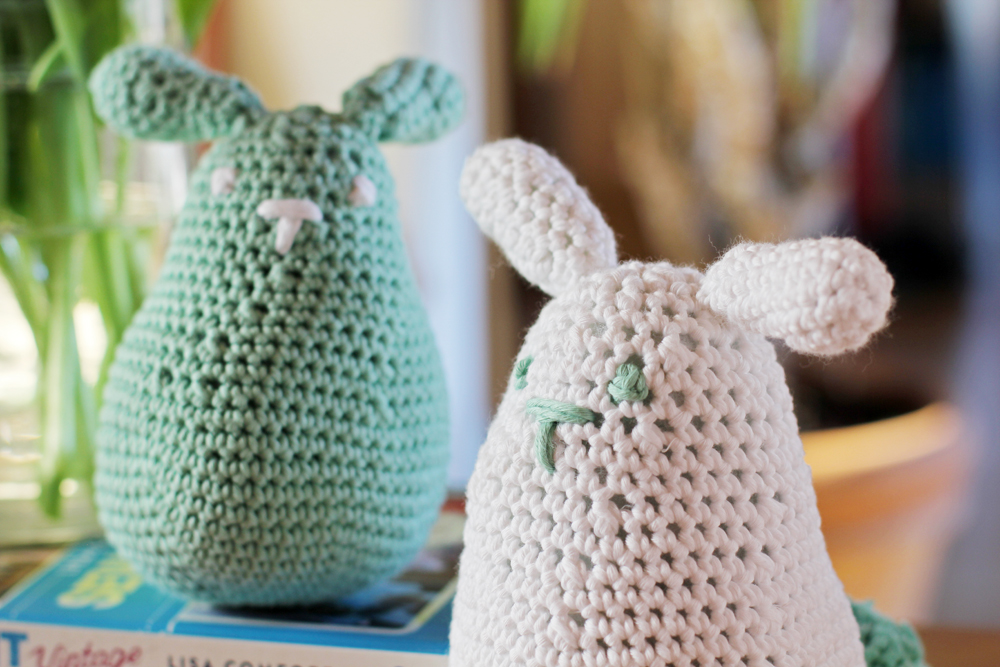
I chose the spearmint green Shiny Happy Cotton, as I love pastel colours in my home. The wool is lovely and soft to touch, and has a silky shine to it. It’s perfect for those amigurumi-type projects, as it’s absolutely lint-free. I always wanted to try amigurumi crochet toys, but thought it was super difficult. After finishing two perfectly cute bunnies with no prior experience whatsoever, I might actually attempt this some time soon!

Ruby Rabbit WATG by thisblogisnotforyou.com

Ruby Rabbit WATG by thisblogisnotforyou.com

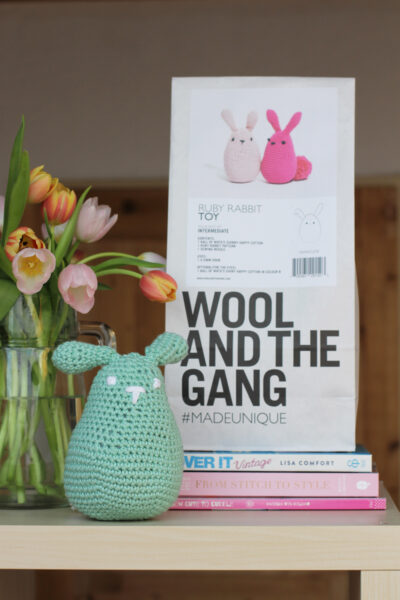
The kit is rated ‘intermediate level’. The instructions include illustrated basic crochet techniques, which was really helpful. The only thing I had to look up was the magic loop technique. I do have quite a bit of experience with knitting, so learning to crochet wasn’t too difficult. But in my opinion, even an absolute knitting and crocheting beginner could tackle this.

The only thing I struggled with at first was tension, which is why my bunnies are different sizes.

The kit includes one ball of Shiny Happy Cotton (colour of choice), the ruby rabbit pattern, a yarn sewing needle and a WATG label. Optionally, you can order the required 4.5mm crochet hook with it and a different colour yarn for the eyes. I used less than one ball of yarn for each rabbit, and had more than enough left to use for the eyes and nose. So if you order two balls, you get two rabbits out in the end. You’ll need some toy stuffing or yarn/fabric scraps to stuff the rabbit. I used stuffing from an old pillow.

RubyRabbit (2)photo credit: Wool And The GangRuby Rabbit WATG by thisblogisnotforyou.com

photo credit: Wool And The GangRuby Rabbit WATG by thisblogisnotforyou.com

Ruby Rabbit WATG by thisblogisnotforyou.comRuby Rabbit WATG by thisblogisnotforyou.com

WIN A RUBY RABBIT KIT THIS EASTER WEEKEND!

To have a chance at winning a Ruby Rabbit kit in your colour of choice, just head over to Woolandthegang.com to check out the color options. Leave a comment below, letting me know which one you like best and head over here to sign up to the WATG newsletter!

The giveaway closes on Tuesday 18 April 2017 at midnight (UTC) and I’ll annouce the winner shortly after on the blog.

Also, you can use the promo code “EASTERX” to get 15% off until next Tuesday!

GOOD LUCK & HAPPY EASTER!

xx

Charlie

Please note: A winner will be selected at random from all entries entered before midnight on 18 April 2017 and the winner will receive the prize described above. There is no cash alternative, and your prize is non-negotiable, and not refundable. If the prize isn’t claimed, another winner will be selected at random.


Happy Easter!

facebook/bloglovin/pinterest
twitter/instagram

Stay in touch!

Honeymoon Maxi Dress

Chiffon Maxi Dress by Thisblogisnotforyou.comChiffon Maxi Dress by Thisblogisnotforyou.comChiffon Maxi Dress by Thisblogisnotforyou.comChiffon Maxi Dress by Thisblogisnotforyou.comChiffon Maxi Dress by Thisblogisnotforyou.comChiffon Maxi Dress by Thisblogisnotforyou.com (Click through for more pics and info!)

Chiffon Maxi Dress by Thisblogisnotforyou.com

Chiffon Maxi Dress by Thisblogisnotforyou.comChiffon Maxi Dress by Thisblogisnotforyou.com

  GOODBYE SUMMER

Before this blog fills up with autumn makes and lush wool fabrics, I need to share this last summer make with you! I made this dress for our honeymoon in Sardegna, Italy.

Although this dress is far from perfect and not exactly how I envisioned it, I’m really pleased with it and loved wearing it on holiday. Since we’ve been back from our trip, it has been hanging in the closet, though, waiting for summer to return next year.

I drafted the pattern myself by copying a RTW mini summer dress I liked the fit of. Copying the pattern was quite easy and the cut was rather boxy and simple. I had this really beautiful and delicate bird print chiffon in my stash. I knew it would be quite see-through even with the lining, so I decided to use a lot more fabric for the skirt, cutting a wider skirt and thus, adding more gathers. This helped with the transparency, but I have to admit that it’s not the most flattering silhouette – and it’s a lot warmer, as well.

Apart from this, I really love it, although the sewing process didn’t go as smoothly as I hoped. By copying the pattern, I somehow lost about 5cm of shoulder strap length – I have no idea how that happened. And I didn’t notice until I tried the fully-constructed bodice on – lining understitched an all. The fit was horrible and it took me a while to get behind the reason for this. The bodice was sitting way too high, too tight around the bust and the armholes were also too small! There was no way I would’ve deconstructed the whole thing again and I would’ve lost a lot of skirt length by cutting out a new bodice. I was forced to get creative, which is how this awesome criss-cross shoulder strap detail happened. I basically cut the bodice at the shoulder seams and inserted the missing 5 cm of length by adding four tiny straps to each side.

Chiffon Maxi Dress by Thisblogisnotforyou.comChiffon Maxi Dress by Thisblogisnotforyou.comChiffon Maxi Dress by Thisblogisnotforyou.comChiffon Maxi Dress by Thisblogisnotforyou.com

The dress is lined with some ivory tricot fabric. The skirt a very simple shape, no gathers or even darts. It hits mid-thigh, with is a lot shorter than I usually wear, but the long layer of chiffon keeps it quite decent-looking.

The chiffon skirt is basically just two large rectangular pieces sewed together at the side seams and gathered into the waist. I used my rolled-hem foot to hem the skirt. Initially, I wanted to make a floor-length maxi skirt, but I didn’t have quite enough fabric so now it’s a midi rather than a maxi length.

You see, there have been a lot of changes and some frustration in the process of making this dress. In the end I somehow managed to turn it into something wearable I really like.

So all’s well that ends well.

I wore the dress on a little trip through town, shopping at the local market. They even had some really lovely haberdashery on display!

Chiffon Maxi Dress by Thisblogisnotforyou.comChiffon Maxi Dress by Thisblogisnotforyou.comChiffon Maxi Dress by Thisblogisnotforyou.com

Chiffon Maxi Dress by Thisblogisnotforyou.com

Chiffon Maxi Dress by Thisblogisnotforyou.comChiffon Maxi Dress by Thisblogisnotforyou.com

These rather bumpy projects can be the most valuable! Mistakes don’t have to become failures. They can push us to be more creative.

Do you have any sewing fails that you managed to turn into something beautiful?

xx

Charlie


Happy sewing!

facebook/bloglovin/pinterest
twitter/instagram

Stay in touch!

High-waisted Ultimate Trousers

high-waisted Ultimate Trousers by thisblogisnotforyou.com (Click through for more pics and info)high-waisted Ultimate Trousers by thisblogisnotforyou.comhigh-waisted Ultimate Trousers by thisblogisnotforyou.com

high-waisted Ultimate Trousers by thisblogisnotforyou.com

  ROCKS AND ANCHORS

I’ve been looking forward to sharing these pics with you since we got back from holiday. We took them on our last night in Sardinia at the beach of our hotel where we pretty much spent most of our time. Compared to the previous post (we took the pics on the second day of our trip) I got quite a tan in just a week! I hadn’t been to South Europe in a couple of years and after living in England I forgot how easily I tan.

I love these trousers! You know I’m a big fan of Sew Over It’s wardrobe staple patterns such as the Ultimate Pencil Skirt or the Ultimate Trousers. As much as I love the trousers and their fit, I always had issues with how low they sat. Without a waistband (the orignal pattern has a facing) they get stretched out quite easily and sit very low which isn’t very practical at work, as I sometimes play with kids on the floor and don’t want my backside to hang out.

I had plans to raise the waist and add a waistband after seeing Lisa’s numerous, beautiful versions of high-waisted Ultimate Trousers. I found the perfect fabric, a stretch-denim with an anchor print just before the holiday in a fabric shop near Munich. I made up a muslin ad raised the waist by 10cm which turned out alright, but I lowered the waistline a few centimetres again as it was a tad too high. I love the look with this pair, but I might lower it just a tiny bit more for the next pair, which I plan to make from a very busy print.

high-waisted Ultimate Trousers by thisblogisnotforyou.comhigh-waisted Ultimate Trousers by thisblogisnotforyou.comhigh-waisted Ultimate Trousers by thisblogisnotforyou.comhigh-waisted Ultimate Trousers by thisblogisnotforyou.com

high-waisted Ultimate Trousers by thisblogisnotforyou.com

high-waisted Ultimate Trousers by thisblogisnotforyou.comhigh-waisted Ultimate Trousers by thisblogisnotforyou.com

high-waisted Ultimate Trousers by thisblogisnotforyou.com

I really dig the raised waist hack of this pattern, it’s just so different from most RTW styles out there. The only downside is that it’s not the most figure flattering style – I’m certainly not a size zero but also not very big, but still you can see every lump and bump, especially with the tshirt tugged in. So after a week of feasting on Italian food pretty much non-stop, it wasn’t the most comfortable outfit to wear! But I loved it anyway – and who cares about a pizza-and-pasta-bump. It was absolutely worth it.

Oh, and I have to mention the hat – just because it’s fabulous! Especially since it’ll make another appearance in the next post as well. I’m so in love with this hat I can’t tell you. I always wanted one just like it, but never cared to buy one, because you don’t simply strut around with a hat like that unless you’re Audrey Hepburn. Right before our trip I went shopping for sunglasses and came across this hat at C&A (large German department store) and thinking of lying at the beach, sipping cocktails and nibbling olives I had a massive urge to just grab it, pay whatever they asked for (which luckily wasn’t much) and run with it. Which I did. I wore it every day on holiday, which makes up for the next few months where it will sit on my closet un-used, because – let’s be realistic – I won’t be wearing it unless I’m sitting on a beach in Italy somewhere. So that’s my excuse for that many cheesy sunhat pictures. high-waisted Ultimate Trousers by thisblogisnotforyou.com

high-waisted Ultimate Trousers by thisblogisnotforyou.com

high-waisted Ultimate Trousers by thisblogisnotforyou.comhigh-waisted Ultimate Trousers by thisblogisnotforyou.com

So what’s your favourite wardrobe staple pattern that you love to hack over and over again?

xx

Charlie


Happy sewing!

facebook/bloglovin/pinterest
twitter/instagram

Stay in touch!

The Valentine’s Day Alternative

the valentines day alternativeI don’t need Valentine’s Day to tell you “I love you”.

Ever thought of that?

Valentine’s Day is coming up. Obviously. Once you leave the house and step into a store, there’s hearts & chocolates & kitsch & millions of shades of pink and red everywhere.

Today at the supermarket I saw people swarming in front of a rack full of Valentine’s Day gifts, grabbing tacky stuffed animals, overpriced boxes of chocolates and all sorts of pink knickknack.

A lot of people make desperate efforts to find something they can buy and give their loved one’s. What for? Expressing how much you love a person through giving them a card and a box of chocolates?

Sure a sweet card and chocolates is a nice thing to get once in a while, but I think the best gift one can give is to make time for someone. The more, the better.

Valentine’s Day will be a Thursday and Thursday is always one of the busiest days of my week. (I’m probably not the only one! 🙂 ) But that doesn’t bother me at all.

Why not simply ignore all the commerce and “peer pressure” and pick another day? Pick a day when you have time for more than just rushing to the pizza place around the corner.

Do something fun and memorable and most of all, spend time together.
And then, try doing this once a month.
Maybe Valentine’s Day helps as a reminder to take some time and spend it with our loved ones, but we definitely don’t need it to tell someone “I love you”.

i dont need valentines day2