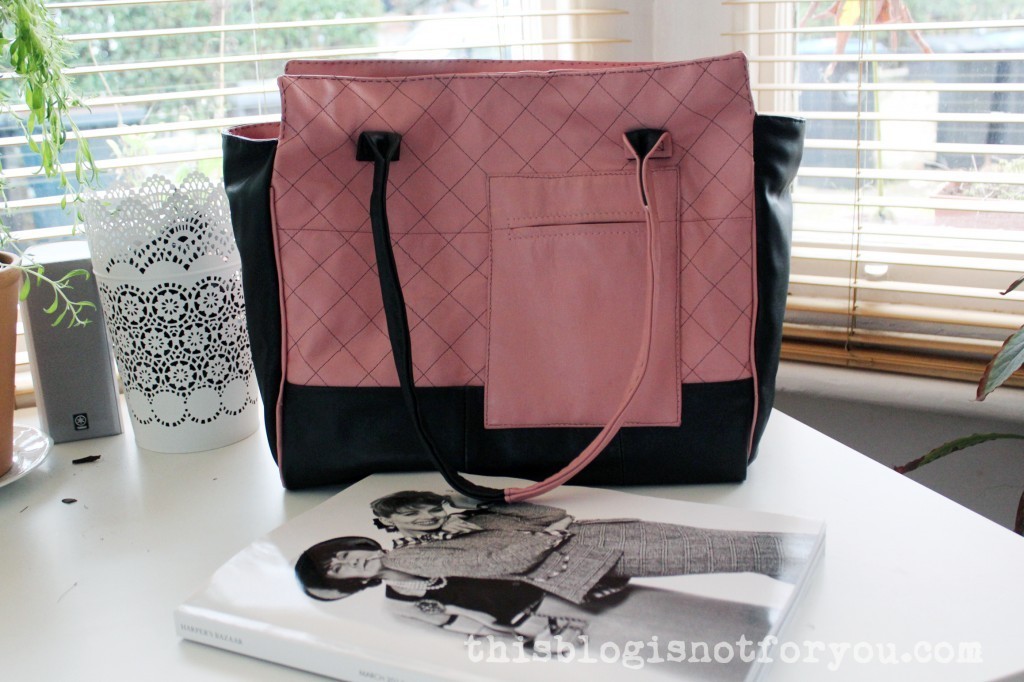
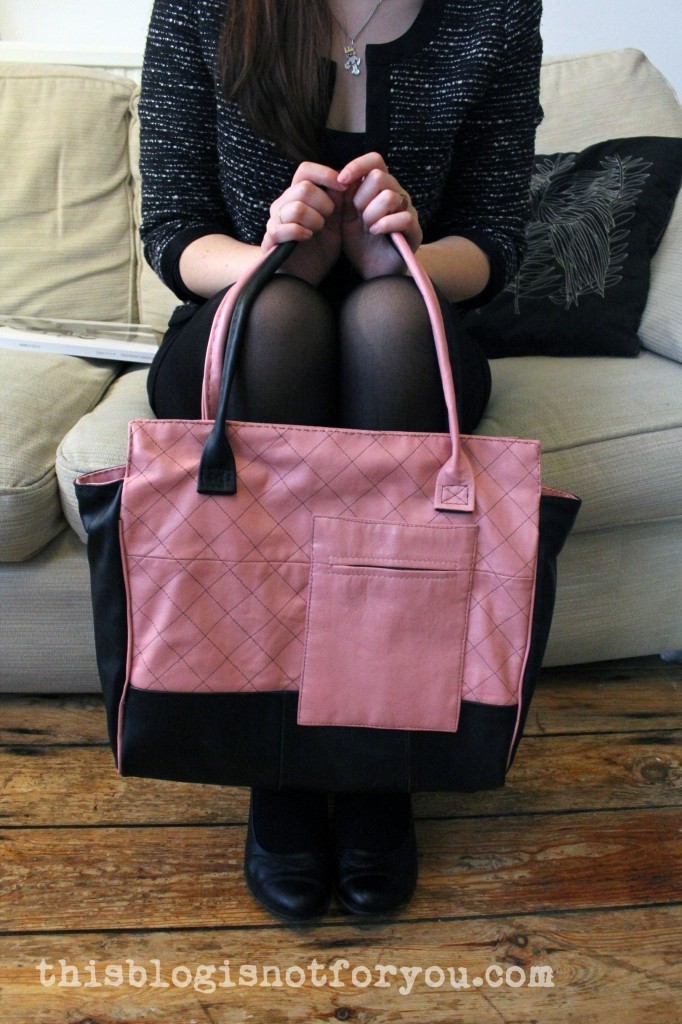
After weeks of hurting fingers, broken needles and a lot of frustration, I finished my leather coat refashion. The outcome? A leather bag!
It was certainly not an easy and quick refashion project, that much I can tell you. Especially since it was my very first time sewing with real leather (rant ends here).
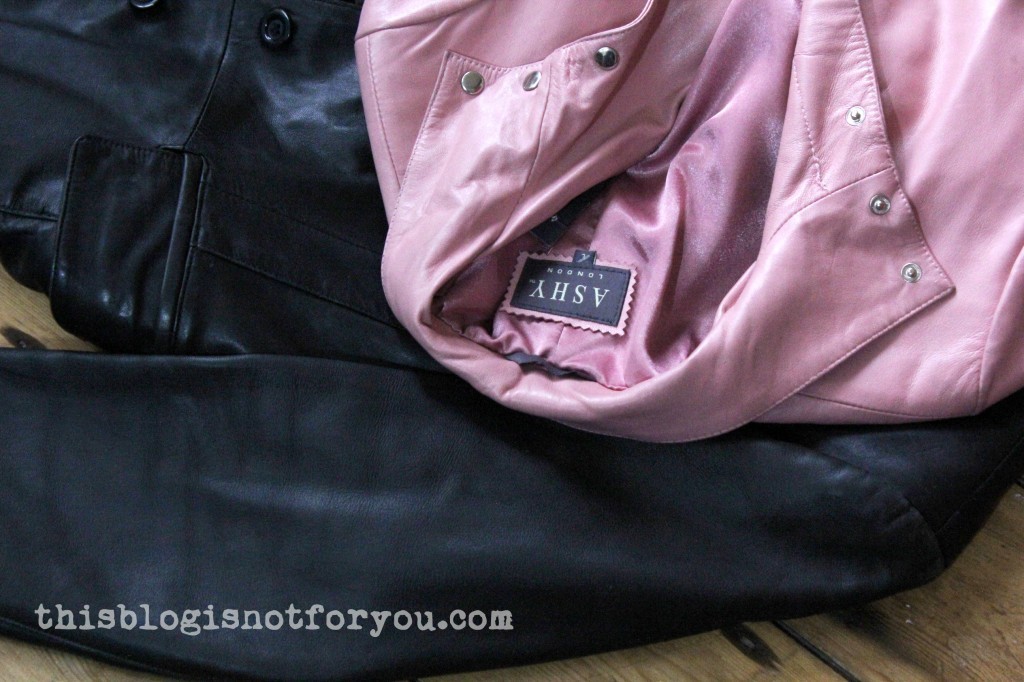
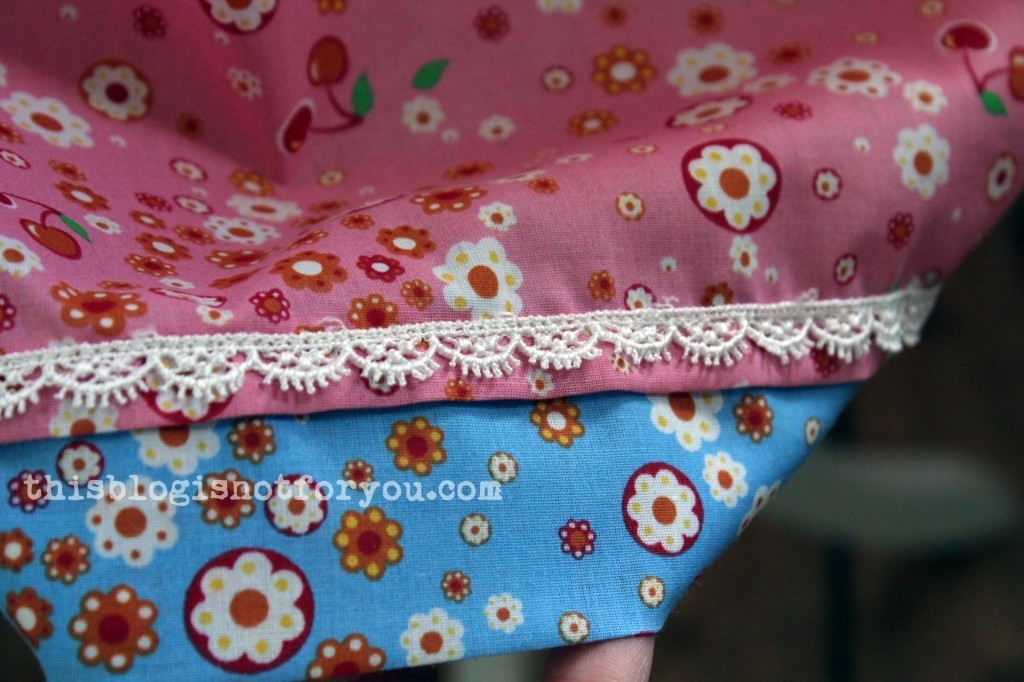
I found these two beauties in a thrift store a few weeks ago (6 pounds each!):
(Is there a tree in my flat? Sort of.)
Quite a bargain! The coats are way too big for me, so there was plenty of leather and lining to use. For making the bag I only used the bottom leather panels of both coats and some of the lining from the pink coat.
I made the pattern for the bag myself and, as you can see, found a way to recycle the patch pockets of the pink coat. I love that the bag is big enough to carry a binder around (Not that I do that every day, but whenever I need to take one with me I realise that none of my bags are large enough.) The bag unfortunately doesn’t count into my 27 Dresses Challenge (ohhhh….) and it’s also not for me to wear. SO WHAT’S THE POINT OF GOING THROUGH ALL THIS?
I made the bag for my little sis’ birthday (Yes, I must love her very much). I’m not really the pink bag type of girl, but she loves everything black and pink. Hopefully, it doesn’t fall apart, hehe. The bag was shipped off to good old Germany yesterday and hopefully won’t get lost on the way (I still don’t trust Royal Mail.)
I won’t post a tutorial on making the bag, but I have taken quite a lot of pictures during the process. So keep your eyes peeled for a making-of post in the next couple of days. I will then also post some pics of the innards and details! If anyone is interested in the pattern of the bag, leave me a comment. If there are a few of you who would like to try and make the bag without proper instructions, I might post the measurements of the pattern pieces.
FYI, my fingers stopped twitching over the weekend (Gosh! I was getting really concerned!) – I’m now fully recovered from the leather disease, yay! But I have plenty of leather left and already way too many ideas for further projects. So this definitely wasn’t the last time you see me masochistically tormenting my hands like this!
Happy week everyone!
♥
PS: There’s still plenty of time left to join our Hollywood Sewalong!!
PPS: Who’s watching the Sewing Bee? Some seriously cool refashions this week!
Hellooo all you sewing and vintage lovers! I’m so excited about this post!
A Sewalong!A Sewalong series!A Hollywood movie themed Sewalong series!
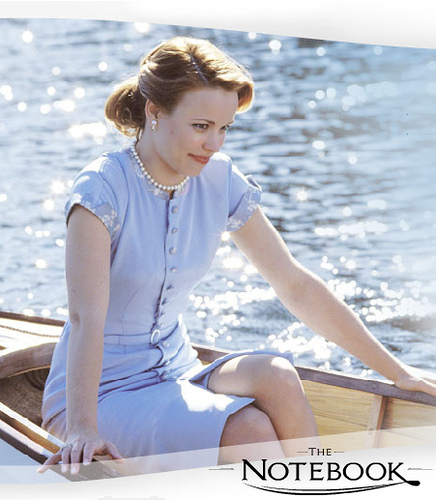
After some months of emailing ideas back and forth, me and some other lovely sewing friends teamed up for a Hollywood movie themed Sewalong. Our first Sewalong movie is “The Notebook”. Love it or hate it, but the outfits worn by the character Allie Hamilton (Racheal McAdams) is just too adorable.
We will all sew something inspired by the 1940’s fashion in the movie. With ‘inspiration’ being the operative word. That means we can recreate one of the outfits into detail or do something completely different and just using small details, fabric or colours as inspiration.
Over the next couple of months we will post our inspiration from the movie, ideas and plans about patterns or fabrics and then, of course, our final pieces.
I personally love the cut and shapes of the 1940’s, the typical ‘wartime silhouette’. Fashion seemed to be much more practical back then, compared to ten years later, in the 50’s, with all these petticoats and bell-shaped skirts. Women’s fashion also looked a bit more masculine, which you can also tell by all these shirt dresses in the movie.
Alrighty, let me show you some of my favourite outfits from the movie. I loved almost all of them, so it was really hard to narrow it down. I decided to pick the ones that inspired me to sew something the moment I saw them. As much as I love recreating something into detail, I’m pretty sure that I will try myself at a very modern take on one of these dresses:
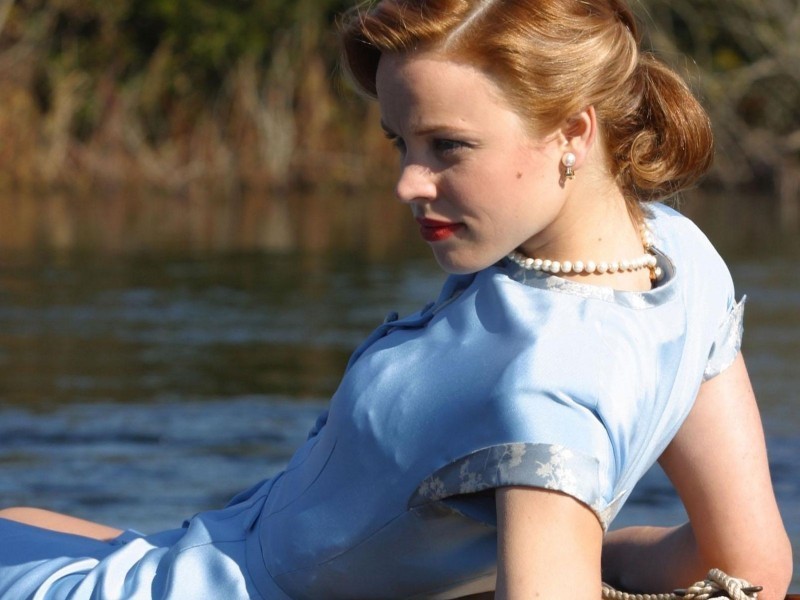
Yeeeees. Of course. The obvious dress inspiration from this movie. And no, Captn Obvious didn’t put me off. It simply is one of the most beautiful dresses from the movie and probably also the garment that gets most on-screen time, which is great for studying details. I love the button-down front, the lace details at the sleeves and the tiny matching belt. Light blue is definitely not my colour, but I think the cut and shape would look great in a more modern take of this dress.
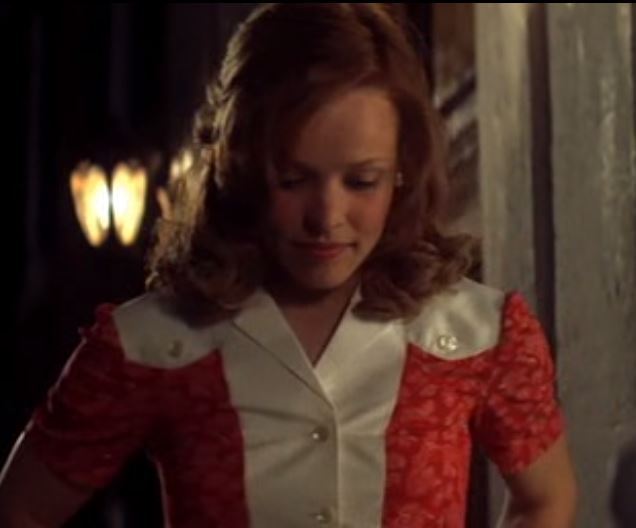
I love this mini shirt dress – or is it a jumpsuit? I’m not quite sure, but I would love it as a jumpsuit. It gives me plenty of inspiration to work with!
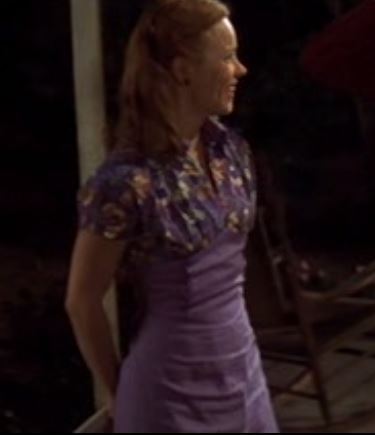
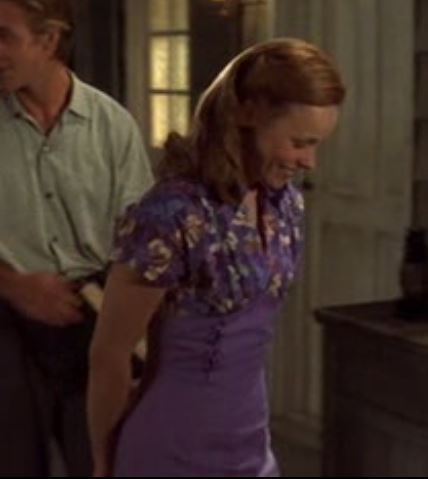
I looove this cute little number. Not because of the colour (not a big fan of purple), but the cut in the front is so adorable. Unfortunately the dress has very little on-screen time and it’s really hard to find proper pictures. I can definitely see a very modern version of this dress.
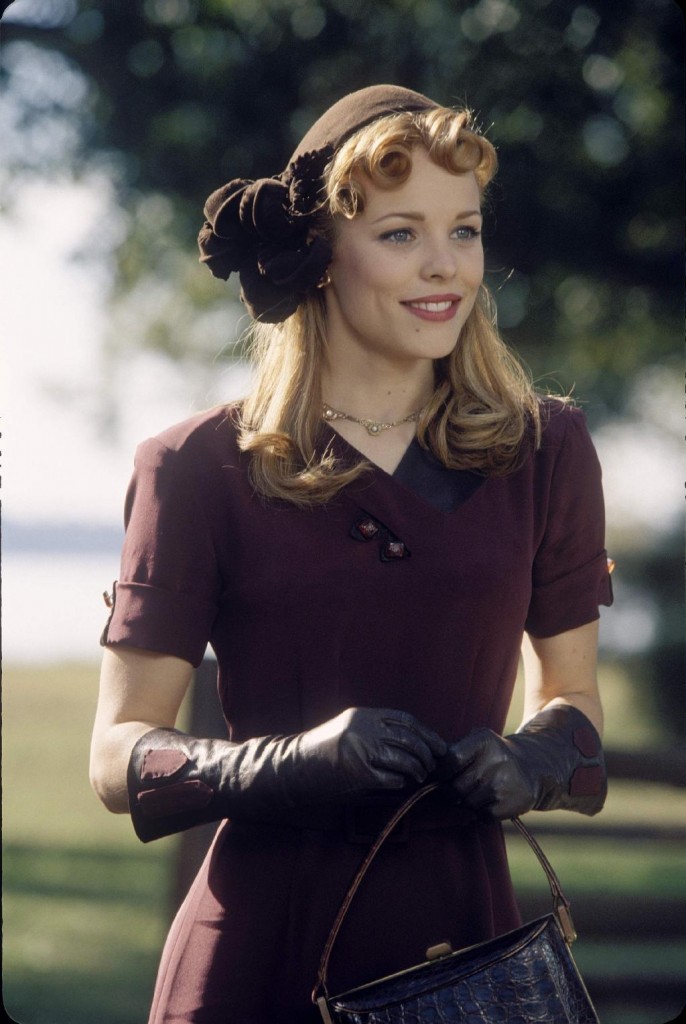
Well, this is just Beau-Ti-Ful. Love the colour, love the neckline. And the matching gloves are amazing!
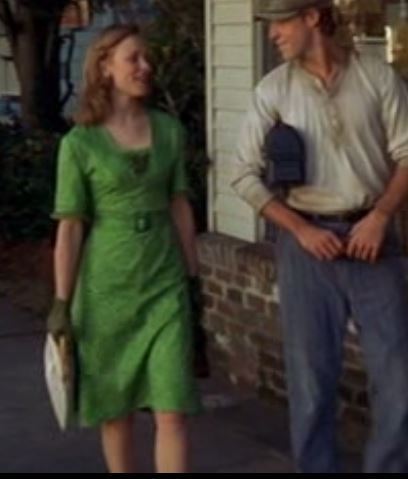
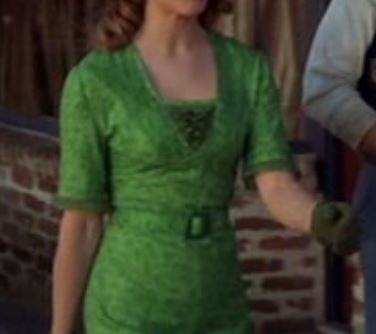
4. The green dress
screenshotscreenshot
This dress is just super simple but very chic. I love the length of the skirt and sleeves and the ruffles under the v-shaped neckline are a cute detail.
So…..what will I do now?
I have no clue, but there’s plenty of inspiration to work with, that’s for sure! So stay tuned and keep our eyes peeled for the next post coming next month.
In the meantime, we would love for you to join us and take part in the Sewalong!
Part 2 will be posted on April 7th when it’s time to share the inspiration we have decided on and some behind-the-scenes pictures and information of our makes!
The final garment will be posted on May 5th!
If you want to join, grab our button (see right-hand sidebar!) and start sewing! Don’t forget to sent us links/pictures of your make as we would love to feature it as part of our Sewalong series!
Three weeks ago I sewed with real leather for the first time. And after three weeks, that brief affair is coming to an end. Two souls alas! are dwelling in my breast.
At first I loved leather. Leather smelled good. Leather looked fancy. Leather liked me. Cutting through leather was such a joy.
And then I began sewing. Marilyn* doesn’t like leather. It’s sticky (imagine going down a slide with naked buttocks, not that I have tried this!) and it’s hard to sew through when you have more than three layers. I ended up having to sew A LOT of seams by hand. Not that I don’t like that in general. I love me some monotonous hand sewing after a stressful day! BUT. Sewing leather by hand is NOT fun. After three weeks my fingers hurt. My wrists hurt and the index finger and thumb on my right hand have been trembling and twitching uncontrollably for the last three days.
Last but not least, being almost done with the project, the leather ripped. I HATE YOU LEATHER. I thought it might be the real thing, but you do nothing but causing me pain.
Well, I have plenty of leather left and some really cool projects planned with it. But my hands need some time to recover. In the meantime, I thought I could ask you guys to flood me with tips and tricks about sewing with leather.
I use a leather needle and embroidery thread and sew the leather sandwiched between two sheets of tissue paper in order to feet it through my machine. I glue a lot of seams before I sew it, since pinning is not an option.
Are there more tricks? Are there special presser feet that are good for sewing with sticky materials? Do you have to add interfacing to all seams to prevent ripping? (I saw that was done in the coat I recycled but couldn’t be bothered to do that myself.)
I’m actually surprised that my cheapo-AEG sewing machine survived the whole thing since she can be quite a diva (I still adore you, Marilyn!).
So what are your experiences sewing with leather? Is it easier to work with faux/PVC leather?
Do you know any good blog posts or other online sources that have helpful information on sewing with that tricky bastard? Any help much appreciated.
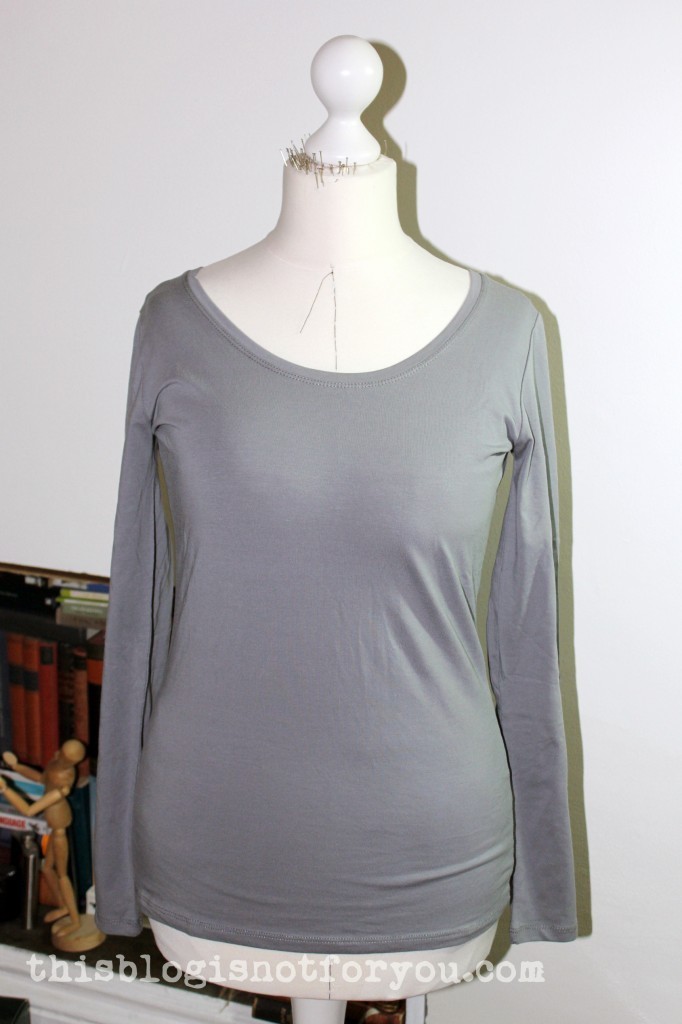
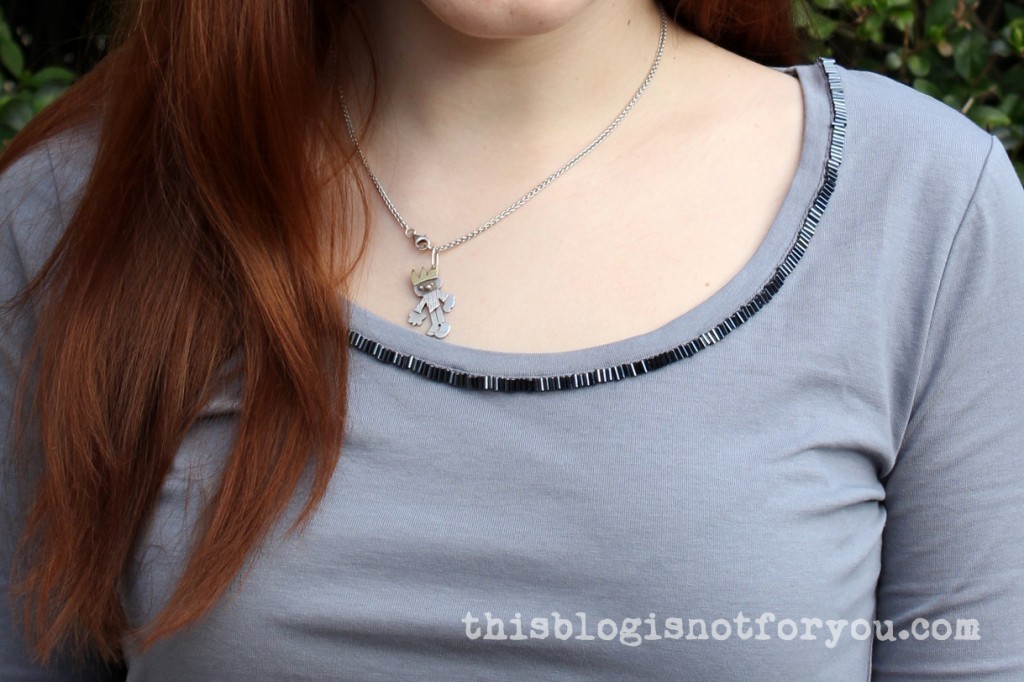
I managed to squeeze in a refashion project in my crazy busy week. While watching one of the most brainless shows on German television (it was a thursday night, guess what it was 😛 ) I embroidered the neckline of a simple grey tee I bought for £3.50 at Primark.
As you know, I don’t go clothes shopping anymore since I prefer to re-/upcycle or sew things myself. Occasionally, I go and buy a pile of basic shirts to wear under my sleeveless dresses, though. I just did this last week and bought grey, black and navy longsleeved tees.
I love wearing these and thought about how to make them look a bit more chic without overdoing it, since they will be worn underneath most of the time. Because the neckline is often still visible, I decided to use a few tube beads to embroider the neckline.I used greyish-blue tube beads and sewed them onto the topstitching of the neckline binding. I didn’t sew the beads onto the binding itself, since I thought they might be too heavy for the light stretch fabric, pulling it down with the result of the neckline gaping open.
I didn’t use one continuous thread, but knotted it off after every 10cm/4” or so. In case the thread should break, I won’t have to redo the whole thing.
It took quite some time.(Cough – three hours – cough!) Somehow everything I sew takes at least twice as long as I thought it would – can anybody relate to that or am I the only one underestimating the time factor?
I love my new shirt. It definitely doesn’t look like it was just £3.50, so the time was absolutely worth it. Sometimes it’s really some small touches that make a garment work.
If you are into embroidery – here are some of my other projects you might like:
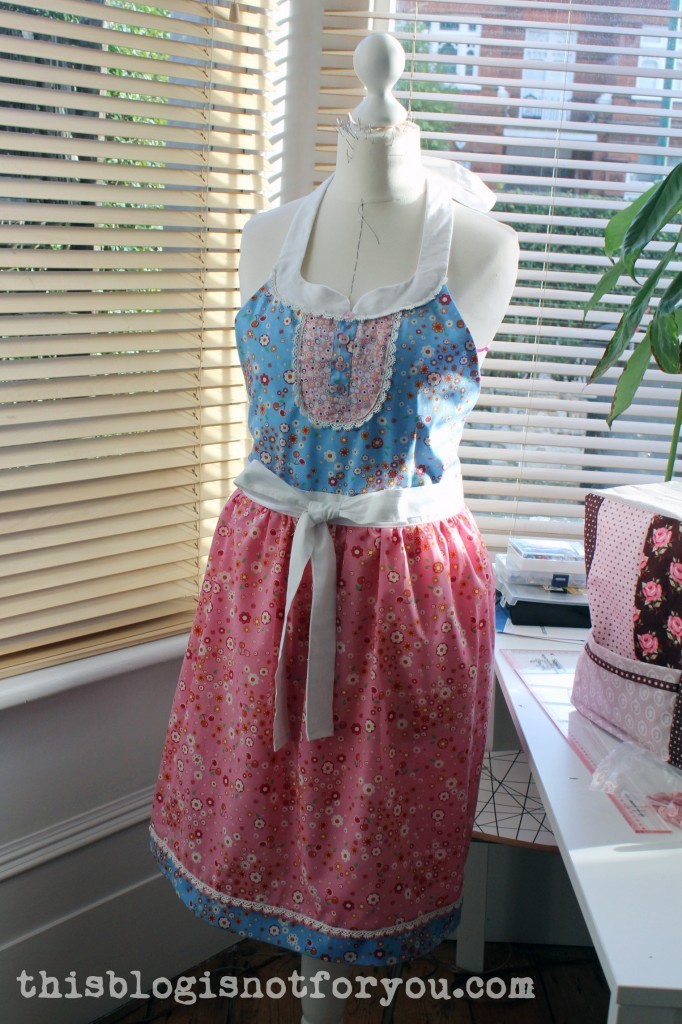
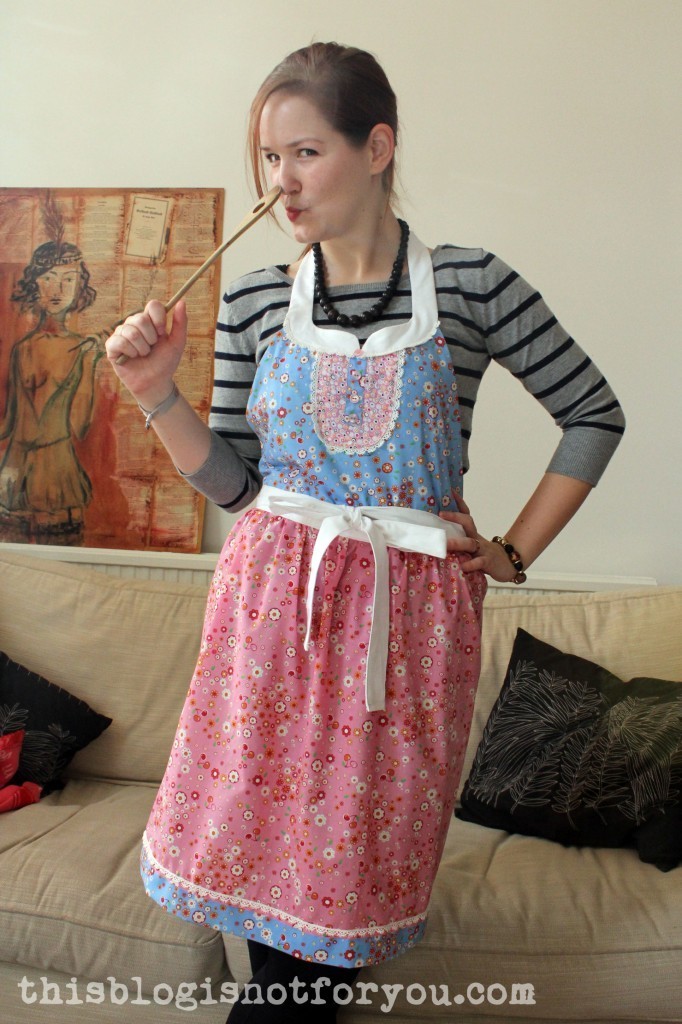
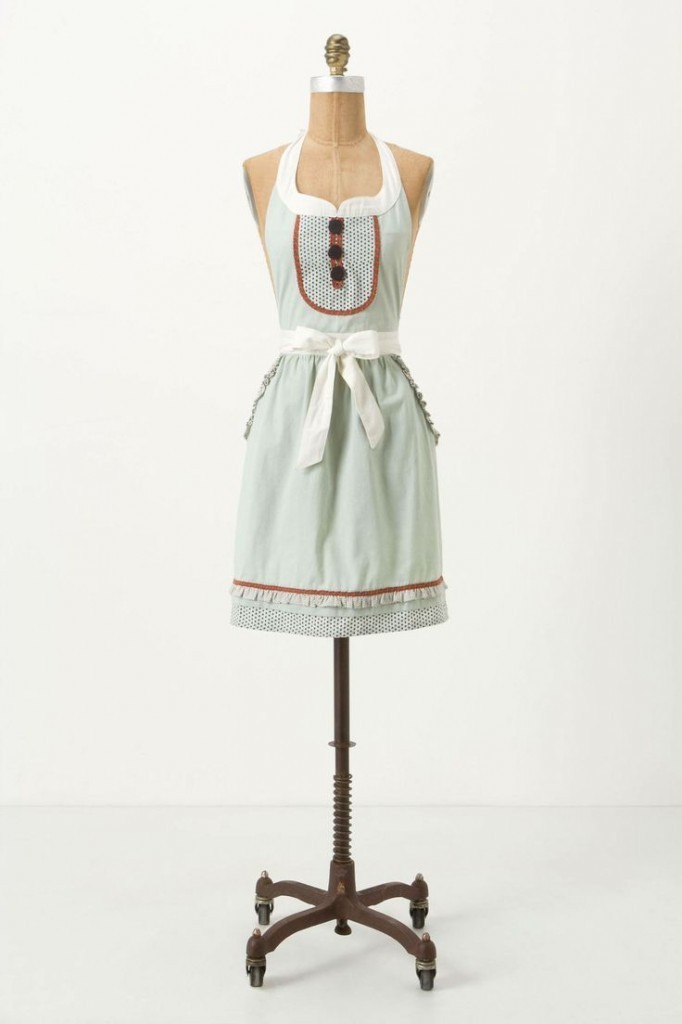
After being a bit ill (and lethargic, blogging-wise) I finally managed to write up the ‘tutorial’ for my Anthro-inspired apron. I use quotation marks because I realised that I actually didn’t take quite as many pictures of the process as my busy brain had imagined. Oooppsi.
Well, think of it as an entertaining collection of commented making-of pictures. You will surely unterstand the process, since it’s really not that complicated. Think as if you had to sew with Burdastyle pattern instructions – at least I have pictures 🙂
First of all, I chose suitable fabric. (Obviously.)
It wasn’t quite as easy as it sounds, since I have many leftover fabric pieces in different sizes, colours, styles. When using fabric scraps you should map out what goes where before you start cutting to make sure you have enough fabric. (Ask me how I know this!)
I pinned different fabric combinations on my dressform, which helped a lot with figuring out the ‘design’. (And no, I didn’t like the neon-cupcake version.)
Anthro-version
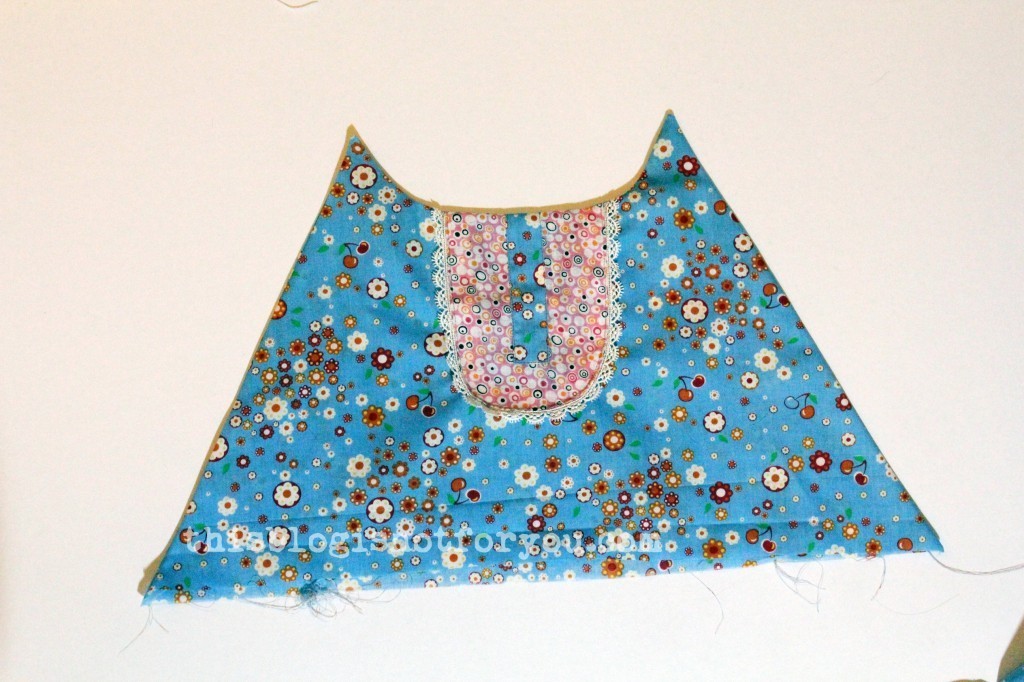
After choosing my fabrics, I used some black tape (you can also use ribbon and pin it) to mark the lines of the apron on my dressform. Alternatively, if you do not have a dressform, just draw it on paper and use it as a pattern piece. (It’s a kitchen apron, so don’t worry about the perfect fit too much.) I tried to make it very similar to the Anthro-version, as I really loved the shape of the neckline.Pinning my fabric (wrong side up) on my dressform, I traced the marked neckline with tailor’s chalk.
I cut out two pieces, one for lining the bodice (yes, even a kitchen apron appreciates lining). FYI, the side seams of my bodice meet the waistband about 1inch/2.5cm behind where your side seams normally would be (hope that makes sense). So the bodice part of the apron hugs the body and fits more snugly.
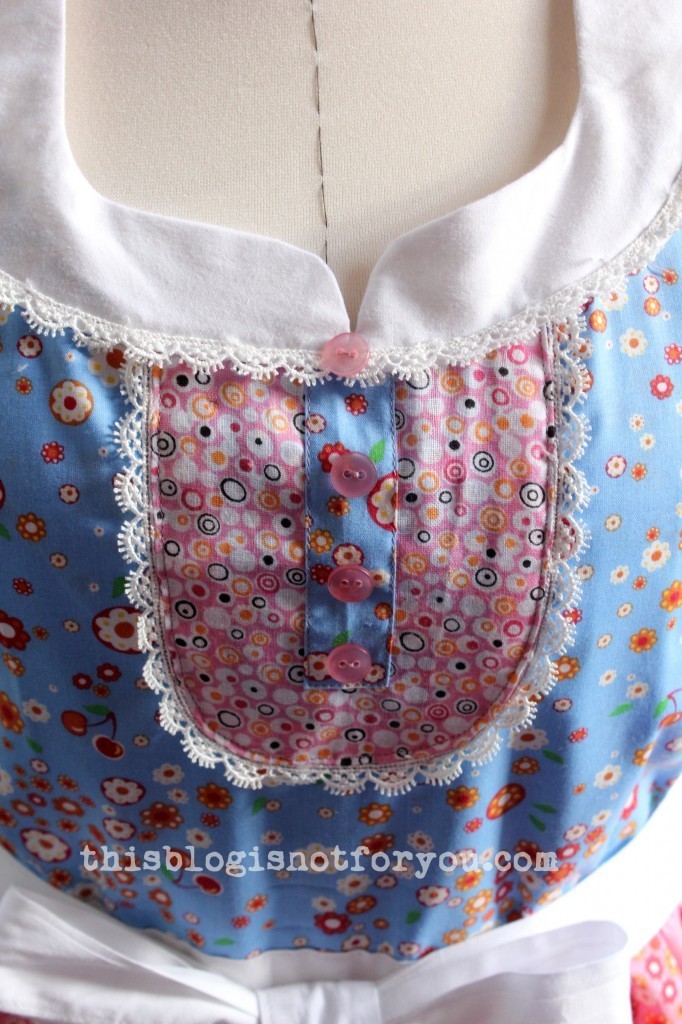
Before sewing together the two bodice pieces, all embellishments need to be applied first to get a neat finish.
I cut out a bib (don’t forget the seam allowance!).I marked the center on the bib (and also on my bodice piece) with a small notch.
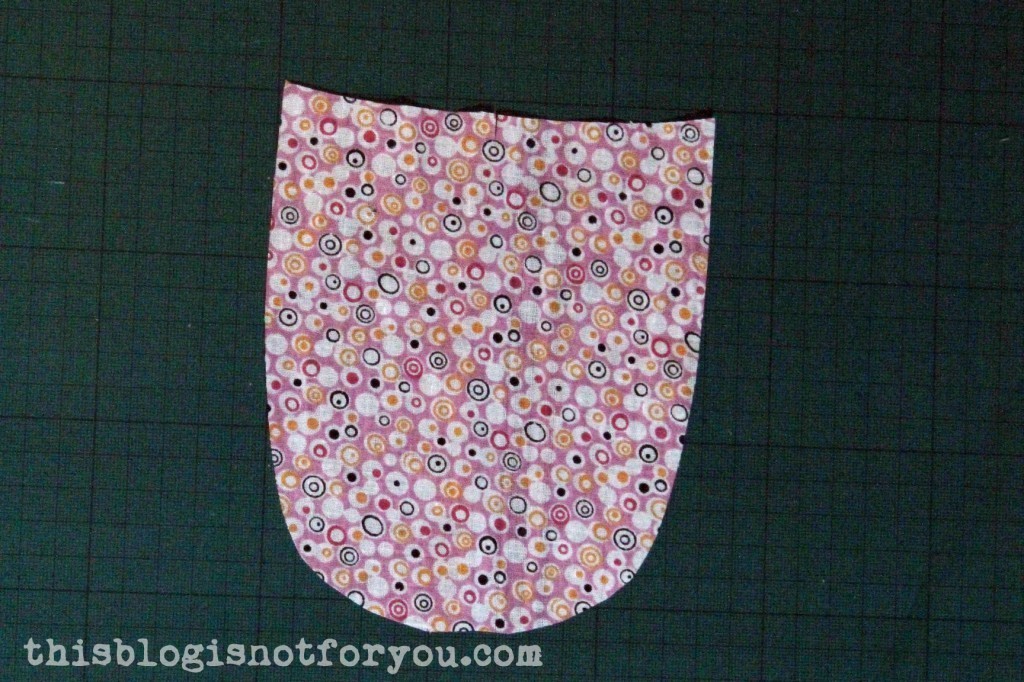
I stitched around the bib and clipped the seam allowance. This step helps you to keep the exact shape of the bib when pressing and topstitching.
Still with me?
Grab a cup of coffee before we go on – now comes the exciting part. Topstitching (YAY!).
Tada!
Yeahh, I sort of got so excited about the whole topstitching part that I forgot to take pictures of the steps in between.
Just a few tips:
Fold and press the seam allowance of the appliqués first. Align them with the center (important!) and pin/baste them in place. I would recommend handbasting in place, especially when sewing the bib onto the bodice. Round shapes are tricky enough to topstitch. Pins can cause the fabric to be a bit uneven or stretch out of shape. When you baste, the fabric lies completely flat.
I stitched the faux placket onto the bib first, then topstitched the bib onto the bodice. In a separate step I added some lace trim, stitching very close to my topstitching (I actually used contrasting thread for that).
Now it’s time to sew the bodice parts together, stitching around the side seams and neckline.
Using the same marking and tracing technique on my dressform, I cut out the straps. I stitched around the edges like so:
I left the bottom part (where the straps are attached to the bodice) open. This way you can easily turn the tube inside out and you can use the opening to slip in the top edge of the bodice, then topstitch around the neckline and all the raw edges are neatly hidden.
I messed up my topstitching here (probably too much coffee?) and had to unpick twice. In the end that wasn’t even necessary. After adding the trim to the neckline, the topstitching was hidden anyway. Sewing is about the things you don’t see, I know.
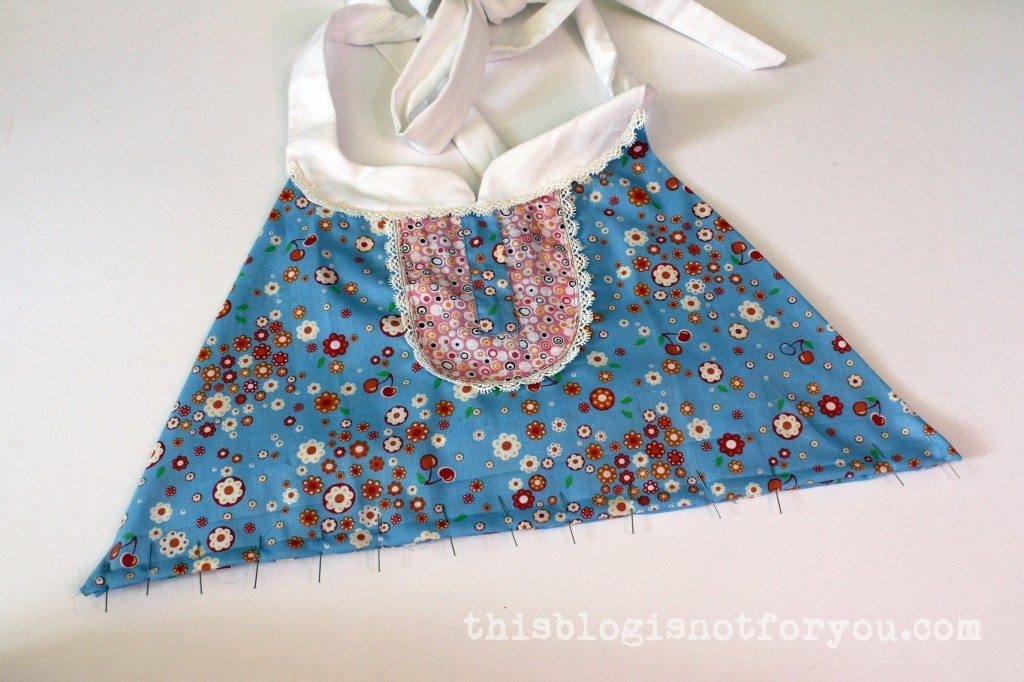
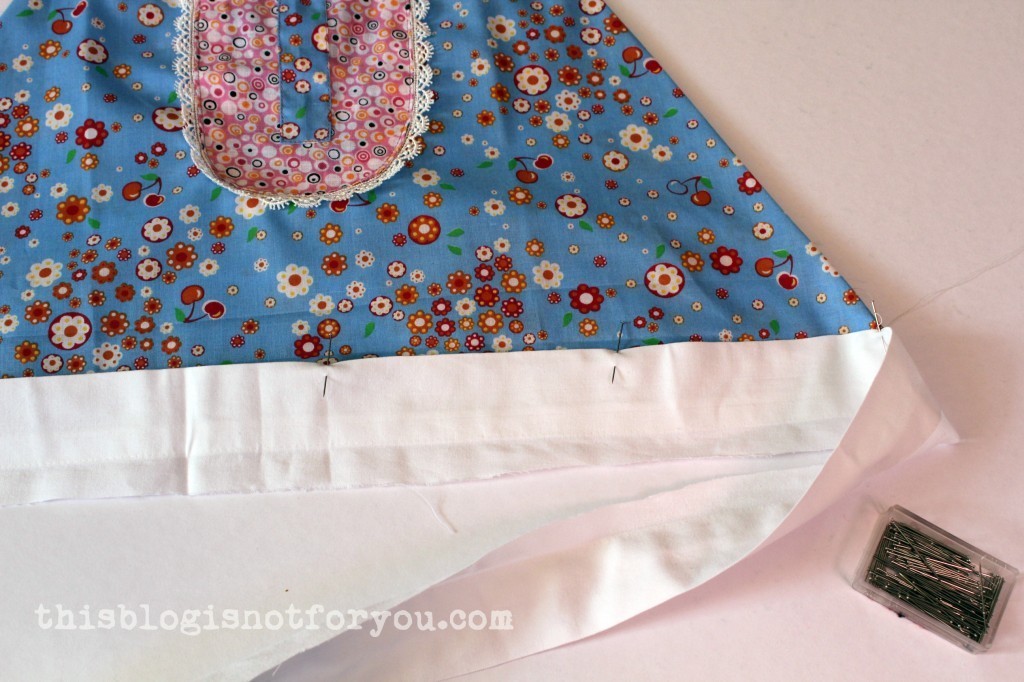
Fold and press the seam allowance of the bottom edge of the bodice. Pin both bodice pieces together (left sides facing) and stitch together close to the edge. I then attached the waistband to the bodice. When cutting out the strap/straps for the waistband, make sure it’s long enough to tie it in the front.
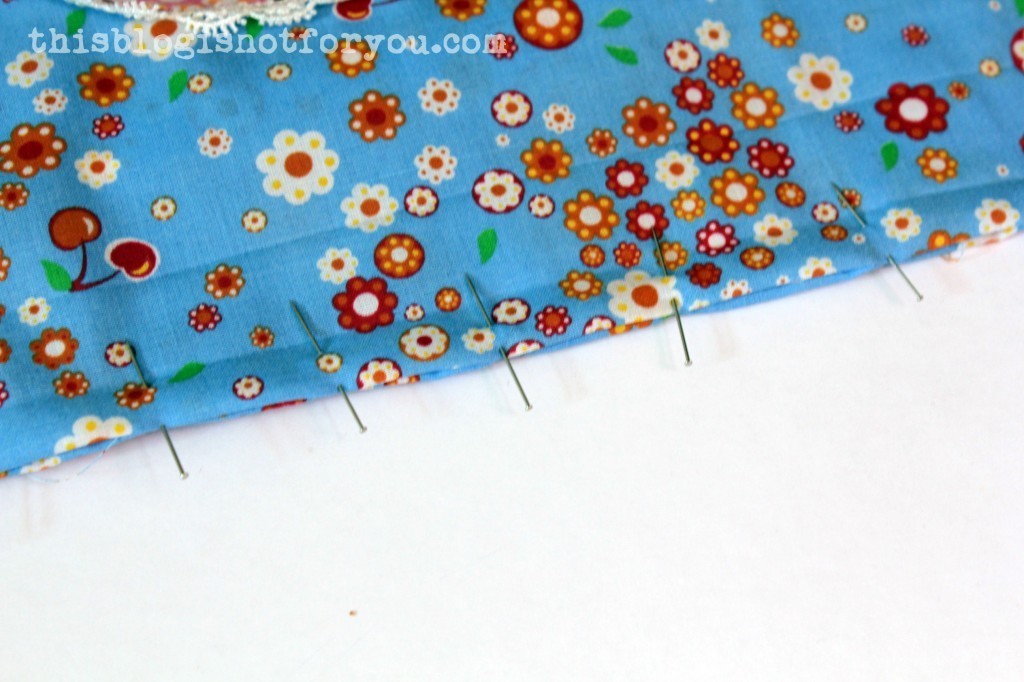
I basically cut out two waistbands, topstitched together, enclosing the bodice and skirt. This way the apron also looks nicely finished on the wrong side.Before gathering and attaching the skirt panel, I hemmed it and added trim. It’s easier to do that when the fabric lies flat.
I gathered the skirt panel and sewed it onto the waistband.After the apron was finished, I decided to add a ‘second hem’ (is there a name for that?) in a contrasting colour/the same fabric I used for the bodice. I simply cut out a strip twice as wide as I wanted the hem to be, folded it over in the middle and stitched it onto the skirt, both hems overlapping.
And that’s it. I hope my instructions made sense – sorry for the lack of pictures.

 Finally.
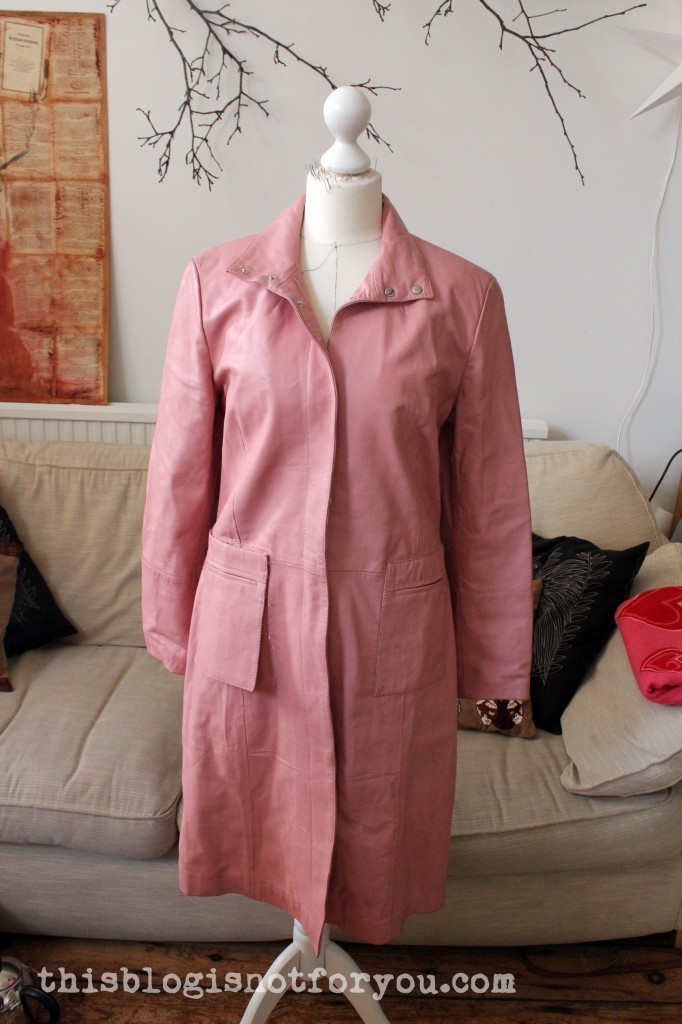

 The bag unfortunately doesn’t count into my 27 Dresses Challenge (ohhhh….) and it’s also not for me to wear. SO WHAT’S THE POINT OF GOING THROUGH ALL THIS?
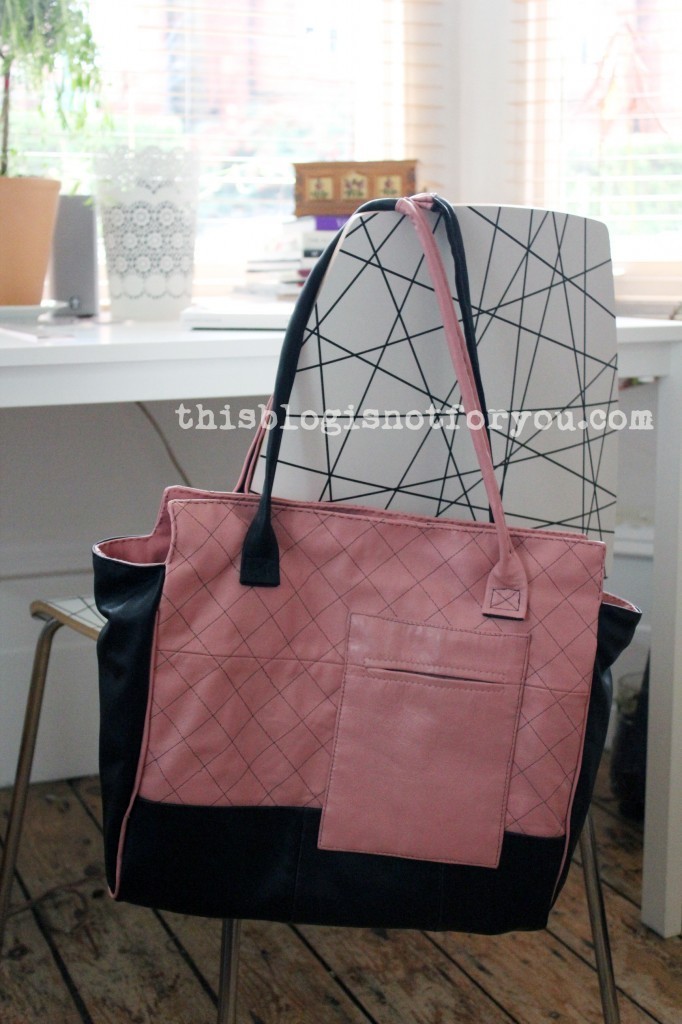


 Three weeks ago I sewed with real leather for the first time. And after three weeks, that brief affair is coming to an end. Two souls alas! are dwelling in my breast.
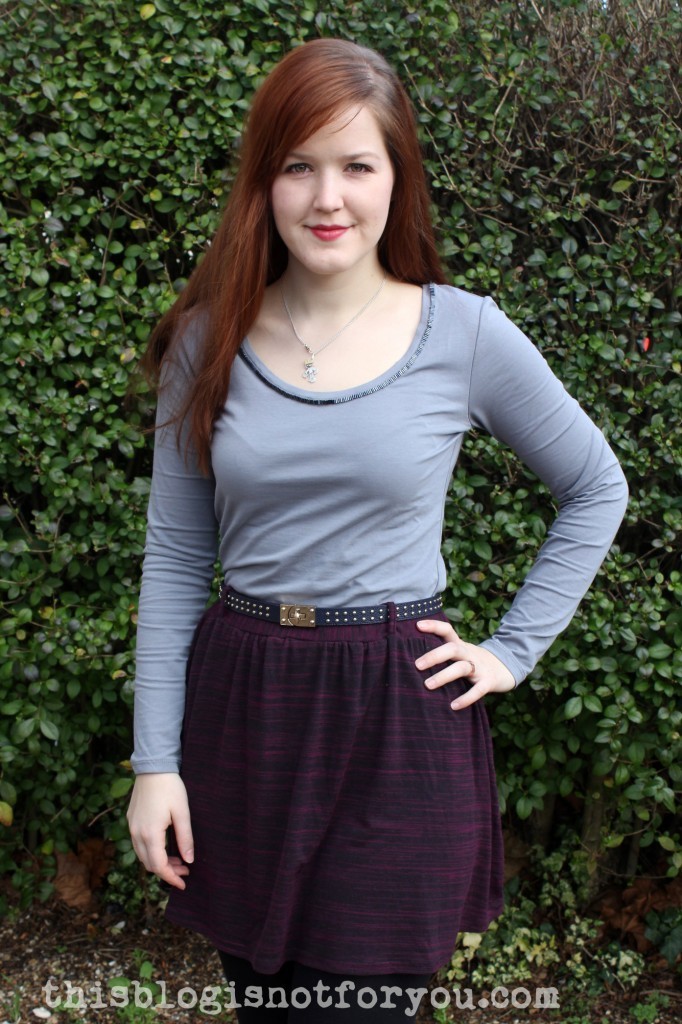
 I love wearing these and thought about how to make them look a bit more chic without overdoing it, since they will be worn underneath most of the time. Because the neckline is often still visible, I decided to use a few tube beads to embroider the neckline.
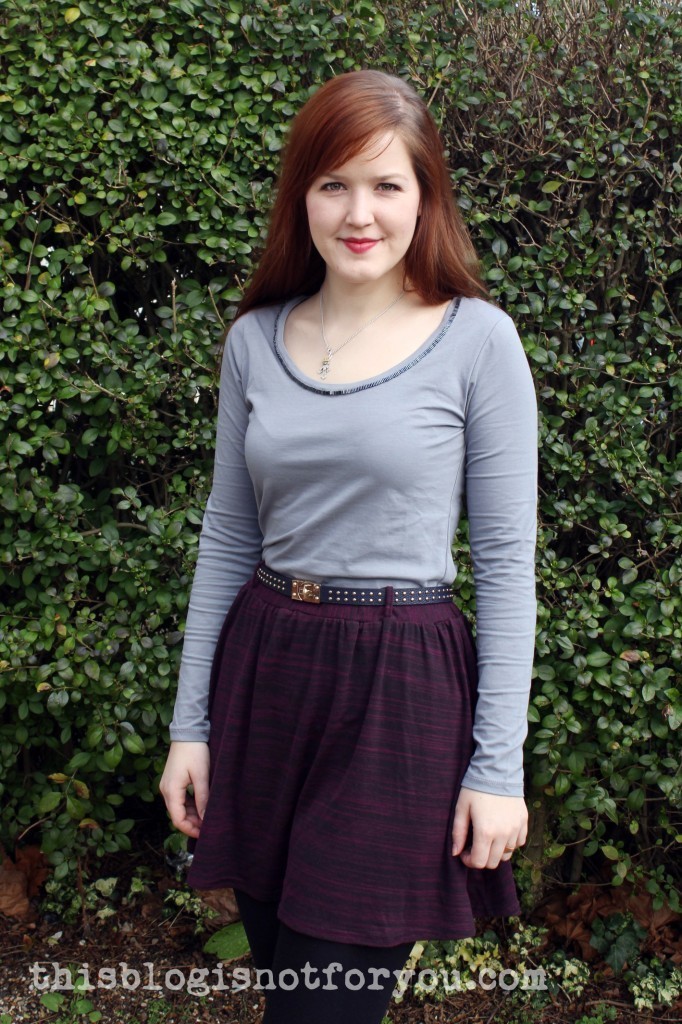

 I used greyish-blue tube beads and sewed them onto the topstitching of the neckline binding. I didn’t sew the beads onto the binding itself, since I thought they might be too heavy for the light stretch fabric, pulling it down with the result of the neckline gaping open.
 I didn’t use one continuous thread, but knotted it off after every 10cm/4” or so. In case the thread should break, I won’t have to redo the whole thing.


 Heeeeeeeeeeello!
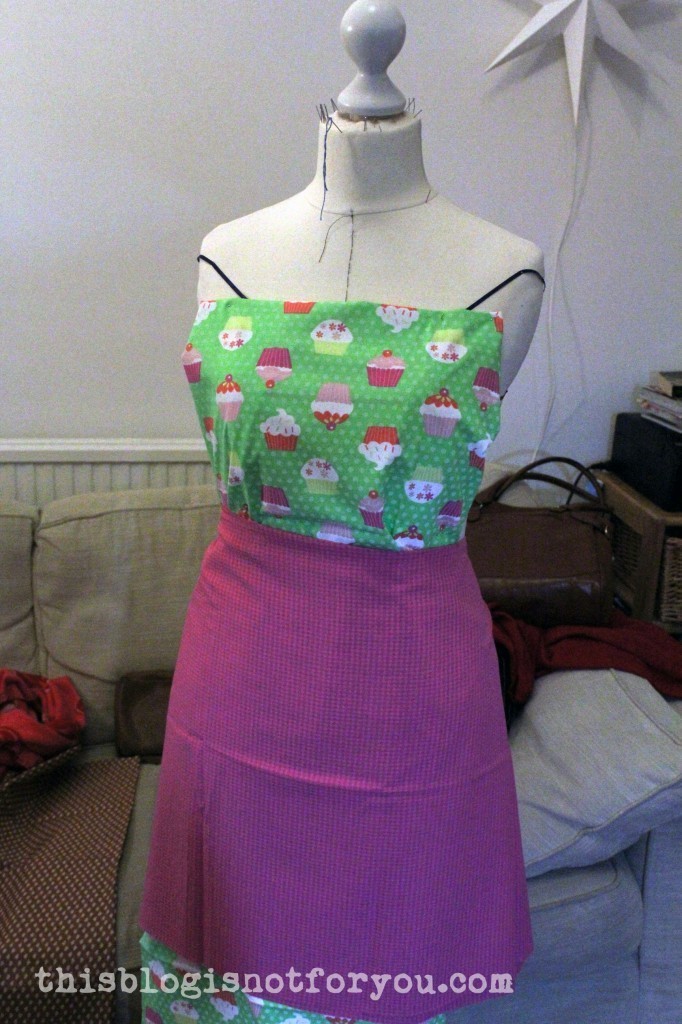
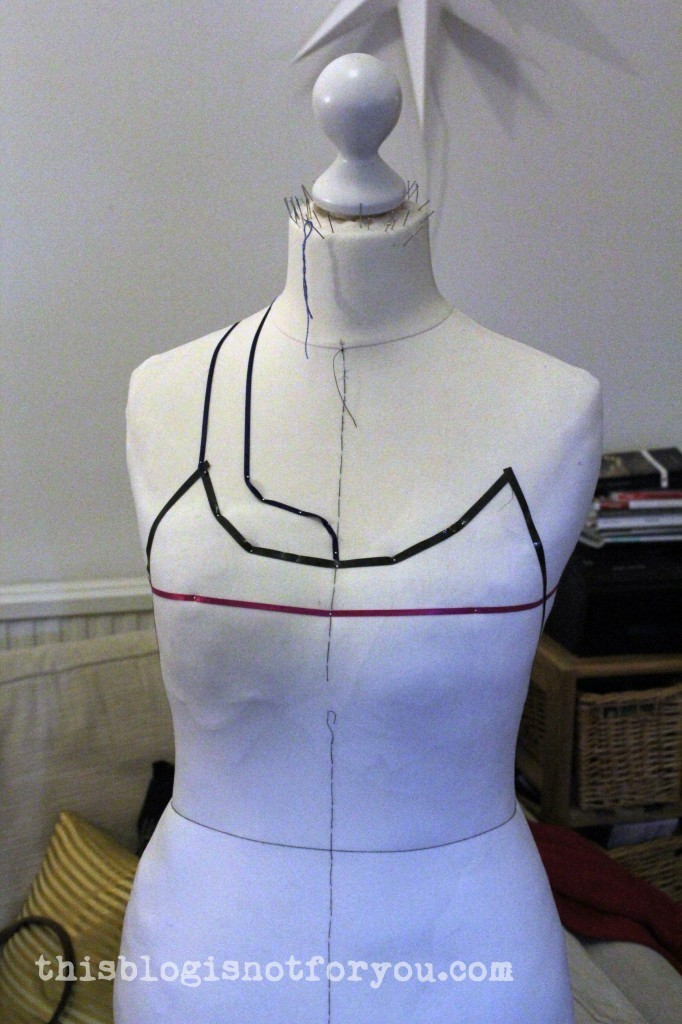 After choosing my fabrics, I used some black tape (you can also use ribbon and pin it) to mark the lines of the apron on my dressform. Alternatively, if you do not have a dressform, just draw it on paper and use it as a pattern piece. (It’s a kitchen apron, so don’t worry about the perfect fit too much.) I tried to make it very similar to the Anthro-version, as I really loved the shape of the neckline.
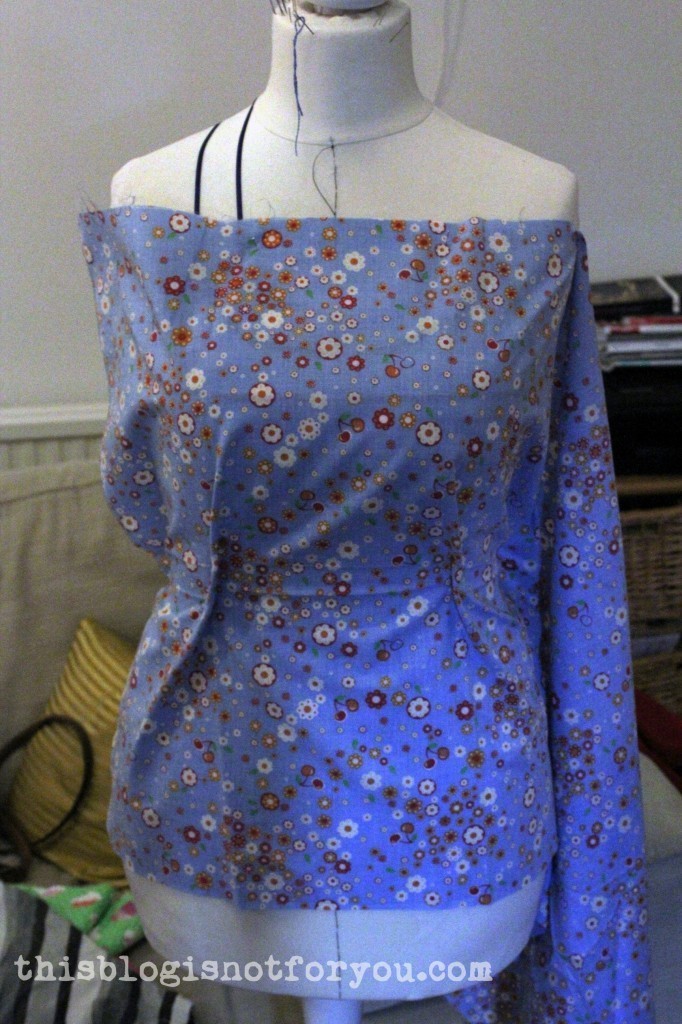 Pinning my fabric (wrong side up) on my dressform, I traced the marked neckline with tailor’s chalk.
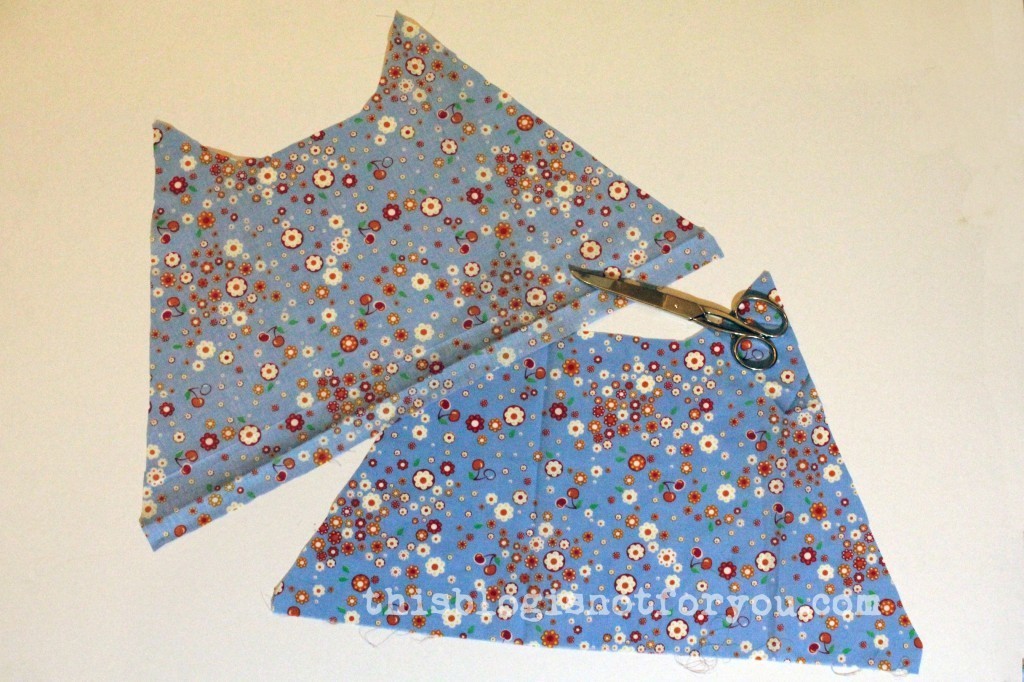
 I cut out a bib (don’t forget the seam allowance!).
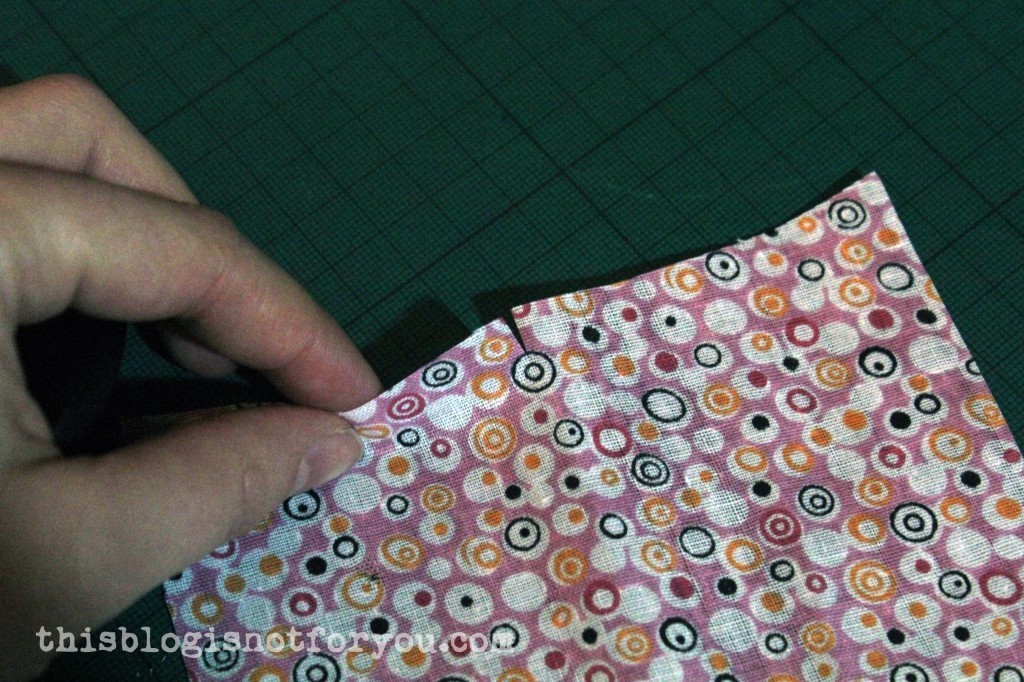 I marked the center on the bib (and also on my bodice piece) with a small notch.
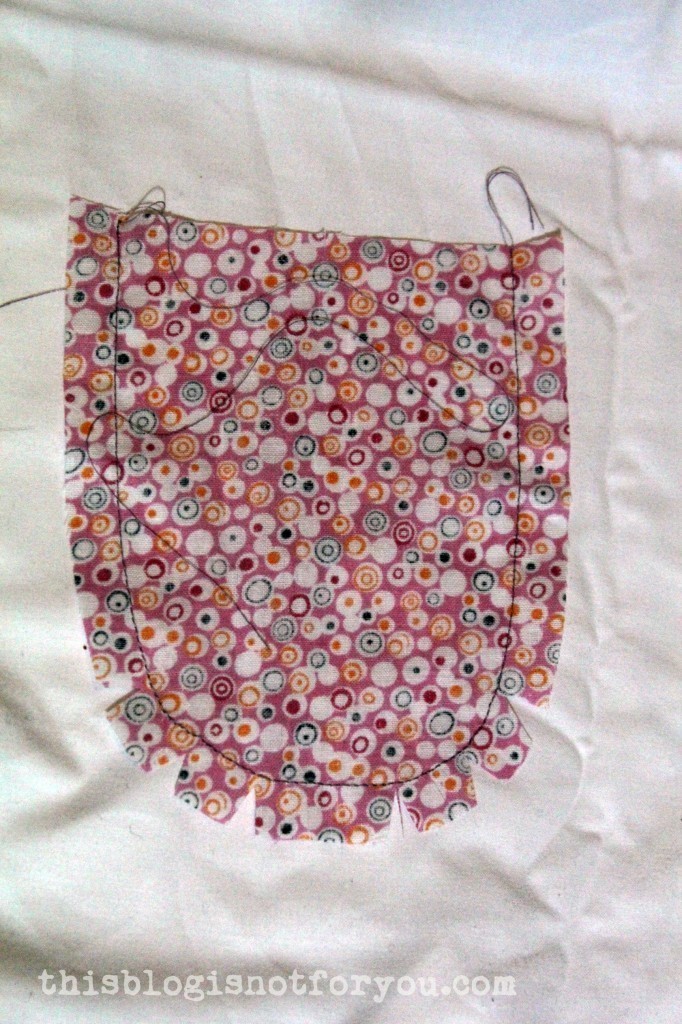
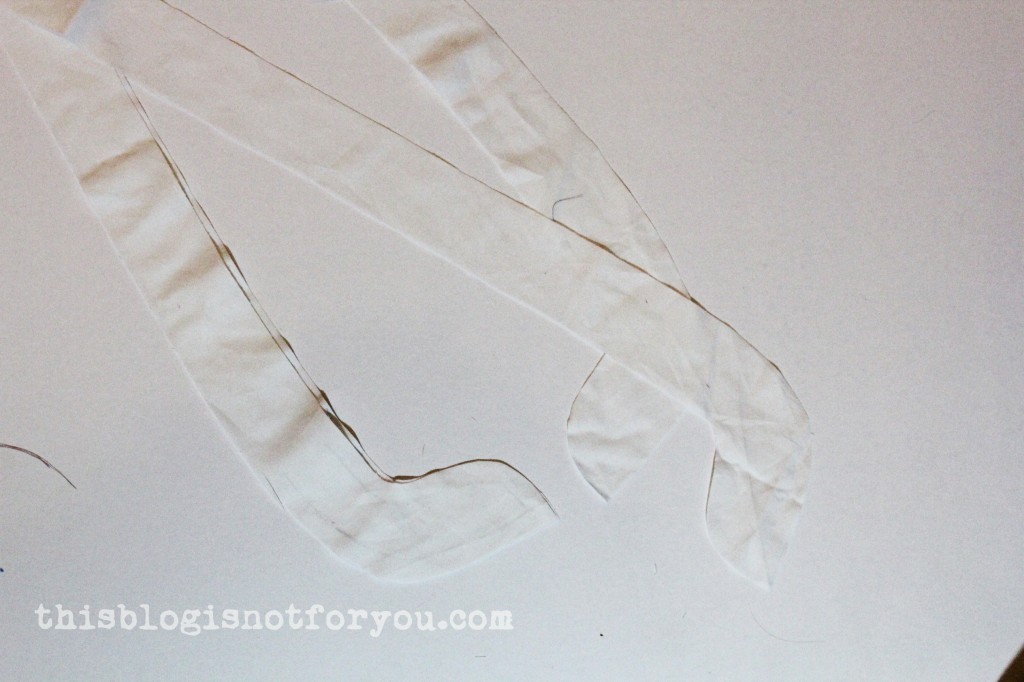 Using the same marking and tracing technique on my dressform, I cut out the straps. I stitched around the edges like so:
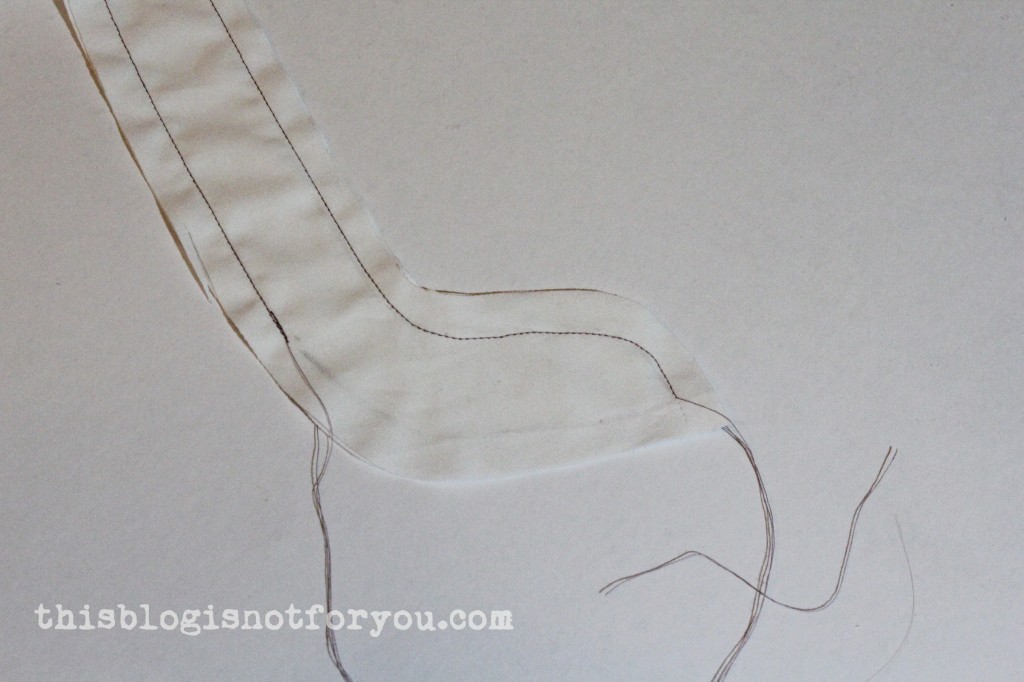
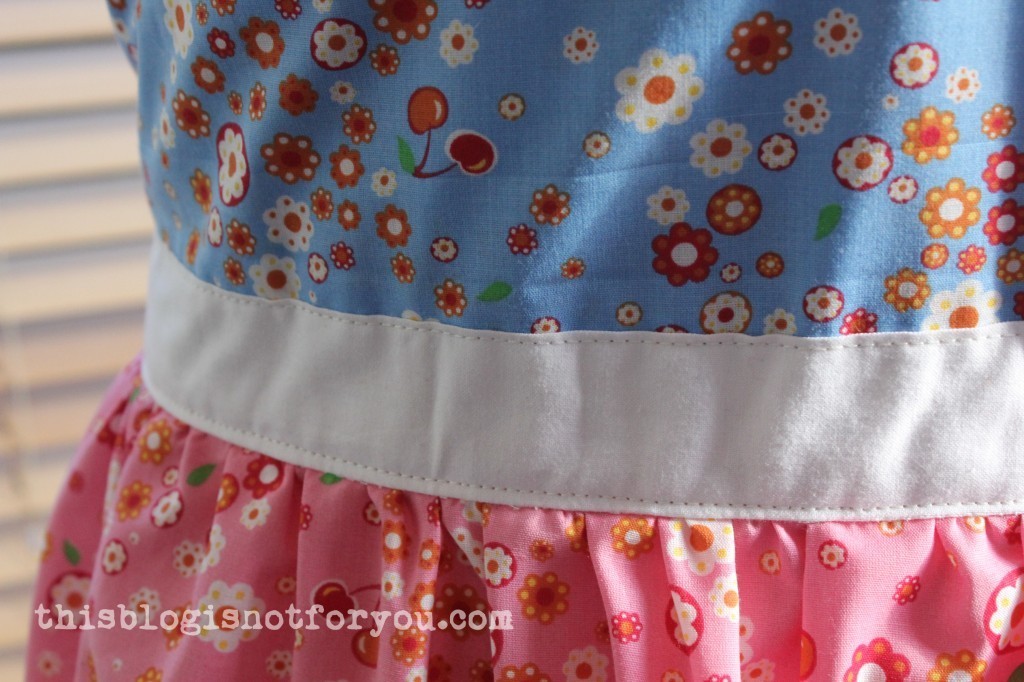
 I then attached the waistband to the bodice. When cutting out the strap/straps for the waistband, make sure it’s long enough to tie it in the front.
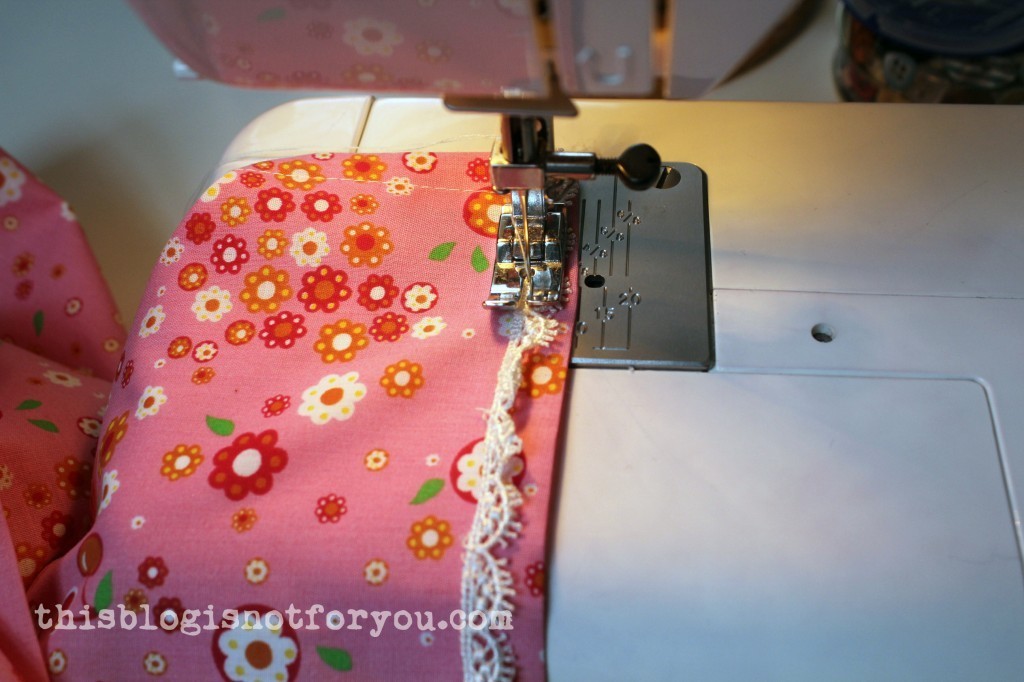 Before gathering and attaching the skirt panel, I hemmed it and added trim. It’s easier to do that when the fabric lies flat.
 After the apron was finished, I decided to add a ‘second hem’ (is there a name for that?) in a contrasting colour/the same fabric I used for the bodice. I simply cut out a strip twice as wide as I wanted the hem to be, folded it over in the middle and stitched it onto the skirt, both hems overlapping.