Lovely Freya May who blogs over at The Dressmaking Diaries nominated me for the Versatile Blogger Award! I love her blog and can’t wait for all the great stuff she’s gonna make in the future! Check out her blog – it’s totally worth it!
One doesn’t get an award for nothing, so here are the rules:
Thank the person who nominated you for the award.
Include a link to the person who nominated your blog
Select 15 blogs/bloggers that you have recently discovered or frequently visit and nominate them for the award.
Include a link to all 15 of the blogs/bloggers that you want to nominate.
And lastly, tell the person who nominated you 7 things about yourself.
My dear friend and talented lady Aura has two wonderful blogs (I here count as one).
Simplement Aurelie – is full of all sorts of tips, tricks and inspiration for pretty eyes, hair and lips. In case your soul needs some wellness, check out her inspiring blog Beauty for Ashes!
Seven things about me:
The first proper garment I sewed was a denim mini-skirt made from an old jeans when I was 12 or 13 years old. Without a sewing machine!
My sewing machine is an AEG NM1714 and her name is Marilyn.
When I’m sad I buy books.
This blog started out as a personal blog. This changed after the first blog post 🙂
While I’m tracing patterns I love to watch Project Runway.
When I was 13 I wanted to become a fashion designer and took a 3 month class in Fashion Illustration. The class was really useless and I decided to become something else.
The name of this blog was inspired by Mark Z. Danielewski’s “House of Leaves”
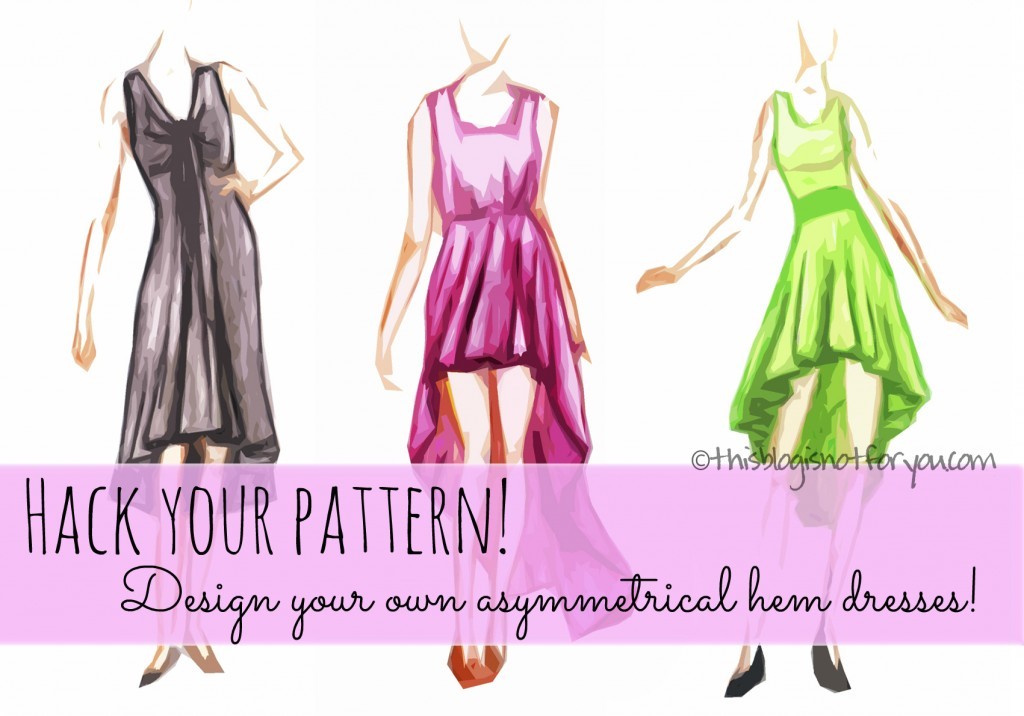
We all love pattern hacks, don’t we? I really do like patterns, especially the Burdastyle ones, and there are so many that I’ll never be able to sew them all. Nevertheless, sometimes you just want to add your own personal touch. And when you have a certain design in mind, but you just can’t find that particular pattern you’re looking for anywhere, you probably have to.
Summer is (hopefully) coming soon and last year’s asymmetrical hem maxi dresses are in stores again (I like!). I actually didn’t buy any last summer, but I’m totally planning on sewing loads this spring. A lot of the patterns I have are from last year and older and Burdastyle didn’t have too many good asymmetrical hem dresses so far.
That’s where the pattern hack comes in handy. You can just pick whatever dress pattern you like and change the dress skirt pattern into an asymmetrical one. You can also start drafting one from scratch and combining it with your favorite bodice pattern.
A lot of people are afraid of drafting patterns. Yes, it’s complicated. Yes, you need to learn a lot of technique before you’re getting good at it and yes, it’s not too much fun in the beginning. But seriously, no one expects you to become a Lagerfeld, Marc Jacobs or Michael Kors overnight.
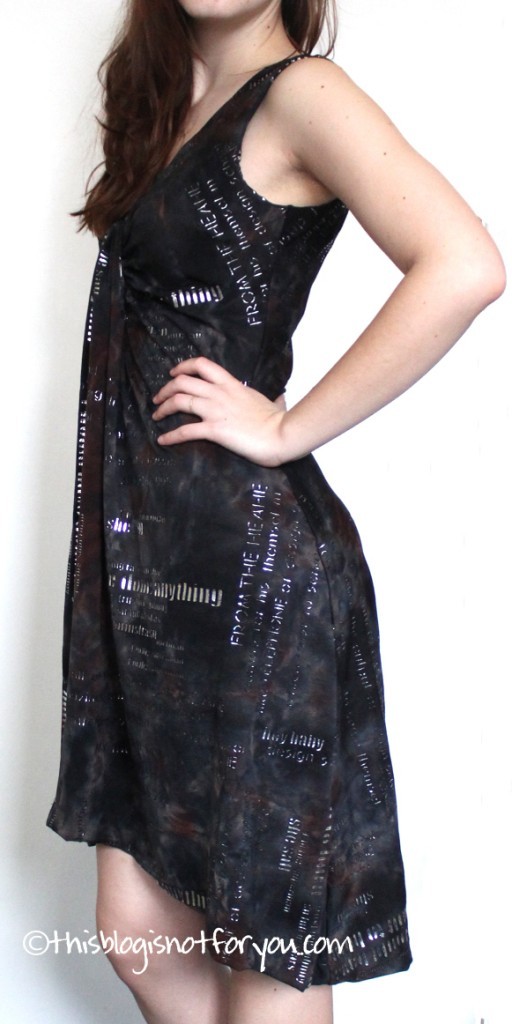
I found that it’s less frightening and really fun to start with trying out minor pattern hacks, changing patterns you’re already familiar with. As you’ve seen with my waterfall dress, I just used a simple Burdastyle pattern and changed it a bit.
As promised, I’m going to show you how I did it. Furthermore, I’ll show you what other changes are possible to get slightly different looks – there are so many different asymmetrical hem dresses!
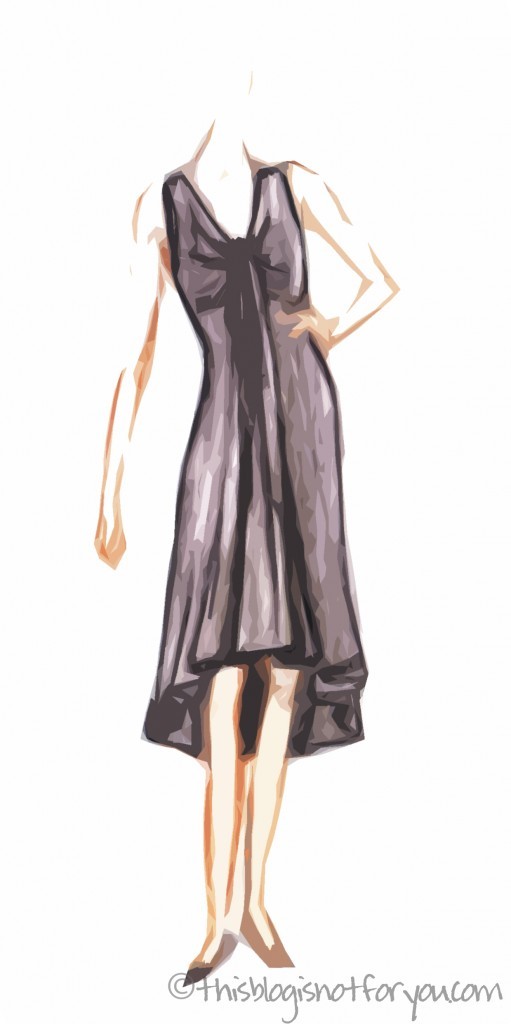
THE FIRST LOOK: oval shaped with a straight hem in the back
This is a draft of an asymmetrical hem that just about the same as the one of my waterfall dress. As shown in the picture below, the hem is straight in the centre front, sloped down at the sides and is quite straight (although not a 100%) again in the back.
What you need to do is either shorten your pattern in the front or lengthen it in the back. Since I made the hem shorter anyway, I made the changes in the front. To get a more softer edge instead of a very triangular shape, you can’t just draw an asymmetrical staight line. The slightly s-shaped curve creates a smooth transition between front and back. You also see the line sloping down more steeply only after it reaches the middle of the front pattern piece. There are only small changes to the back pattern, to make the changes look less abrupt and to avoid having it look like you combined two different pattern pieces.
It’s also very important to make the pattern pieces the same length at the side seam.
Here are some pictures from the modified Burdastyle pattern:
THE SECOND LOOK: oval shape in the front, slightly longer v-shape in the back
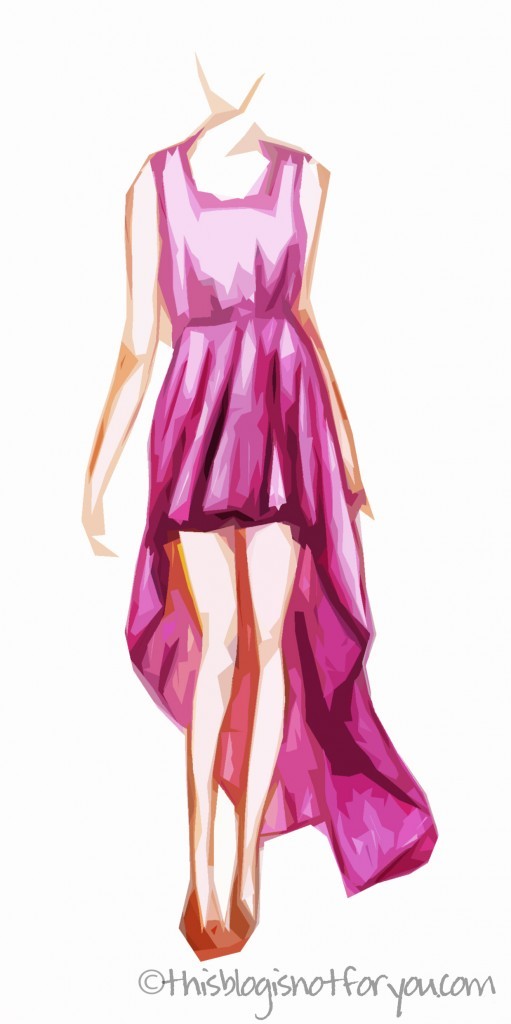
I very much love this look, because it looks quite romantic. Here the shape in the front is almost like the one in the first look, but the back is much longer and the transition from front to back is very smooth and it’s much more asymmetrical. To get this look you have to shorten the front and lenghten the back quite a bit. If it’s a knee-length dress, I’d suggest shortening the front by at least 20cm/8” and lengthing the back by about 20-25cm/8-10” or more. Give the line a smooth curved shape in the centre front and back to avoid awkward triangular edges. THE THIRD LOOK: straight in the front, maxi v-shape in the back
This is my favorite look and I’m de-fi-nite-ly making a dress like this for summer. It’s such an awesome femine look. Here, the front is straight almost until it reaches the side seams and then steeply slopes down to that long flowing train. The front will be almost miniskirt-length, the back about ankle-length. (Take your measurements, waistline to ankle, to get the right length) What you should always consider is the width of the hemline:
To get a beautifully flowing skirt, you need not only to lengthen but also to widen the pattern. You could also just use a gathered-skirt pattern, if you don’t feel confident enough to make the changes yourself. If you have one that fits you well, use it and simply make the changes described above.
Here’s an example of an asymmetrical dress with a very wide hem (which also means you’ll need loads of fabric!).
If you use a pattern of a slightly flared skirt it will probably look similar to this:
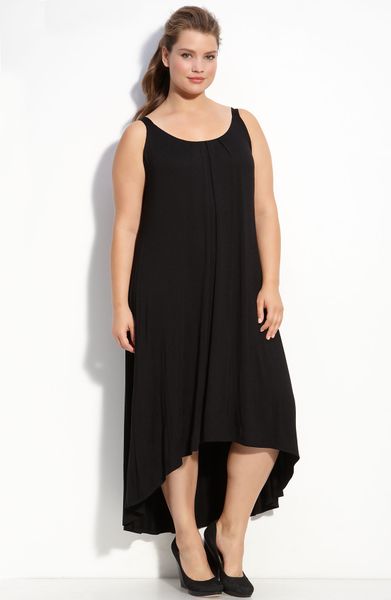
found at Bershka
found at Nordstrom
When you do not widen the hem of the pattern, the hem will probably end up looking like the one in the picture below. It’s also nice, but less romantic and flowing and probably more suitable for sporty and casual looks.
found at Zara
I hope this was somewhat helpful and I’ll see loads of pretty asymmetical dresses in the upcoming months!
In case you decide to hack your pattern to make an asymmetrical dress for the summer, I’d love to see it when it’s done!
Just send me a picture to hello(at)thisblogisnotforyou.com!
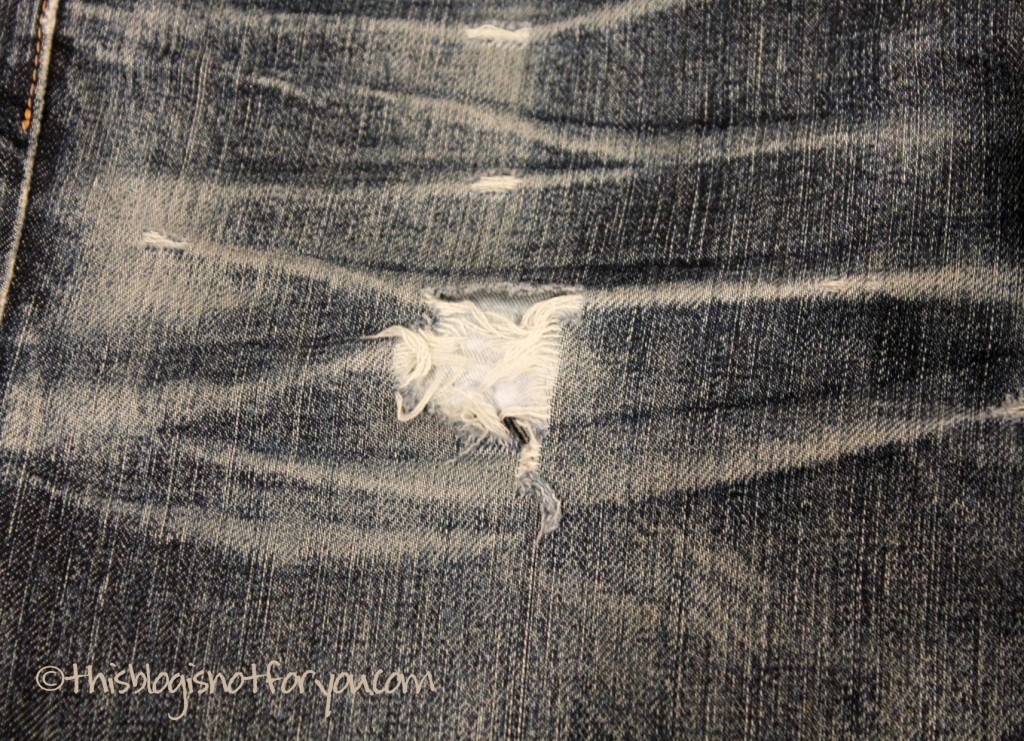
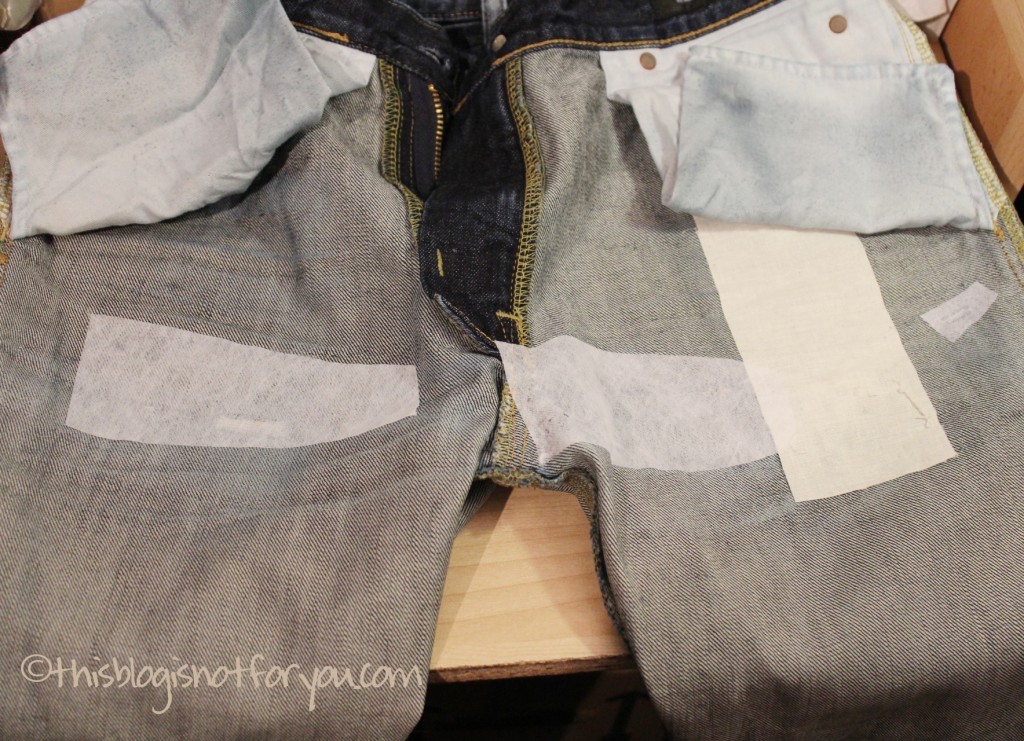
Today I finally had a few minutes to mend a pair of jeans that has been waiting for treatment quite a while. The boyfriend wore them until they almost fell apart, so I wasn’t even sure if I could save them or not. Holey moley! Way too many holes. Since it was his favourite pair I gave it a try.
I followed Suzannah’s very helpful instructions. She blogs over at Adventures in Dressmaking, which is one of my faaaaavourite blogs.
Click on the picture to get to Adventures in Dressmaking’s jeans mending tutorial!
Here are some pictures from the mending process.
I altered the technique a little, since the one hole was soo big I wanted to use creme coloured cotton instead of white interfacing. I more or less taped the cotton to the left side of the hole using fusible web tape (which is normally used for no-sew iron-on hemming). For the smaller holes I used interfacing as recommended by Suzannah.
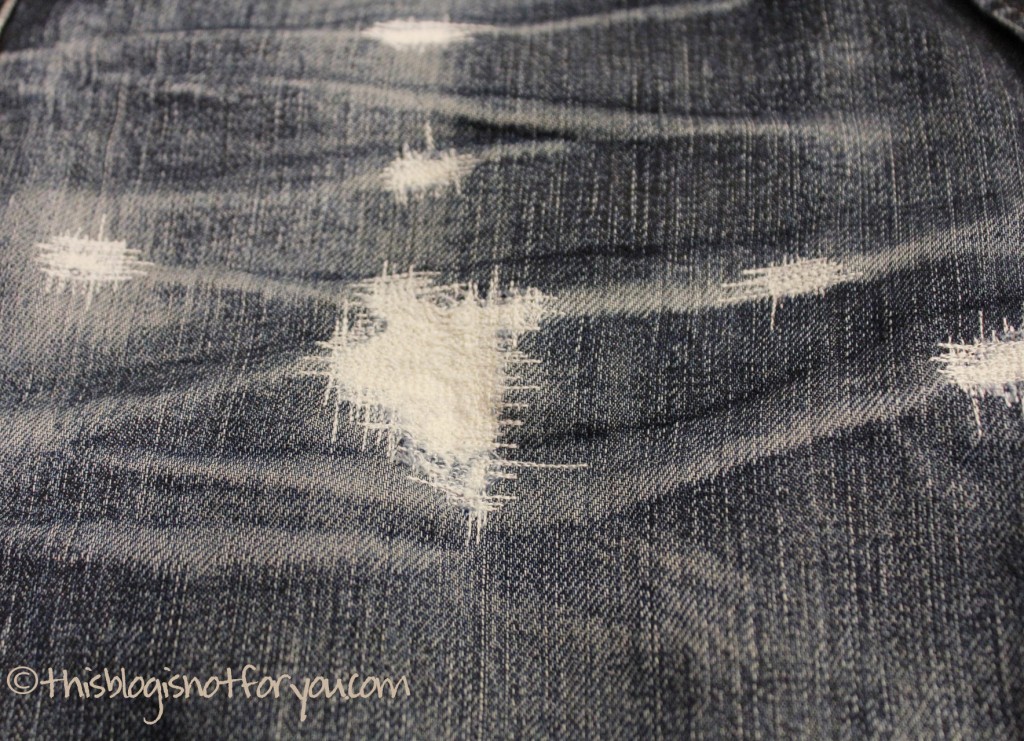
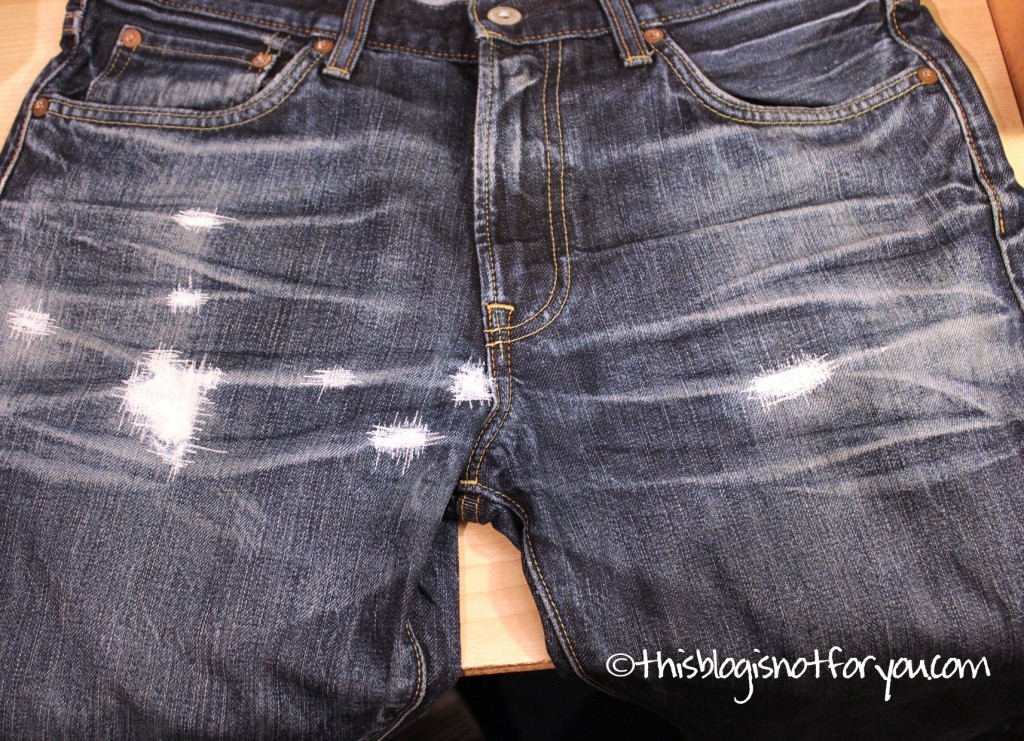
It looks a bit funny at first, but after the first repaired hole I got used to it. Now I think it looks like it’s there on purpose – the boyfriend thinks it looks cool, as well (which is all that matters).
…you’re an absolute Blogging Newbie
…you just started blogging and you feel like you could need some helpful tips and tricks
…you have been blogging for a while but somehow feel like you might have missed out some vital steps
…you have been blogging for years but somehow you have trouble getting people to read your blog and subscribe
Last time I told you about what I’ve learnt about growing your blog. Today I give you a rather brief overview about steps and stuff you should consider to make your blog legal.
Sorry again for the delay. I had an incredibly busy week and this post took quite long to write up (I had to do some research, too! You just never stop learning :)).
HOW TO MAKE YOUR BLOG LEGAL
Let’s talk legal stuff concerning your blog. It might be a bit frightening at first if you’ve never thought about it before, but it’s important to know and have thought about it.
I can tell you right away that I won’t go into too much detail, just because there is sooo much detail that one could write a book about it (ain’t nobody got time for that!). What I’ll do is telling you the most important things you should keep in mind (and find out more about).
The things we’re looking at today don’t necessarily have to apply to your own blog, so please don’t freak out if you feel a bit overwhelmed by all this information.
It’s just guidelines, some of them are definitely important, others may be optional. It’s up to you what you take on. Be critical and do some research to find out which steps you have to take to make your blog legal.
Copyright
#1 Copyright your own blog.
Although it’s optional, this is important for everyone, whatever blog you have.
Before we get to the part where you have to make sure you are not infringing any copyright, we want to make sure no one infringes yours.
To prevent others from copying – stealing – your blog’s content, you first have to copyright it. It’s as simple as that.
You ask yourself why? Just have a look around and you’ll find thousands of stories of people copying whole articles or even blogs, stealing pictures or selling other’s free patterns online. Yes, there are people like this.
If you love your blog and care about blogging, hearing or even experiencing things like that are incredibly frustrating. That’s why you will probably want to make sure that your content stays your content and people respect your blog.
The least you can do about it is placing a copyright notice on your blog. You need to include a
somewhere in your blog (e.g. footer, sidebar). You’ll find mine at the bottom of each page.
There are also copyright generators online, that’ll help you if you want to include the copyright note into your blog’s PHP. WebWeaver is a free tool for generating auto-updating copyrights (updating the current year automatically).
Obviously, having a copyright notice won’t prevent anyone from stealing your content if they really want to – but it gives you the legal basis to do something against it.
#2 Watermark your pictures.
Another important (and also optional) thing for copyrighting your content is watermarking your pictures – just to be on the safe side.
Pictures get shared pretty easily nowadays with Pinterest, Facebook and Co. Sometimes the original source gets lost on the way, because sadly not everyone cares about copyright (we do!). You never know where your pictures will end up. Even with copyrighted pages there have been incidents when others stole pictures and shamelessly claimed them to be their own.
Of course, you wouldn’t steal someone else’s content intentionally. But accidental copyright infringement or plagiarism happens all the time. If you’re unlucky you could even get a law suit for this.
Remember to:
Always show sources of pictures that are not your own – and make sure you’ve found out if you’re allowed to share them! Sometimes people won’t allow you to include more than one picture of their article in yours. Whenever you’re not sure don’t be afraid to ask for permission. Most bloggers will be glad to be featured provided you reference them correctly!
You can do that for example by adding captions to your pictures naming the source or making the pictures a clickable link that leads to the original source. Better you do both.
Referencing pictures could look like this:
source: www.thisblogisnotforyou.com
Naming the source is especially important when you include someone’s pictures that are not watermarked, so people wouldn’t be able to tell if it was yours or not. This could get you into trouble if this someone learns and cares about this. And frankly speaking, it’s only fair. Imagine you put all this time and effort into something and someone else uses it without giving credit.
The same applies for content in general. You always have to reference ideas that are not your own. Make sure you don’t copy too large a passage of an article. Even if referenced this could get you into trouble. Again, when not sure – ask for permission!
A referenced passage could look like this, if quoting directly:
“What is copyright infringement?
Copyright infringement occurs when a copyrighted work is reproduced, distributed, performed, publicly displayed, or made into a derivative work without the permission of the copyright owner.”
I always try to include a link to the source. If you reference correctly, it’s not necessary – but again, it’s only fair. If someone quoted me or used my ideas, I’d want them to at least provide a link to my blog, wouldn’t you too?
More steps to make your blog legal
Ok, if you’re still reading – this was the most basic part. Now it gets worse. 🙂
Please do not freak out, some of this might not apply for you – but if it does, take your time to do some research. You don’t have to do all of this on the spot, but you should put it on your high priority list.
Terms of Use/Terms of Service/Terms of Conditions is used interchangeably and is commonly abbreviated as ToS or TOS. Those are the rules a person or organisation must observe in order to use a service/your blog. It normally includes copyright and any terms of use regarding material etc. you provide for download. It basically should say how things work on your blog and that readers accept such rules merely by accessing your site.
The ToS are meant to protect you, so it’s always better to have them. There a various different ToS, depending on the type of organisation/website/blog you are.
Here’s a good website providing some information on what should be included in your ToS.
If you feel totally lost, try a ToS generator. Bennadel.com offers a free ToS and Privacy Policy generator. Simply enter your blog name (in the company name field) and your state and you’ll get a personalised ToS. Make sure you read it and edit it (where necessary) before copying it to your blog. At a later stage, when you feel more comfortable with things like this, you should make the effort and write up a personalised one. It’s nicer and your site will appear more trustworthy to your readers.
#5 Privacy Policy.
Similar to letting your readers know about your ToS, you should be open about what information you collect from them, as well as what you do with that information.
This is why websites have a privacy policy. In a privacy policy you diclose what all sorts of personal information you gather and what you do with it (e.g. whether you keep it confidential or not). This includes using services like Google Analytics or a visitor stats plugin.
Things like that have become incredibly important nowadays. Many people are concerned about their personal data and information being misused, sold, etc.
Having a privacy policy is very important and again shows your readers you care about them and treat the information you’re obtaining about them in a trustworthy way.
#6 Diclosure Policy.
A Diclosure Policy is needed when
– you’re running ads on your blog and thus make money through advertising
– you’re making money or receive free products from sponsored posts
– you’re getting any form of compensation through your blog.
If one of these things applies to you, you should get a diclosure policy. I’m doing none of these things yet, so I’m no expert on this topic, but there are many others that have written about it. Have a look around online to learn how to do this, what should be included, etc.
#7 Are giveaways legal?
To make it even more confusing, when you’re hosting giveaways, there are even more things to think about to make sure your giveaway isn’t an “illegal lottery”. Here are some helpful links to see what things and laws you should consider if you’re offering giveaways on your blog:
Don’t be scared and don’t panic if you’ve never thought about it before. Do think about it now. It’s always good to have some knowledge about things like that, even if you decide to go on considering it “just a hobby”.
In conclusion, …
Blogging has become very popular these days and it becomes harder and harder to draw a line between blogging as a hobby and blogging as business since people learnt that they can actually make money with it. Can a personal blog running ads be considered a proper business?
Since blogging is mostly seen as being “just a hobby” people are often not careful enough. I had a look around and was quite shocked seeing that not a single one of my favourite (and quite famous) blogs that I checked had a ToS or privacy/dislosure policy.
Especially when you make money with blogging or offering giveaways, it becomes more than a hobby. Take it seriously to avoid trouble. Even if nothing happens in 99% of all cases, you don’t want to be the 1% that gets into trouble.
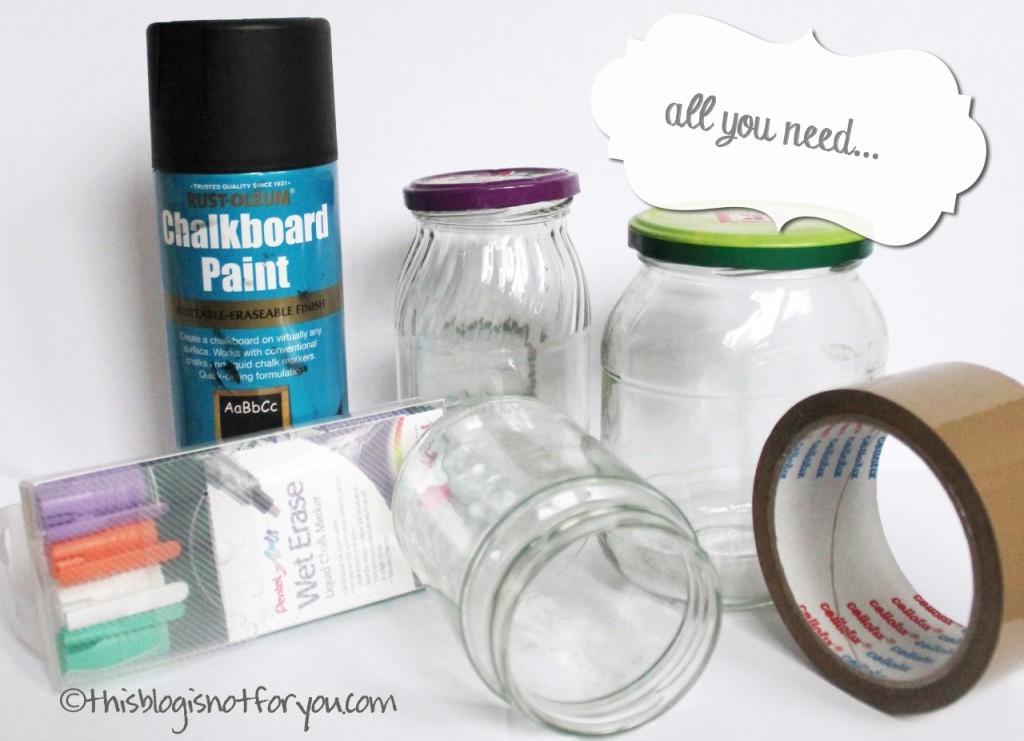
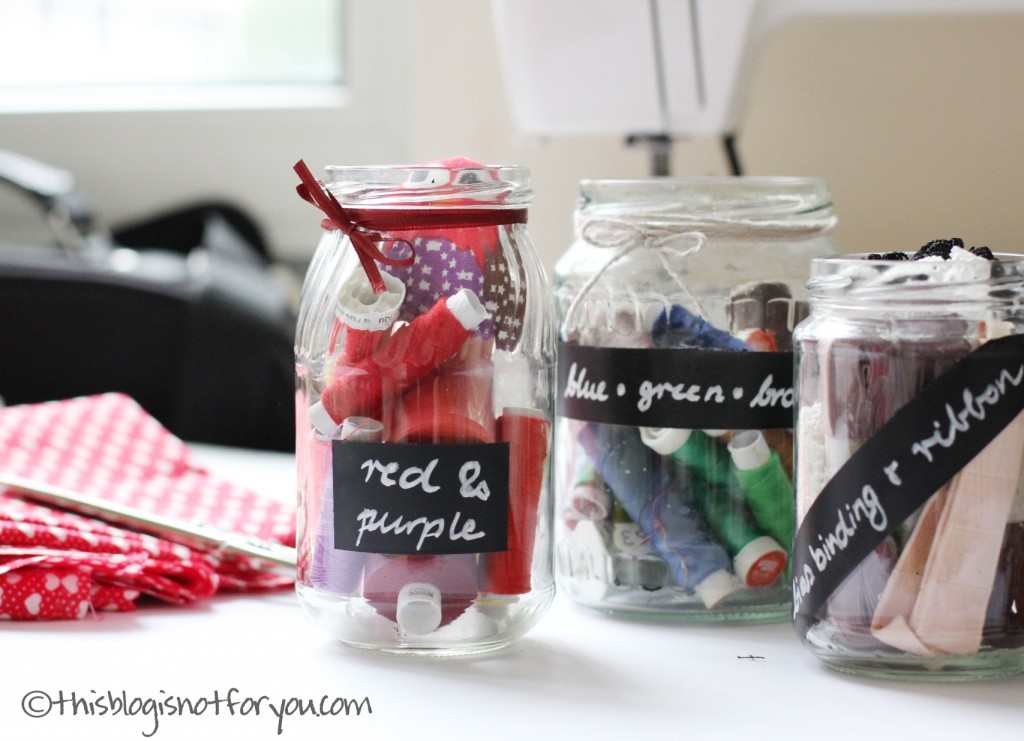
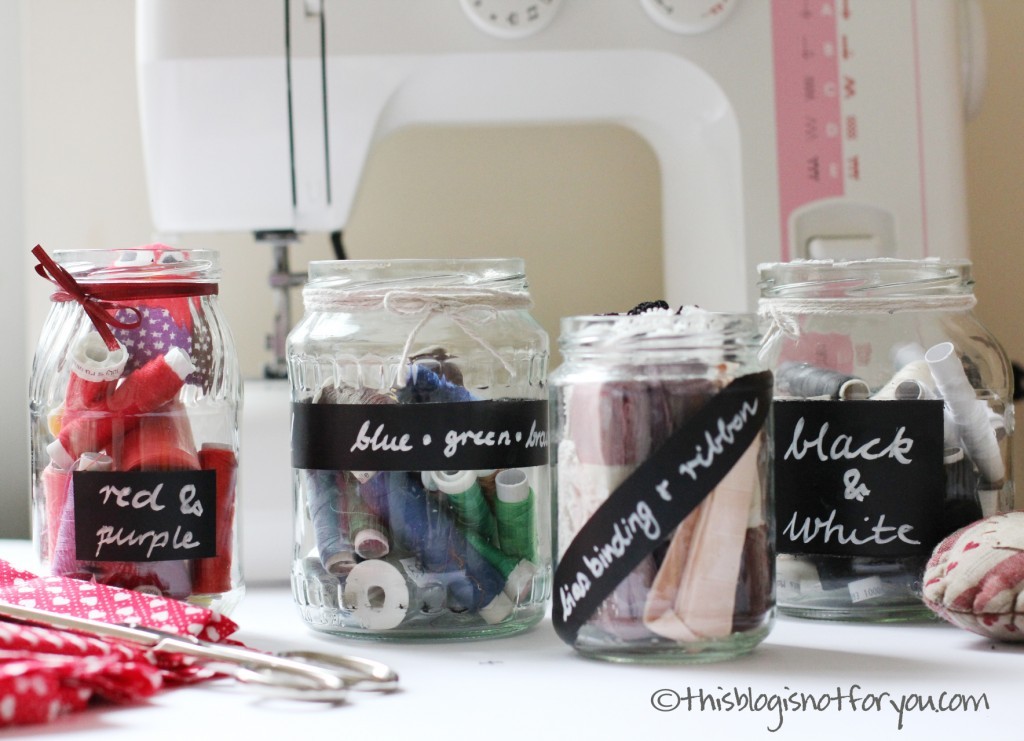
This is a very quick DIY I did on the weekend. My messy boxes full of sewing supplies had been bothering me for quite a while. Normally I use plastic organising containers or empty cookie boxes, but buying containers can be quite expensive when you need a lot of them and I never find things after I put them in cookie boxes. I just have too many of them.
This DIY was inspired by a friend who sent me a picture of a craft/sewing room at IKEA Berlin. They had thread sorted in jars by colour. I liked the idea a lot – it looks so much better than plastic containers, is see-through (which is great for finding stuff!) and inexpensive.
I still had some chalkboard paint spray left from my previous chalkboard DIYs that I wanted to use for a weekend project.
It’s super simple, quick, decorative and inexpensive – sounds good?
I covered the jars with tape and left out the different shapes for the labels. I sprayed it with chalkboard paint spray (2 coats) which only takes a few minutes. I let it dry for a few hours – just to be on the safe side (you don’t want to have fingerprints on it, do you?). You can spray the lids as well, if you want to.
I removed the tape (carefully!) and labelled the jars with wet-erase liquid chalk marker.
Tip: You can make corrections to the chalkboard paint using cotton buds and nail polish remover.


 This is a draft of an asymmetrical hem that just about the same as the one of my
 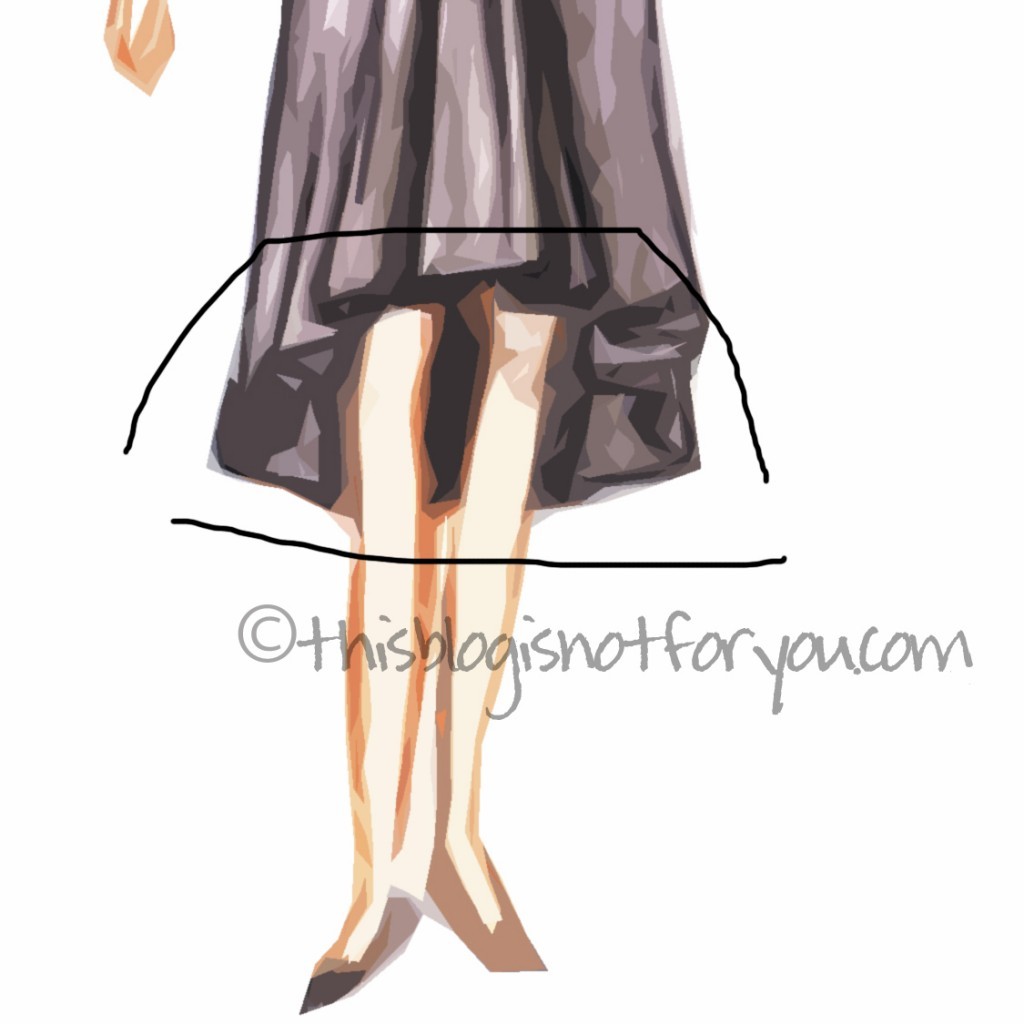 What you need to do is either shorten your pattern in the front or lengthen it in the back. Since I made the hem shorter anyway, I made the changes in the front. To get a more softer edge instead of a very triangular shape, you can’t just draw an asymmetrical staight line. The slightly s-shaped curve creates a smooth transition between front and back. You also see the line sloping down more steeply only after it reaches the middle of the front pattern piece. There are only small changes to the back pattern, to make the changes look less abrupt and to avoid having it look like you combined two different pattern pieces.
 Here are some pictures from the modified
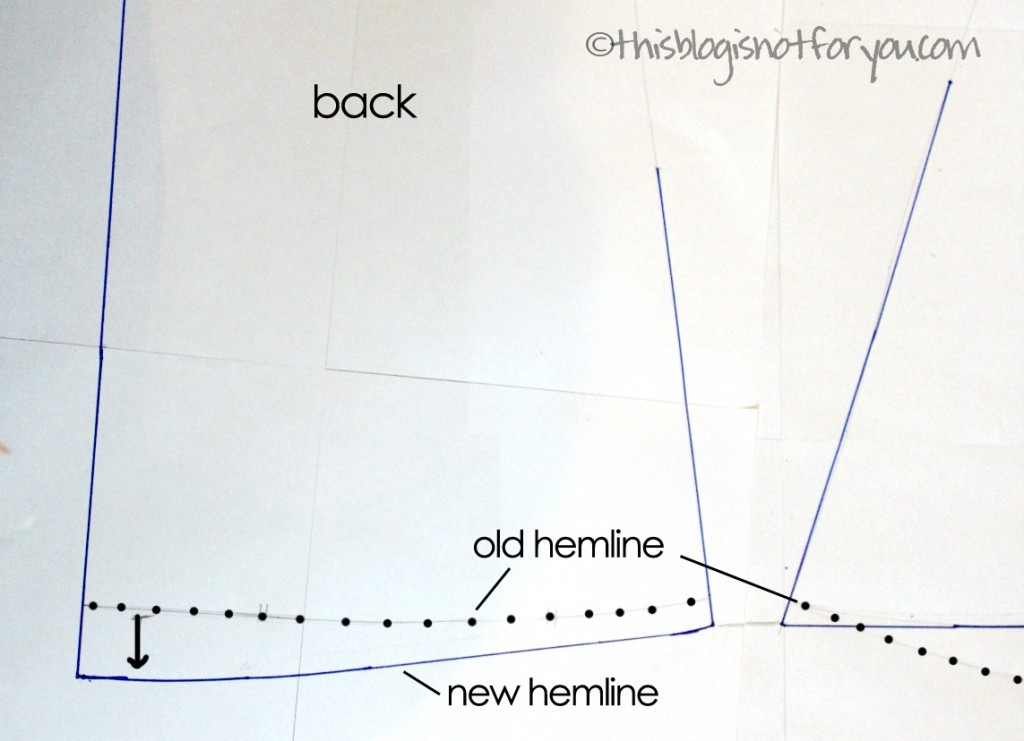

 I very much love this look, because it looks quite romantic. Here the shape in the front is almost like the one in the first look, but the back is much longer and the transition from front to back is very smooth and it’s much more asymmetrical.
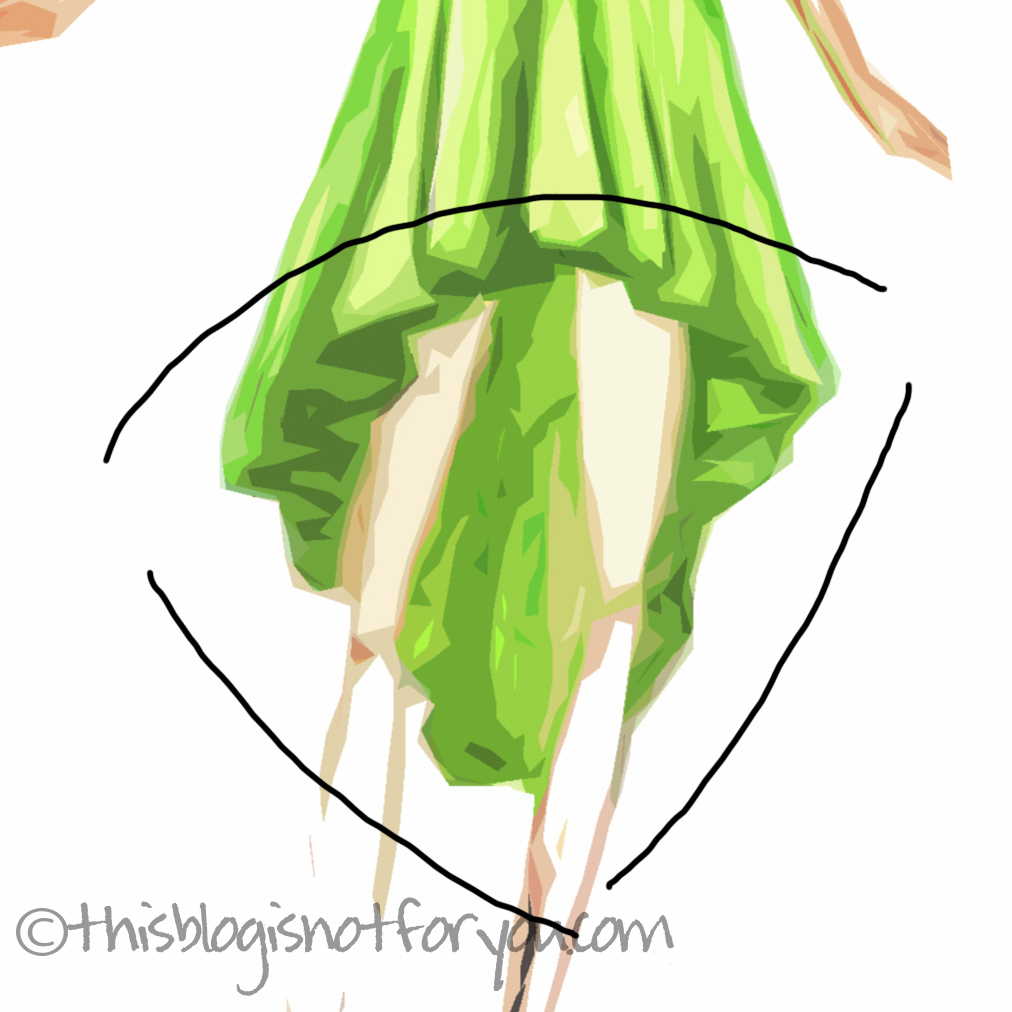 To get this look you have to shorten the front and lenghten the back quite a bit. If it’s a knee-length dress, I’d suggest shortening the front by at least 20cm/8” and lengthing the back by about 20-25cm/8-10” or more. Give the line a smooth curved shape in the centre front and back to avoid awkward triangular edges.
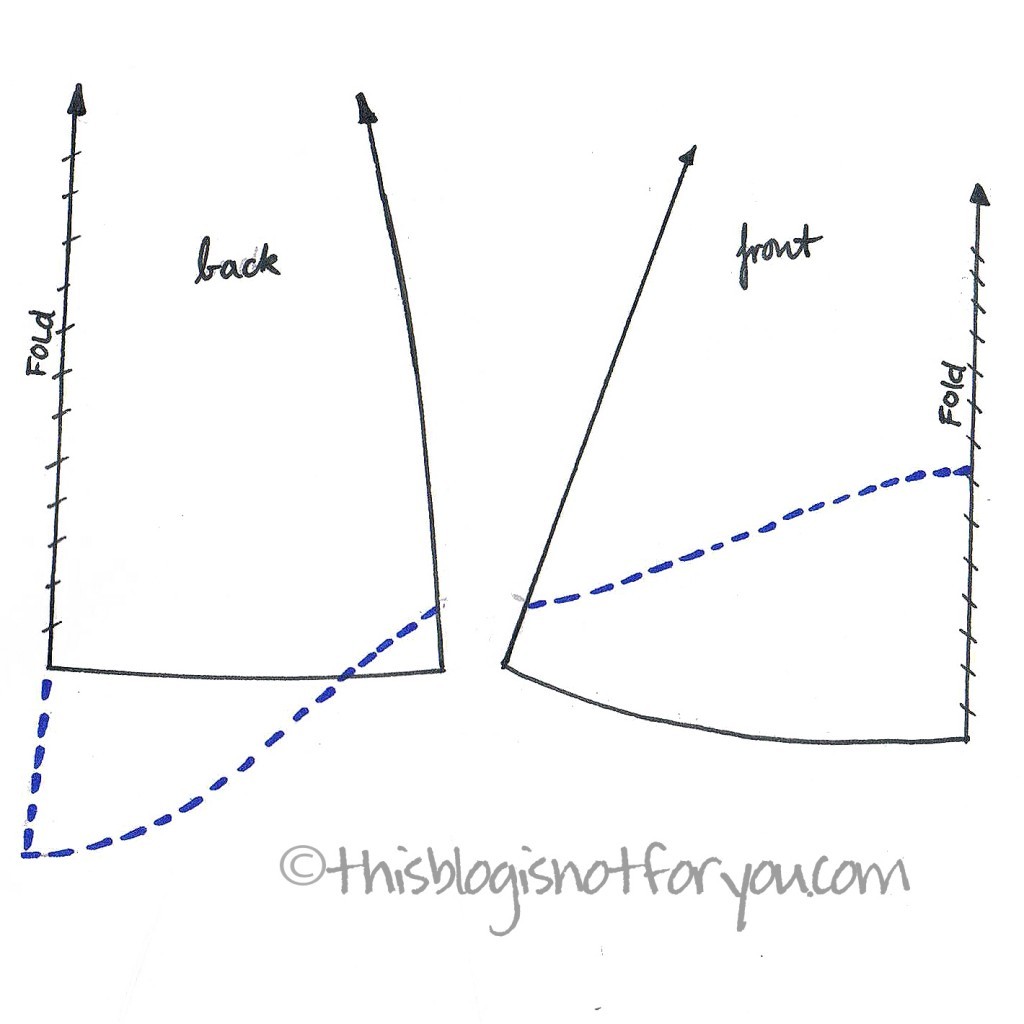
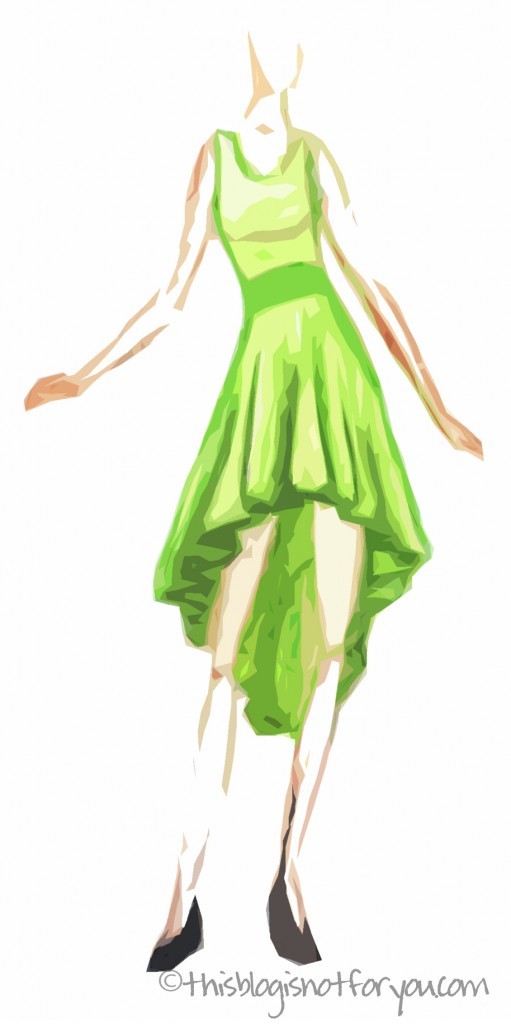
 This is my favorite look and I’m de-fi-nite-ly making a dress like this for summer. It’s such an awesome femine look. Here, the front is straight almost until it reaches the side seams and then steeply slopes down to that long flowing train.
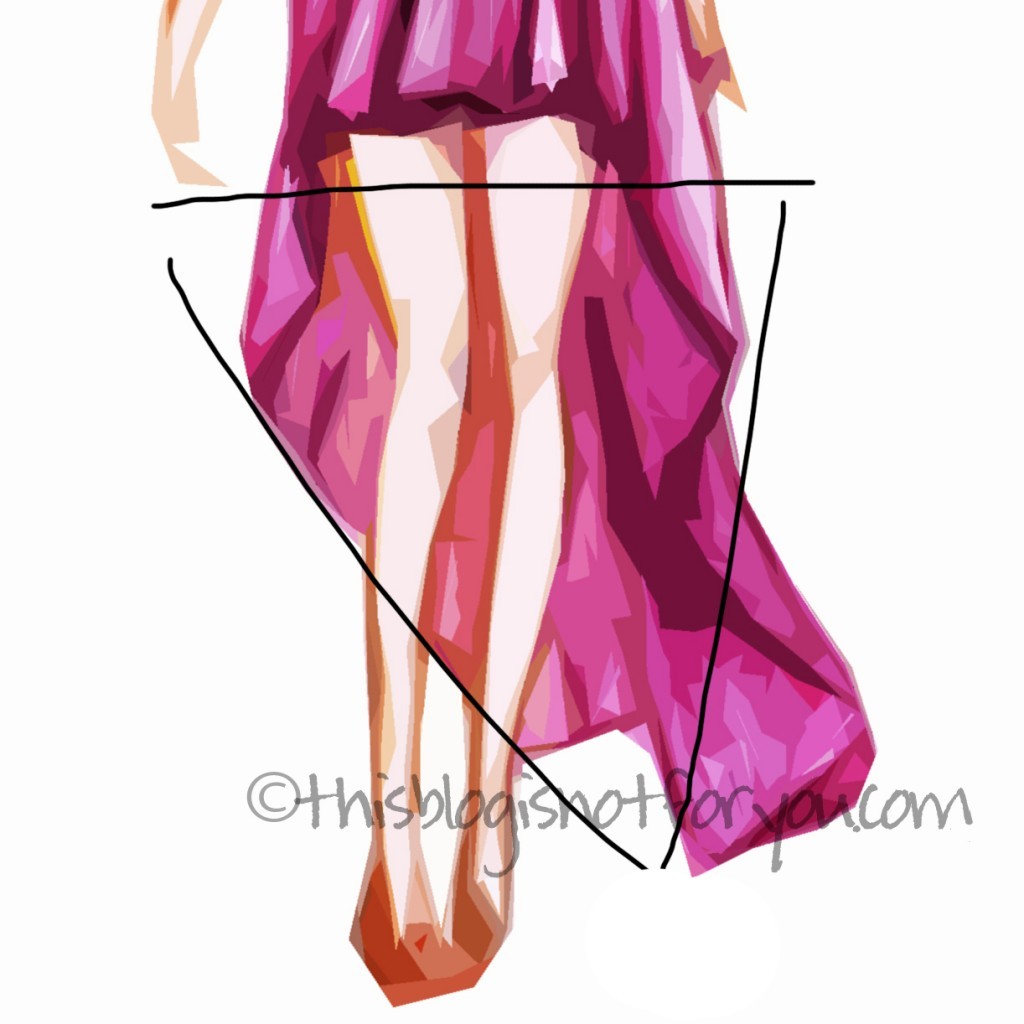 The front will be almost miniskirt-length, the back about ankle-length. (Take your measurements, waistline to ankle, to get the right length)
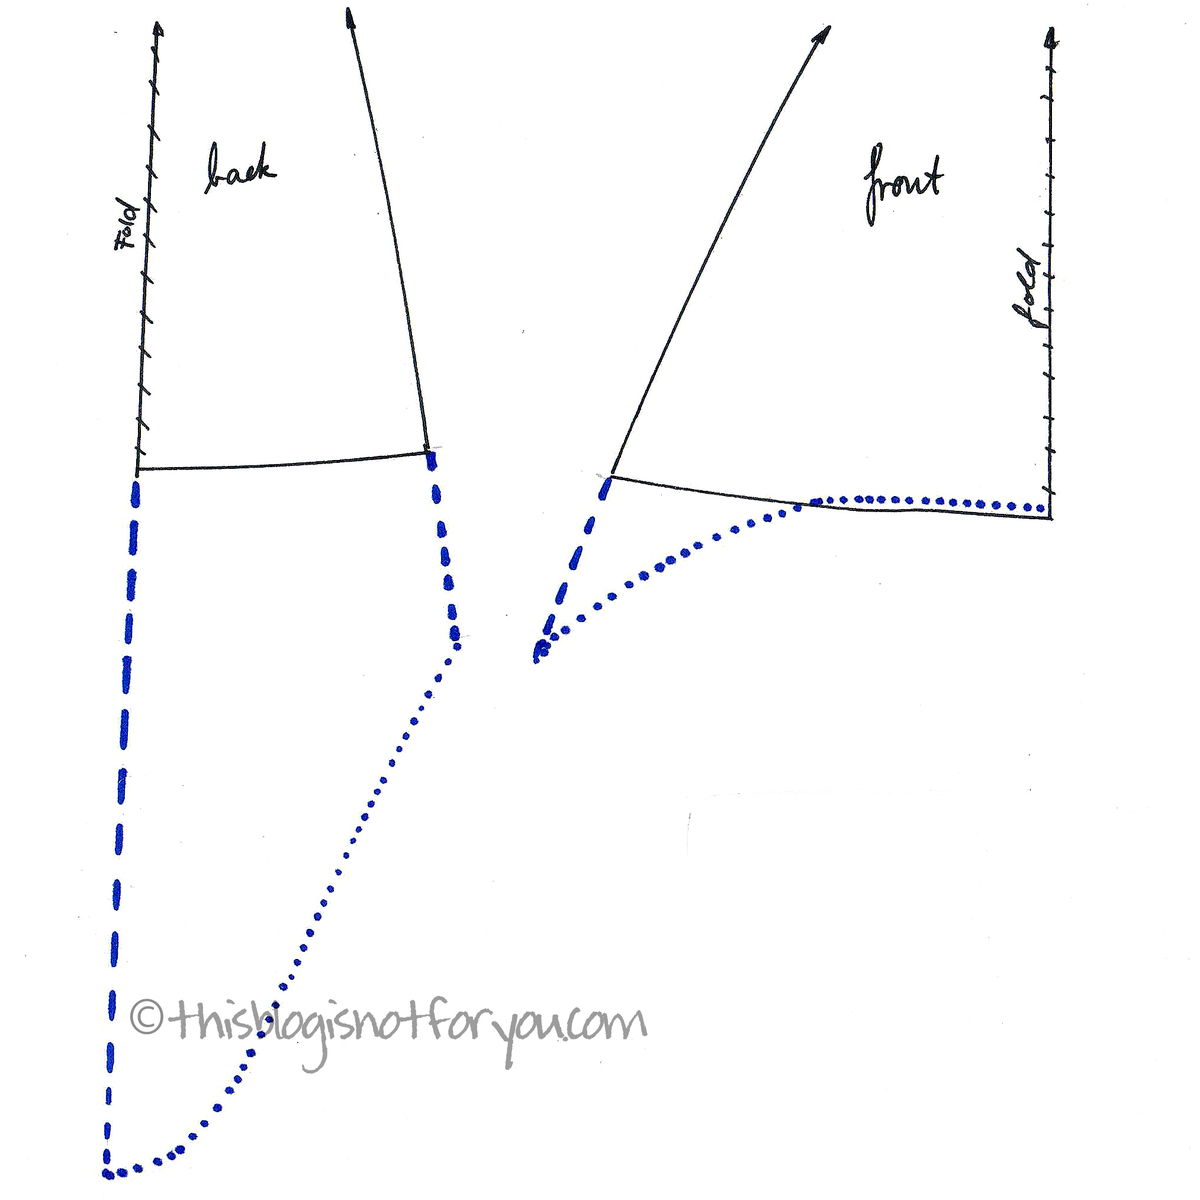


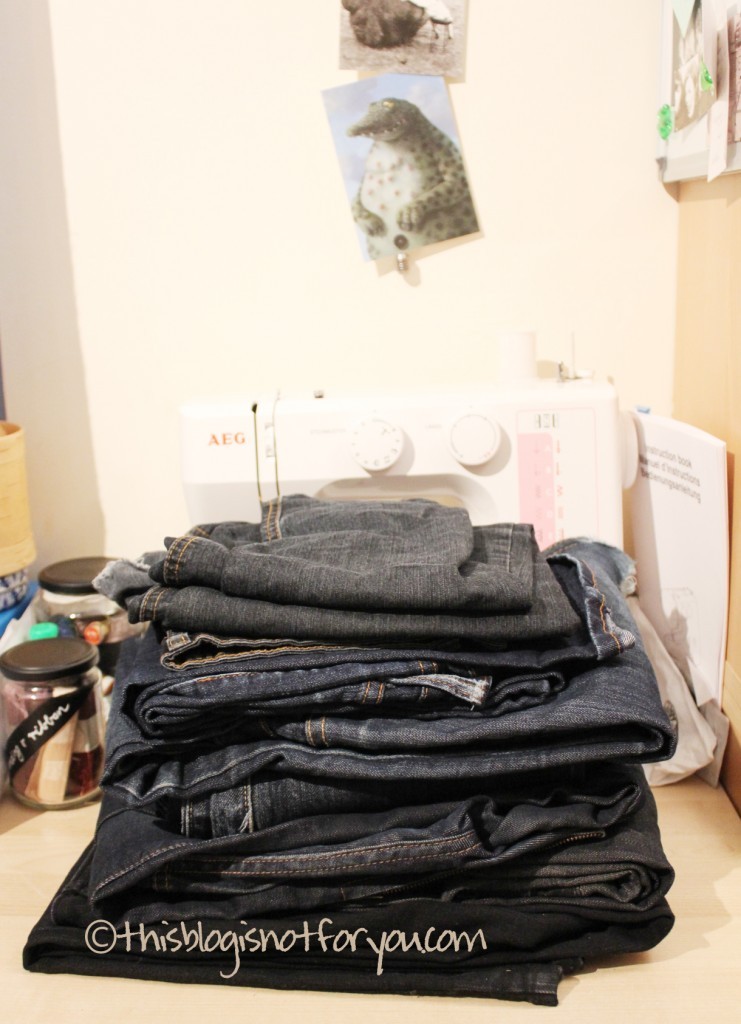 Jeans-mending day – not my favorite day!